


IFU-08, Rev D | Date: November 2019
Page 7 of 39
Chapter 3
Pairing VitalPatch to VistaPoint
Use the following procedure to pair the VitalPatch to the VistaPoint application.
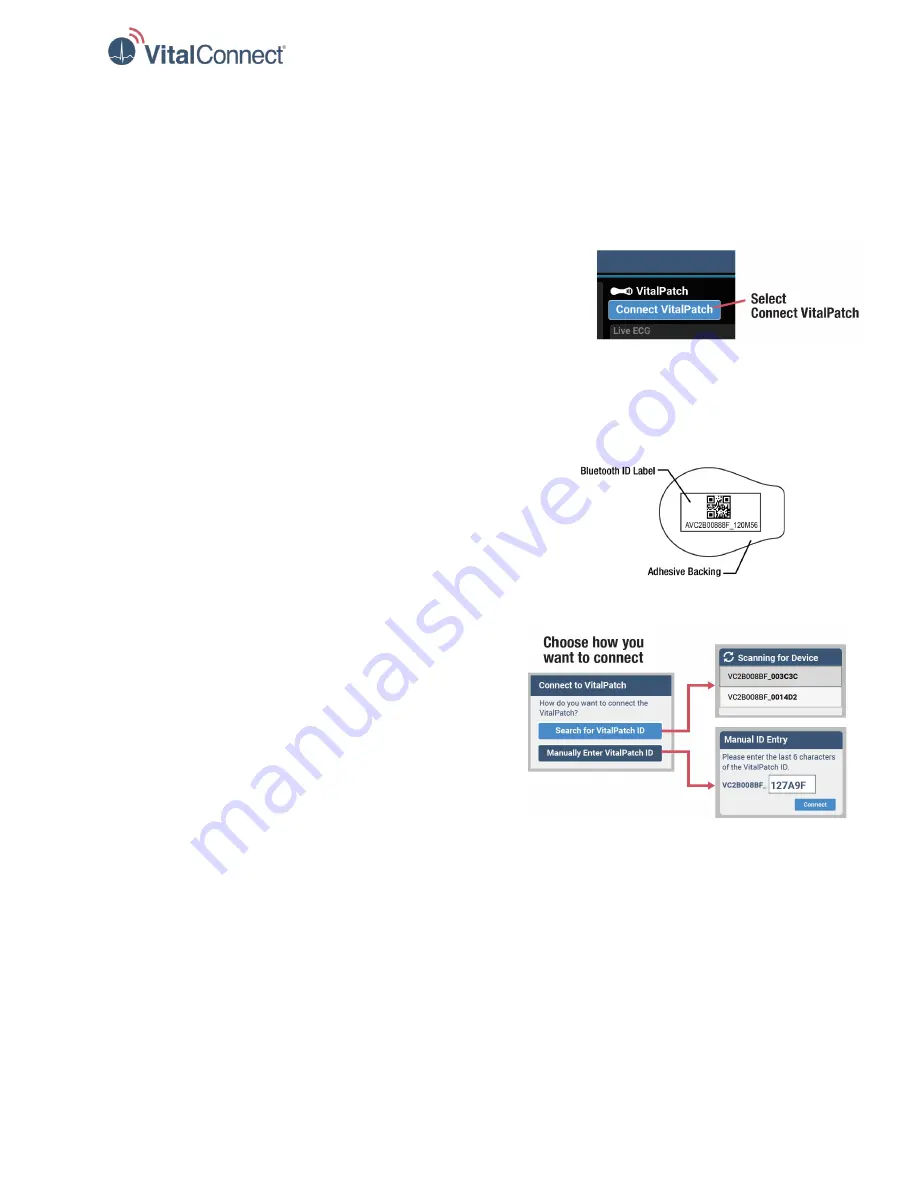
Step 1: Begin the Pairing Process
Select
Connect VitalPatch
from the VistaPoint dashboard.
See Figure 3. If a previous VitalPatch is still connected, disconnect it
before continuing (see “When Monitoring is Complete” on page 14).
Step 2: Connect and Select Biosensor
The Bluetooth ID is printed on the package and on the adhesive backing. You will need this ID to pair the
VitalPatch biosensor with VistaPoint. See Figure 4.
There are two ways to select the VitalPatch biosensor:
•
Select
Search for VitalPatch ID
to automatically search for
nearby VitalPatch biosensors by Bluetooth ID. See Figure 5.
The screen displays a list of VitalPatch Biosensors that are
within Bluetooth range of the relay. Find the Bluetooth ID of the
biosensor that you have powered on in the list and select it. If
the Bluetooth ID does not appear in the list, you may select
the
Rescan
button at the top to repeat the search. If the
biosensor is still not listed, press the biosensor power
button again and press the
Rescan
button again.
•
Alternatively, you may select the
Manually Enter
VitalPatch ID
option, and then enter the last six letters
and numbers of the biosensor’s Bluetooth ID. The
header beginning with “VC2” is pre-populated as shown
in Figure 5.
Select the
Connect
button when done selecting (or entering)
the Bluetooth ID. Wait several seconds for the application to
sync with the biosensor.
After the VitalPatch is paired you will be prompted to perform the posture calibration. Refer to the next
step.
Figure 3: Begin Pairing Process
Figure 4: Bluetooth ID on
Adhesive Backing
Figure 5: Scan for ID or Enter ID Manually