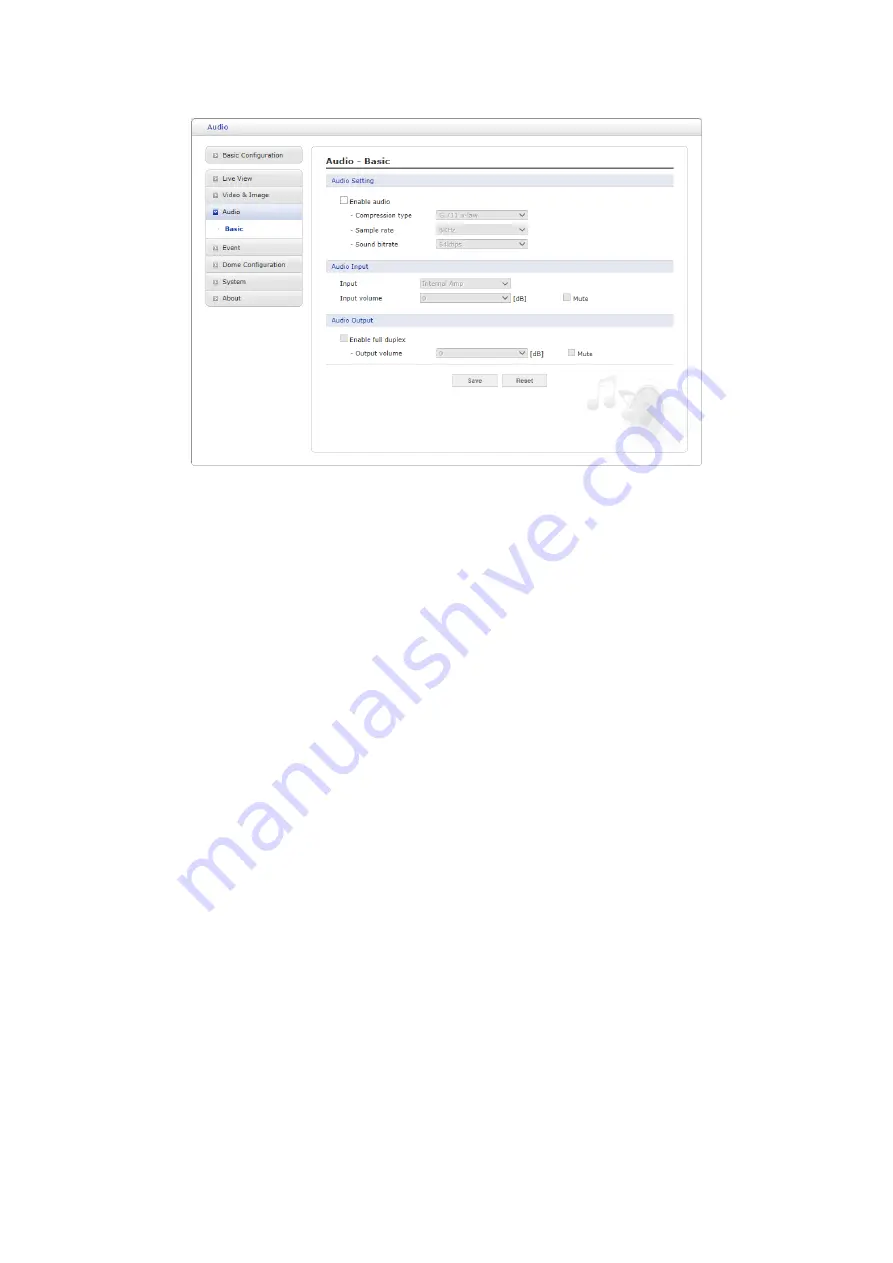
Vista ONVIF VK2-4KX30IR-PM Installation Manual Download Page 33

33 

3.6.4   Audio  


The network camera can transmit audio to other clients using an external microphone and can play 
audio received from other clients by attaching a speaker. The Setup page has an additional menu 
item called Audio, which allows different audio configurations, such as full duplex and simplex.  

• Audio Setting:  

– Enable audio:

 Check the box to enable audio in the video stream.  

–  Compression  type:

  Select  the  desired  audio  Compression  format  between  G.711  µ-law 

and G.711 A-law.  

–  Sample  rate:

  Select  the  required  Sample  rate  (number  of  times  per  second  the  sound  is 

sampled).  The  higher  the  sample  rate,  the  better  the  audio  quality  and  the  greater  the 
bandwidth required.  

– Sound bit rate:

 Depending on the selected encoding, set the desired audio quality (bit rate). 

The settings affect the available bandwidth and the required audio quality.  

• Audio Input:

 Audio from an external line source can be connected to the STEREO Jack I/O of 

the network camera.  

– Input:

 User can select amplifier between Internal Amp and External Amp.  

– Input volume:

 If there are problems with the sound input being too low or high, it is possible 

to adjust the input gain for the microphone attached to the network camera.  

• Audio Output:  

–  Enable  full  duplex:

 Check the box to enable Full Duplex mode. This means that you can 

transmit and receive audio (talk and listen) at the same time, without having to use any of 
the controls. This is just like having a telephone conversation. This mode requires that the 
client PC has a sound card with support for full-duplex audio.  

Uncheck  the  box  enable  Simplex  mode.  The  simplex  mode  only  transmits  audio  from  the 
network camera to any web client. It does not receive audio from other web clients.  

– Output volume:

 If the sound from the speaker is too low or high it is possible to adjust the 

output gain for the active speaker attached to the network camera.  

When  the  settings  are  complete,  click 

Save

  button  to  save  the  settings,  or  click 

Reset

  button  to 

clear all of the information you entered without saving it.  


Summary of Contents for ONVIF VK2-4KX30IR-PM

Page 1: ...Installation Manual VK2 4KX30IR PM Please read this manual thoroughly before use and keep it handy for future reference...

Page 2: ...ent is not handled properly WARNING Improper use of this equipment can cause severe bodily injury or equipment damage CAUTION Improper use of this equipment can cause equipment damage Note Notes conta...

Page 3: ...the point where they exit from the apparatus 10 Only use attachments accessories specified by the manufacturer 11 Unplug this apparatus during lightning storms or when unused for long periods of time...

Page 4: ...admin password over a secure connection 13 3 4 Live View Page 14 3 5 Playback 16 3 6 Network Camera Setup 18 3 6 1 Basic Configuration 18 3 6 2 Live View 22 3 6 3 Video Image 23 3 6 4 Audio 33 3 6 5 E...

Page 5: ...ing the VK2 4KX30IR PM includes integral IR illumination which tracks with the zoom function of the camera to provide optimum illumination over the zoom range for balanced images at distances of up to...

Page 6: ...to improve images before encoding takes place Intelligent video capabilities The network camera includes intelligent capabilities such as VCA Video Content Analysis The network camera s external input...

Page 7: ...pport the combined weight of the camera and bracketry The use of a solid backboard is recommended when attaching to gypsum walls The PM camera comes with a 1 5 NPT install adaptor which fits to the br...

Page 8: ...ible with 10 100Mbps 3 RCA jack BLACK Audio Input 4 RCA jack GRAY Audio Output 5 5 pin cable YELLOW Alarm Input 1 WHITE Alarm Input 2 VIOLET Alarm Input 3 BROWN Alarm Input 4 GRAY GND 6 2 pin cable RE...

Page 9: ...SD card cover 2 Install or change Micro SD card 3 Replace the Micro SD card cover plate taking care that it is seated and fitted correctly NOTE The Micro SD card cover is a primary seal so failure to...

Page 10: ...ND are common Connect the ground side of the alarm input and or alarm output to the G Ground connector AO Alarm Output The camera can activate external devices such as buzzers or lights Connect the de...

Page 11: ...vice to the network and power up 2 Start SmartManager utility Start All programs SmartManager SmartManager The main window will display and after a short while any network devices connected to the net...

Page 12: ...streaming video in Microsoft Internet Explorer set your browser to allow ActiveX controls 3 1 Access from a browser 1 Start a browser Internet Explorer 2 Enter the IP address or host name of the netw...

Page 13: ...ayed when the network camera is accessed for the setup at the first time Enter your admin name and password set by the administrator NOTE The default administrator user name and password is admin If t...

Page 14: ...eo stream on the Live View page Stream profiles are configured under Setup Basic Configuration Video Image For more information please see Basic Configuration Video Image of User s Manual The resoluti...

Page 15: ...a pop up window to manually start or stop the event The PTZ button activates a pop up window for Pan Tilt and Zoom control The VCA button shows hides VCA rule setting and detected objects The Face Det...

Page 16: ...n the SD local storage select it from the list and click the Playback buttons Go to the first go to the beginning of the video clip Fast backward play fast play backward of the video clip Backward pla...

Page 17: ...layed monthly If there is a recorded data for a particular date a blue square on the date will be displayed If you select a particular date in the calendar a yellow square on the date will be displaye...

Page 18: ...camera by clicking Setup either in the first connection page or the top second right button of the Live View page Accessing the network camera from a computer for the first time opens the Admin Passwo...

Page 19: ...ides the lowest level of access which only allows access to the Live View page Operator An operator can view the Live View page create and modify events and adjust certain other settings Operators hav...

Page 20: ...tatic known IP address for a particular MAC address Use the following IP address To use a static IP address for the network camera check the radio button and then make the following settings IP addres...

Page 21: ...asic for more details about Video Image setup 4 Audio The network camera can transmit audio to other clients using an external microphone and can play audio received from other clients by attaching a...

Page 22: ...l as determine Date Time format in this page Please refer to System Date Time for more details about Date Time setup 3 6 2 Live View Video Input Mode Video Mode Choose Video Mode you wish to use from...

Page 23: ...ervice H 264 MP Main Profile Primary profile for low cost applications that require additional error robustness this profile is used rarely in videoconferencing and mobile applications it does add add...

Page 24: ...of Picture size If users want to have a high quality of fast image one by one please decrease the value For the purpose of general monitoring please do not change a basic value Such act may cause a pr...

Page 25: ...nt stops and lasts for about 5 seconds Focus Limit Minimum distance for Auto Focus operation Object nearer than this limit may not be clearly focused Speed Focus speed can be adjusted in the range of...

Page 26: ...teen privacy masks The privacy masks are configured by mask windows Click and drag mouse to designate a mask window area When you click Go button go to the stored mask window area When the settings ar...

Page 27: ...can be streamed to a website User can copy and paste the HTML code generated on the screen to the website page code where user wants to display live video NOTE To use webcasting service the Enable An...

Page 28: ...28 5 Camera Setup In this page user can setup Exposure Control White Balance Control Image Appearance Inc DARKBUSTER Day Night Control and IR Control...

Page 29: ...utter Determines shutter mode between automatic and fixed 4 Shutter speed Select shutter speed if Shutter is in fixed mode 5 Iris Determines Iris mode between automatic and fixed 6 Iris F number Selec...

Page 30: ...pearance User can setup image related controls including DARKBUSTER function 1 User can either use slide bar or type in number for items in 1 2 User can select individual function and level NOTE Defog...

Page 31: ...level Specify the illumination level that deactivates the IR mode If the illumination is above the specified level the indicator will turn off 1 20 Fixed IR Bright Specify the brightness of the Fixed...

Page 32: ...etting User can determine show or hide OSD for each stream Also user can set the transparency level of OSD by slide bar or type in number OSD Color User can change OSD color by type in OSD Title User...

Page 33: ...e STEREO Jack I O of the network camera Input User can select amplifier between Internal Amp and External Amp Input volume If there are problems with the sound input being too low or high it is possib...

Page 34: ...is started Select Enable on boot to activate the On Boot event Enter the Dwell time the event lasts from the point of detection 1 180 seconds When the settings are complete click Save button to save...

Page 35: ...o use an alarm port check the desired Enable alarm port first Type Choose the type of alarm to use from the drop down list NO Normally Open or NC Normally Closed Dwell Time Set the dwell time an event...

Page 36: ...ely the event can be triggered via the product s API Application Programming Interface Select Enable manual trigger to activate the manual trigger for up to 4 manual triggers Set the dwell time the tr...

Page 37: ...sensitivity of this function where large value sets more sensitive detection Zone List ID Order of generation Include 1 8 Exclude 9 16 Name User definable zone name Type shows zone type and cannot be...

Page 38: ...lect Enable network loss to activate the Network Loss event Select a dwell time for how long the event will last from the point of detection When the settings are complete click Save button to save th...

Page 39: ...move camera direction using external force Select Enable tampering to activate the Tampering event Dwell time Determine how long the event will last from the point of detection When the settings are...

Page 40: ...sitivity Sensitivity As the value becomes bigger the detection sensitivity increases Min width size Minimum horizontal pixel size for detections in a 1920x1080 format Min height size Minimum vertical...

Page 41: ...ateral Rule Name User can type in the rule name Mode Currently Enter rule only Exclusive Area The area where the rules are not applied Once selected a purple box appears on the video preview window Dr...

Page 42: ...a bounding box for the detected face Select Enable face detector to activate the Face Detector Set threshold for detection sensitivity When the settings are complete click Save button to save the sett...

Page 43: ...record status check Trigger event if the record status is modified Enable format event Trigger event if the micro SD card is formatted AIHM Server Setting Select Enable AIHM server to send the AIHM ev...

Page 44: ...ction Enable specific time User can select type in date and time in the calendar for triggering the event Enable every day Trigger event every day at specified time Enable day of week Trigger event at...

Page 45: ...box is you are using a mail server to receive event notification and image email Mail Server Enter the host names or IP addresses for your mail server Port Enter the port number for your mail server...

Page 46: ...ter an email address and click the Test button to test that the mail servers are functioning and that the email address is valid When the settings are complete click Save button to save the settings o...

Page 47: ...f there is a firewall between the camera and the target FTP server Port Enter the port number used by the FTP server Remote directory Specify the path to the directory where the uploaded images will b...

Page 48: ...iles saved If suffixes are also used the file name will take the form prefix suffix extension Additional suffix Add either a date time suffix or a sequence number with or without a maximum value When...

Page 49: ...ut port Enable alarm out If selected the output becomes activated for as long as the event is active Type Select a type of NO Normally Open or NC Normally Closed When the settings are complete click S...

Page 50: ...e button to locate it Then click the Upload button Up to 3 audio files are available The total file size must be less than 512 KB Audio Alert Test When the setup is complete the audio output can be te...

Page 51: ...predefined preset position Check the box to enable the service and return to the Home position once the event has ended When the settings are complete click Save button to save the settings or click...

Page 52: ...ream1 H 264 or MPEG 4 data Stream2 MJPEG data Stream3 H 264 or MPEG 4 data Pre event Enter pre event time value for the storage device pre recording Post event Enter post event time value for the stor...

Page 53: ...ssed NFS like many other protocols builds on the Open Network Computing Remote Procedure Call ONC RPC system The CIFS screen displays as below Address Enter IP address for NAS device Remote Directory...

Page 54: ...enable the service XML Notification Setting Notification server URL The network address to the server and the script that will handle the request Notification server port The port number of the notifi...

Page 55: ...box to enable the service Boost Setting You can set the condition in Normal and Boost mode Boot Stream Select a video stream for each condition in the drop down list Frame rate Select a frame refresh...

Page 56: ...an select message transmission type among HTTP HTTPS TCP and UTP URL The network address to the server and the script that will handle the request For example http 192 168 12 244 cgi bin upload cgi Po...

Page 57: ...mera up to a max 15 events can be registered Click the Add button to make a new event map a popup window displays as below To change an existing event select that event and click the Modify button thi...

Page 58: ...st When an event has occurred the camera will boost the Frame rate and Bit rate from the normal condition to this boosted level for the duration of the event Check the box to enable the Function PTZ p...

Page 59: ...Auto Focus is always active Manual Auto Focus is inactive Preset Setup Activate the PTZ Control Panel Preset Delete Delete selected Preset number Follow steps below to store the Preset positions 1 Cli...

Page 60: ...itle Up to 12 characters Alphanumeric characters and space Repeat Select number of repetition from Continuous to 90 The default is Continuous Sequence Select either forward or backward sequence in the...

Page 61: ...on from Tour Position Setup list select the desired Tour Position and click the Delete Position button Set Position Click the Set Position button then show the stored Presets on drop down list Follow...

Page 62: ...an tilt and zoom using Control box The movement history is automatically recorded 2 Click Done button after you completed the camera movement program 3 Repeat step 1 through 2 for each desired Pattern...

Page 63: ...t Tour or Pattern for function Function None Preset Tour Pattern Function No Select Preset Tour or Pattern number for Home Function Waiting Time 10 600 Seconds Function Use Off On When the settings ar...

Page 64: ...es the pan and tilt speed of a camera Motor Setting Proportional P T Select On or Off When the settings are complete click Save button to save the settings or click Reset button to clear all of the in...

Page 65: ...me release instantly and pull it down again to run the auto flip function When you use the panning range it is recommended to use the flip mode to Auto Enable pan angle range setup When the dome camer...

Page 66: ...e camera will return to the right position after the origin check operation Enable schedule origin check If selected execute origin check function at scheduled time Enable monthly Set specific day and...

Page 67: ...ormation after installation Device Name Configuration Enter the device name Location Configuration Enter the location information You can enter up to four locations When the settings are complete clic...

Page 68: ...the box to enable anonymous viewer login to the network camera without a user account When using the user account users have to log in at every access User List Setting This section shows how to regi...

Page 69: ...HTTP by default HTTP HTTPS HTTP HTTPS Upload Certificate To use HTTPS for communication with the network camera an official certificate issued by a CA Certificate Authority must be uploaded from your...

Page 70: ...access accordingly that is if the addresses in the list are allowed then all others are denied access and vice versa Also see the online help for more information NOTE Users from IP addresses that wil...

Page 71: ...u can setup Protocol type Port number LZO compression usage and Renegotiation time as well as download Server certificate file Choose Protocol type between UDP and TCP UDP is preferred Type in Port nu...

Page 72: ...ver setting Default Renegotiation time is 3600 seconds and 0 means no verification Upload CA certificate issued by Server 3 Select authentication method between User authentication and Machine authent...

Page 73: ...computer Synchronize with NTP Server The network camera will obtain the time from an NTP server every 60 minutes Set manually Allows you to manually set the time and date Date Time Format Specify the...

Page 74: ...e a static IP address for the network camera check the radio button and then make the following settings IP address Specify a unique IP address for your network camera Subnet mask Specify the mask for...

Page 75: ...Enter the host name to be used as device information in the client software or SmartManager Services HTTP port Enter a port to receive a service through the HTTP Default port number is 80 HTTPS port E...

Page 76: ...er an address of the DDNS server Username Enter an ID to access to the DDNS server Password Enter a password to be used for accessing the DDNS server Confirm Enter the password again to confirm it Max...

Page 77: ...oup Multicast destination IP Enter an IP between 224 0 0 0 and 239 255 255 255 RTP port Enter a value between 1024 and 65530 RTP TTL Enter a value between 1 and 255 If a network status is smooth enter...

Page 78: ...P must be installed on your workstation if running Windows XP To do this open the Control Panel from the Start Menu and select Add Remove Programs Select Add Remove Windows Components and open the Net...

Page 79: ...router or switch which type of treatment to apply to this type of traffic for example how much bandwidth to reserve for it Note that DSCP values can be entered in decimal or hex form but saved values...

Page 80: ...e located on an intranet LAN and you wish to make it available from the other WAN side of a NAT router With NAT traversal properly configured all HTTP traffic to an external HTTP port in the NAT route...

Page 81: ...CP and Domain Name System DNS or configure each computer s network settings manually which may be difficult and time consuming Zeroconf is built on three core technologies Assignment of numeric networ...

Page 82: ...r a name in the Friendly name field NOTE Also known as zero configuration networking Bonjour enables devices to automatically discover each other on a network without having to enter IP addresses or c...

Page 83: ...anguage The language choices are English Korean French Russian and Chinese When the settings are complete click Save button to save the settings or click Reset button to clear all of the information y...

Page 84: ...is will return all of the network camera s settings to the factory default values including the IP address Upgrade Upgrade your camera by importing an upgrade file and pressing the Upgrade button Duri...

Page 85: ...k the Server Report button to get the important information about the server status this should always be included when requesting support Parameter List Click the Parameter List button to see the uni...

Page 86: ...86 Network Check Click the Network Check button to get the information about the cameras network setting and traffic You can see the pop up window below...

Page 87: ...ow will be provided as a popup window so that users can open and read it without needing to log in It will offer a description of the setting and Help page so that users can manipulate the network cam...

Page 88: ...ro SD card cover 3 Press and hold the Reset button SW1 on the board with your finger while reconnecting the power 4 Keep the Reset button SW1 pressed for about 2 seconds 5 Release the Reset button SW1...

Page 89: ...images If images are very complex try limiting the number of clients accessing the camera Images only shown in black white Check the Video Image setting Blurred images Refocus the camera Poor image qu...

Page 90: ...ventive maintenance allows detection and correction of minor that faults before they become serious and cause equipment failure Every three month perform the following maintenance 1 Inspect all connec...

Page 91: ...Dual Stream H 264 x 1 MJPEG x 1 25 30fps Triple Stream H 264 x 2 MJPEG x 1 Composite Out Audio Compression G 711 Audio Streaming 2 Way PTZ Function Pan Range 360 continuous Pan Speed Max 380 sec Prese...

Page 92: ...iOS External In Out Video Composite Out Audio 1 Input 1 Output RCA Mono Jack Alarm 4 Inputs 1 Output Ethernet RJ 45 10 100Base T SD Card SDHC Max 32GB RS485 ETC Operating Humidity 0 90 RH Non condens...

Page 93: ...e most important to consider High image resolutions and or lower compression levels or high bitrates result in larger images Frame rate and Bandwidth affected Accessing both Motion JPEG and H 264 vide...

Page 94: ...Vista 210 Wharfedale Road Winnersh Triangle Wokingham Berkshire RG41 5TP Subject to change without notice Version 1 1...

Reviews: