background image

S

CANNING


FROM


THE

 P

APER

P

ORT

 S

OFTWARE

37

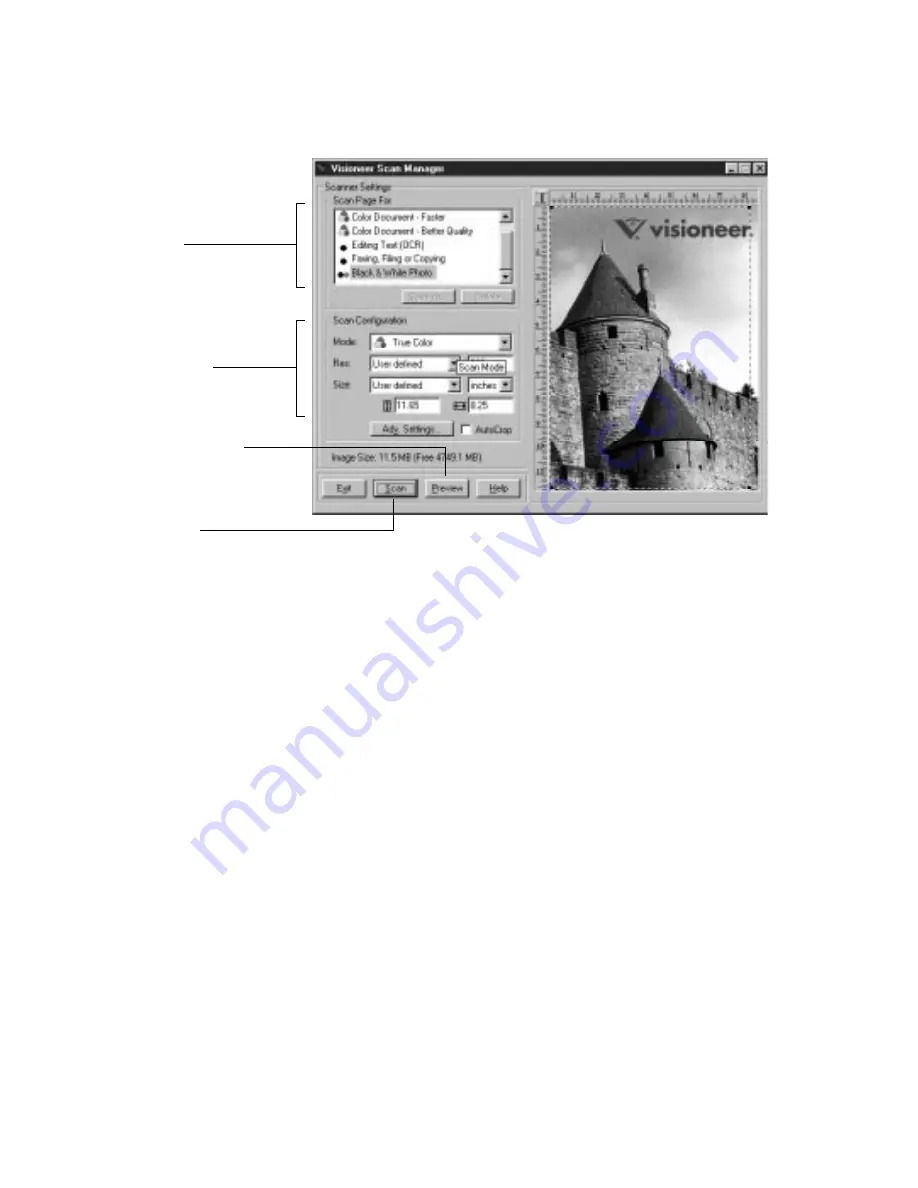
4. Select the options that you want for the scan.

Scan Page For

—Select one of these preset options if you want to 

use it for scanning. These options are optimized for the various uses 
of scanned images, such as scanning for editing text or scanning in 
color. The symbols next to the options indicate black and white, 
grayscale, or color. For more information about these settings, 
see “About the Predefined Scan Settings in PaperPort” on page 41. 
If you don’t want to use one of these preset options, you can 
manually select the scan configuration options. Note that when you 
select a preset option scan configuration settings are for that preset 
option. You can also create your own custom configurations. 
See the Help for details.

Scan Configuration

—Use this section of the dialog box to 

manually select scan options for the image.

Select one of these preset 
options if it’s appropriate for 
how you want to use the 
scanned item.

If you don’t want to use a 
preset option, select new 
settings here to manually 
configure the scan.

Click Preview to see what 
the image will look like.
The Preview image appears in 
the window.

If the image is what you 
want, click Scan. 
If not, adjust the settings or 
select a new preset option 
and click Preview again.

Summary of Contents for OneTouch 8100

Page 1: ...Visioneer OneTouch 8100 Scanner FOR USB OR PARALLEL PORT CONNECTION Installation Guide...

Page 2: ...YOUR EXCLUSIVE REMEDY CONCERNING THE PRODUCT ALL OTHER REPRESENTATIONS WARRANTIES OR CONDITIONS EXPRESS OR IMPLIED WRITTEN OR ORAL INCLUDING ANY WARRANTY OF MERCHANTABILITY FITNESS FOR A PARTICULAR P...

Page 3: ...6 Installing to a Parallel Port 10 STEP 1 Connecting to a Parallel Port 10 STEP 2 Installing the PaperPort Software 13 Checking Out Your Scanner 14 If the Scanner Is Not Properly Connected 16 Part 2 S...

Page 4: ...35 Scanning an Item with the Twain Button 36 Adjusting the Brightness and Contrast 39 Getting Help with the PaperPort Software 40 About the Predefined Scan Settings in PaperPort 41 Cleaning the Scann...

Page 5: ...nect the scanner to either your computer s USB port or to the parallel port This guide contains instructions for both ports For USB port instructions see page 5 For Parallel port instructions see page...

Page 6: ...ATION GUIDE THE VISIONEER ONETOUCH 8100 SCANNER Glass Document pad Reference frame Document cover On Off switch Power jack OneTouch button panel ADF TPA port Host Parallel port USB port behind sliding...

Page 7: ...ument Feeder ADF and a Transparency Adapter TPA for scanning transparencies Please visit our web site at www visioneer com for more information about acquiring these optional devices Host Parallel por...

Page 8: ...available internal memory RAM 70 MB of free hard disk space A VGA or SVGA monitor Recommended settings for your monitor are as many colors as possible High Color 16 bit True Color 24 bit or 32 bit Se...

Page 9: ...d make sure that no other applications are running Microsoft Windows 98 is required to connect the scanner to a USB port 2 Insert the PaperPort CD into your computer s CD ROM drive The CD automaticall...

Page 10: ...e scanner to the computer 4 Follow the steps in the next section to connect the scanner When you re finished click Finish in the dialog box above STEP 2 CONNECTING TO A USB PORT The OneTouch scanner c...

Page 11: ...ner into the keyboard instead of the USB port on the computer 2 Slide the latch on the back of the scanner to uncover its USB port 3 Plug the other end of the USB cable into the scanner s USB port If...

Page 12: ...urn the scanner over to see the locking tab on the bottom Slide the locking tab to the unlocked position 6 Plug the power adapter into an AC wall outlet The following diagram shows the scanner connect...

Page 13: ...Finish button The scanner s on off light turns from amber to green when the scanner and computer are communicating properly That completes the steps to connect your scanner to the computer 9 Remove th...

Page 14: ...parallel LPT port on the back of your computer To connect the scanner to a parallel port 1 Save any open files and then shut down Windows 2 Turn off the power to your computer 3 If a printer is alread...

Page 15: ...older computers the serial port and parallel port both have 25 pin connectors that fit the scanner cable Please make sure you plug the scanner cable into a parallel port 6 If you unplugged a printer f...

Page 16: ...ee the locking tab on the bottom Slide the locking tab to the unlocked position 9 Plug the power adapter into an AC wall outlet The following diagram shows the scanner connected to a computer Unlocked...

Page 17: ...The CD also includes the PaperPort User s Guide You can read the guide from the CD or print a copy from the CD To install the PaperPort software 1 Start Microsoft Windows and make sure that no other...

Page 18: ...p your OneTouch scanner CHECKING OUT YOUR SCANNER The OneTouch scanner software adds the scanner icon to the Windows taskbar at the bottom right corner of the computer screen If the scanner is properl...

Page 19: ...ox That s it Your scanner is ready to scan See Scanning by Pressing the OneTouch Buttons on page 19 Note The scanning lamp under the scanner s glass needs to warm up before you can scan A status messa...

Page 20: ...the scanner to a parallel port are you using an older computer that has 25 pin connectors for both serial and parallel ports You may have plugged the scanner cable into a serial port instead of the p...

Page 21: ...ion The scanner icon will no longer have a red X through it and you re ready to begin scanning If you try all the troubleshooting procedures described above and in the Readme file and the scanner icon...

Page 22: ...on on the scanner s front panel Scan from the Screen Click the scanner icon on the Windows taskbar A panel representing the scanner buttons appears Click a button on the panel on the screen Scan from...

Page 23: ...s face down and press one of the scanner buttons The scanner starts scanning the item A message just above the Windows taskbar shows the status of the scanning When scanning is complete the status mes...

Page 24: ...an The scanner starts scanning the item the messages about the scanning appear above the Windows taskbar the progress window shows the image as it is scanned When the scan is complete the scanned imag...

Page 25: ...ured settings Button Preconfigured Settings Scan Scans the item as an 8 5 x 11 color page and displays it in PaperPort Copy Print Prints the scanned item in black and white on your printer copier at t...

Page 26: ...ings for the Custom button because the Custom tab is selected The Custom button is set up to scan the item with the configuration named Photograph for Editing and then after the scanning is finished t...

Page 27: ...the scanned image Select the application that you want to automatically open to display or process the scanned image Select Configuration the list of the button s scan configurations The configuratio...

Page 28: ...tination application for the scanned image Each destination application has its own properties dialog box Folder Copy displays a dialog box for selecting the folder to use for storing a copies of the...

Page 29: ...eady selected If the tab is not selected click it You can also right click the scanner icon in the Windows taskbar to see the shortcut menu and then choose Configure to display the Configuration dialo...

Page 30: ...ys the scanned image in the new destination application CREATING NEW CONFIGURATIONS You cannot change settings such as brightness or contrast of the preset configurations To scan with settings other t...

Page 31: ...tting To adjust the scan settings and page settings 1 Press and hold down a button on the scanner The Configuration dialog box appears The selected tab on the dialog box corresponds to the button you...

Page 32: ...ist click the configuration that you want to adjust For example the following figure shows a configuration named Photograph for Editing which you would have created earlier 3 Click the Edit button The...

Page 33: ...Color to scan color photographs and other color items Resolution Drag the slider to the right or left to adjust the dots per inch dpi of the resolution The maximum resolution is 600 dpi the minimum i...

Page 34: ...to let the scanner automatically determine the size of the item being scanned For example if you put a photo in the middle of the glass the scanner will automatically determine the size of the photo W...

Page 35: ...are you may have to make some color adjustments using the Gamma feature The default Gamma setting works fine in most cases and normally does not need to be adjusted 6 Click OK The Configuration dialog...

Page 36: ...Preferences dialog box appears The dialog box shows which button you selected for new preferences If the Button tab on the Preferences dialog box is not selected click it Show All Destinations Clicki...

Page 37: ...ividually choose the types of applications to include in the button s list of destination applications Click in the boxes for the types of applications to include in the button s list Show Scan Progre...

Page 38: ...lick in the box and enter the number of minutes for the lamp to remain idle before turning off If you scan when the lamp is off it warms up before scanning resumes On System Standby Shutdown Select th...

Page 39: ...op appears 2 From the PaperPort File menu choose Select Source The Select Source dialog box appears and shows your Visioneer OneTouch scanner as well as all other Twain devices installed on your compu...

Page 40: ...ar or choose Acquire from the File menu The Visioneer Scan Manager dialog box appears Note Your Visioneer OneTouch scanner is initially set to scan from the PaperPort software with the setting Color D...

Page 41: ...can manually select the scan configuration options Note that when you select a preset option scan configuration settings are for that preset option You can also create your own custom configurations...

Page 42: ...the page size and the two number boxes with the vertical and horizontal symbols next to them show the actual page size in inches You can also enter the vertical and horizontal sizes in those two numb...

Page 43: ...mbnail indicates the sample photo was scanned as a bitmap image Please see the PaperPort Getting Started Guide and PaperPort User s Guide on the CD for more information about using the PaperPort softw...

Page 44: ...ose Acquire from the File menu The Visioneer Scan Manager appears 2 Click the Adv Settings button The Advanced Settings dialog box appears 3 Drag the Brightness slider to the left to make the item dar...

Page 45: ...t OCR Black and white 300 dpi Business letters contracts memos and other documents that you want to edit Enhances the use of OCR software for converting scanned text to editable text Provides higher q...

Page 46: ...increase the contrast See the Help for more details about the Advanced Settings dialog box CLEANING THE SCANNER GLASS Scanning items that have excessive amounts of dirt or dust may dirty the scanner...

Page 47: ...29 7 cm Scanner dimensions Height 3 4 inches 8 5 cm Width 11 4 inches 29 0 cm Length 17 3 inches 44 0 cm Weight 5 7 pounds 2 6 kg Operating temperature 50 104 F 5 35 C without condensation Relative hu...

Page 48: ...44 VISIONEER ONETOUCH 8100 SCANNER INSTALLATION GUIDE...

Reviews: