Introduction
Thank you for choosing Visionary International as your light-
ing provider. This operating manual provides information on
how the product functions and how to safely operate and
install the product.
Installing the product (Existing installation)
Any electrical work must conform with the Electricity Act
1992 including section 79, NZECP 50: 2004, Electricity
Act 1992 Section 80 and NZECP 51: 2004.
1) Disable power to the circuit that you are working on.
We highly recommend switching electricity off at the main
switchboard of the premises for added safety.
2) Remove the previous fitting from the ceiling cavity being
careful not to damage the ceiling material. Ensure that there
is no remaining driver/transformer connected to the specific
lighting mains cable.
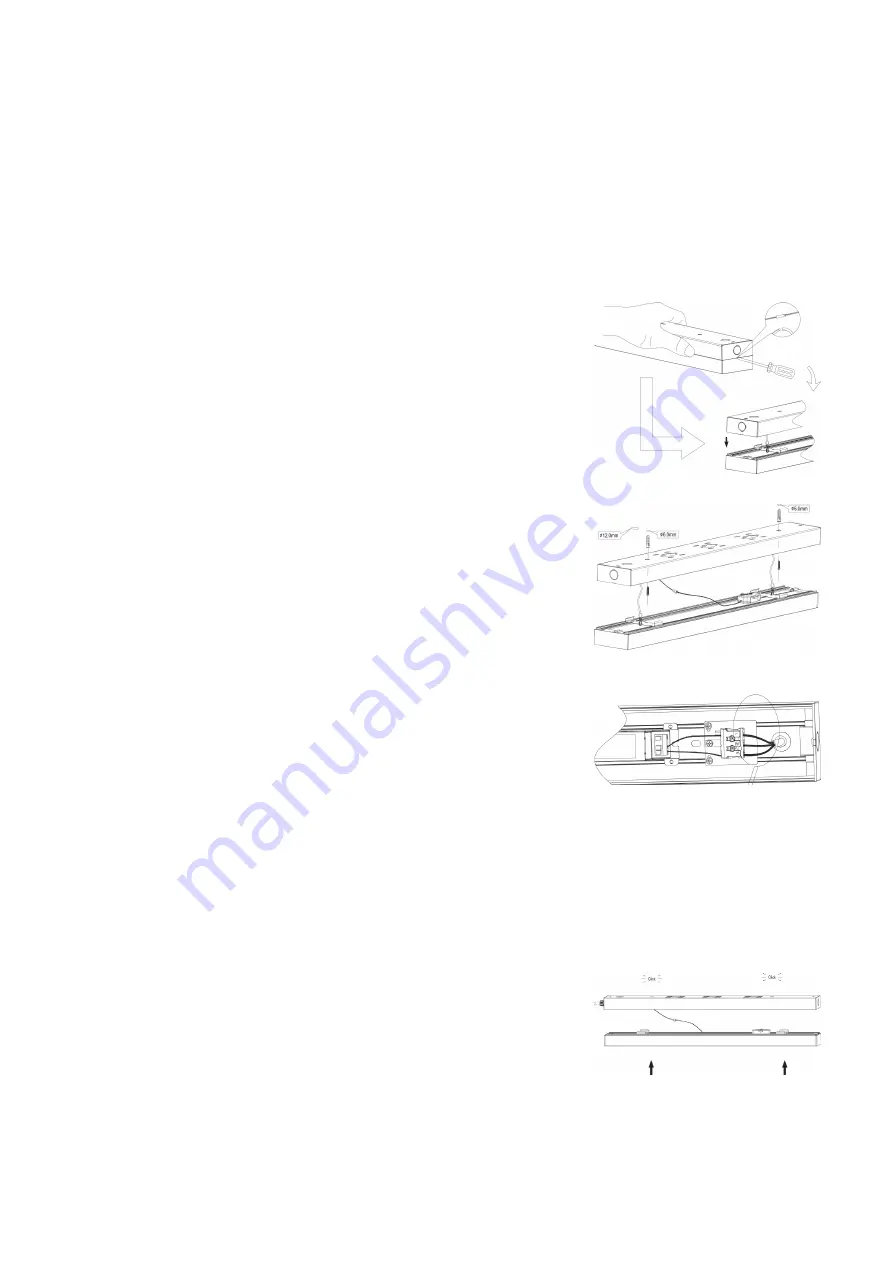
3) Gain access to the batten power supply and terminals by
using a medium sized flat-head screwdriver and inserting it
into the marked divot at one end of the batten between the
upper and lower batten segments. (Illustration on right)
4) Feed the TPS cable through the center of the fitting.
5) Use the supplied screws to fasten the batten to the ceiling
until sturdily in place.
4) Fully unscrew the three input terminals until the screws are
flush with the plastic holder above to prepare cable insertion.
5) Install the three cable colours into the appropriate slot in
the terminal block. Screw down each terminal screw firmly.
Live (Driver input) = Brown or red sheath colour (cable side)
Ground (Driver input) = Yellow sheath colour (cable side)
Neutral (Driver input) = Blue or black sheath colour (cable
side)
NOTE: Some previous installations have had the ground
cable cut off so the cable is not exposed. The NZECP
requires you ensure proper grounding as this is a Class
1 light fitting.
6) Once all cables are installed, tighten the terminal screws
until the cables are fully fastened in the terminal block. Check
all cable cores are locked in place applying a light force on
the TPS cable. Please check to ensure there is no exposed
or unsheathed cable to ensure there is no undue electrical
risk.
7) Connect the upper side of the batten fixture by pressing it
into the lower part of the fixture that is already in place. You
should hear a click as it locks into place. Check around the
entire fitting to ensure all sides are fully fixed and the upper
and lower segments of the batten are flush.


