background image


Page 10 

Plugging In 

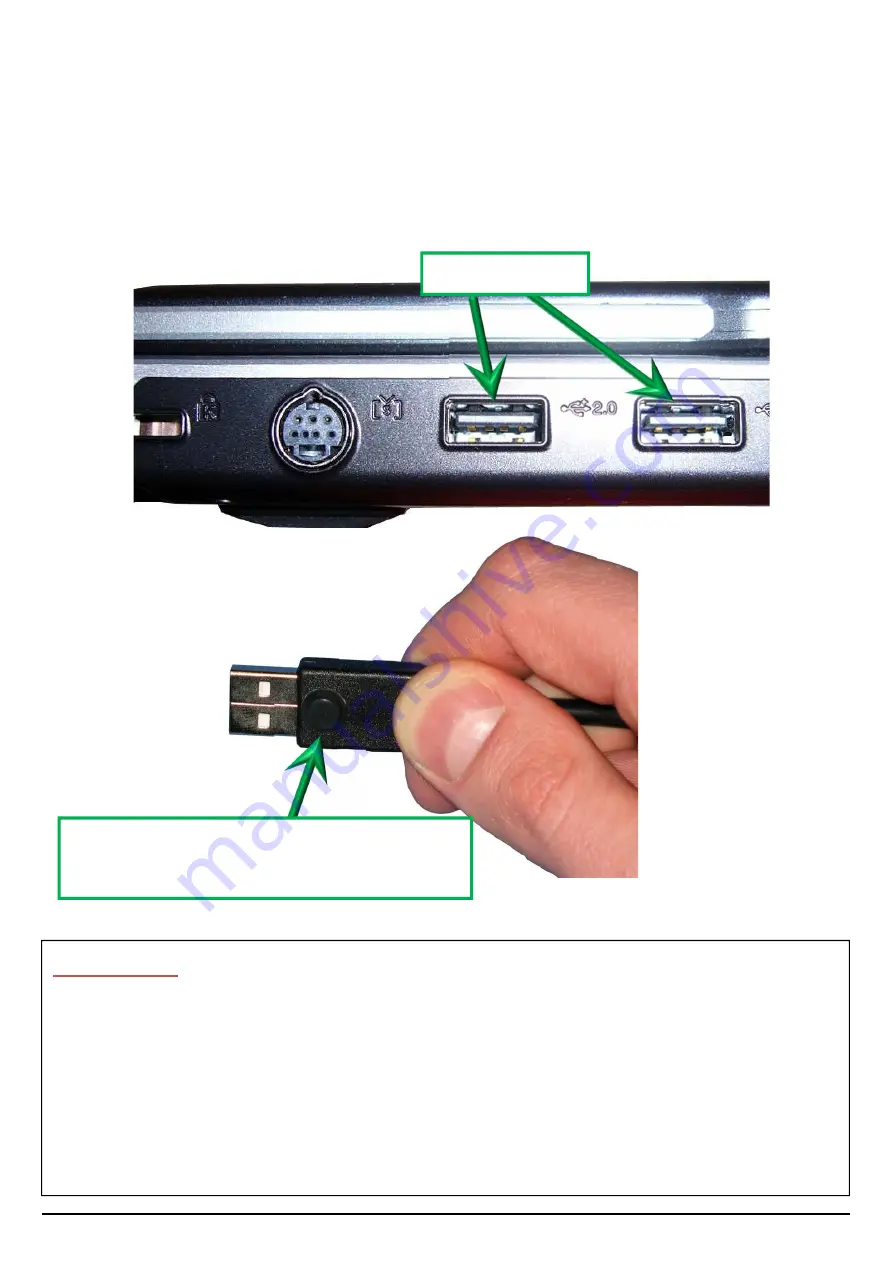
With Scholar HD unfolded, you can plug Scholar HD in to your PC or laptop. One 
USB 2.0 port is required. Below is a picture of typical USB ports found on a laptop 
computer:


Bump-on attached to bottom side of 
USB connector (for most computers) 

USB Ports 

I

MPORTANT

Some computers have their USB ports fitted the other way up! 

USB connectors  will only plug into USB sockets one way round.  They do  not 
require  much  force,  so  take  great  care  when  inserting  them  into  a  socket. 
Forcing a  USB  connector  into  its  socket  the wrong  way  round  will  break the 
socket and or the connector. This is not covered by warranty. 

Summary of Contents for Readit Scholar HD

Page 1: ...Hardware Guide Rev B English Copyright C 2008 2017 VisionAid International Ltd all rights reserved ...

Page 2: ...Plugging In 10 Turning Scholar HD s camera on and off 11 Disabling Camera connected notification 11 Windows XP 12 Windows Vista 7 8 12 Positioning documents for capture 13 1 Tactile Alignment Magnetic Guide 13 2 Tactile Alignment Grooves 15 3 Visual Alignment 15 Close up lens attachment 16 Viewing the bottom of an A4 Letter Page in camera mode 17 Self Viewing 17 Distance Viewing 17 Scholar HD flas...

Page 3: ...s It is also the only machine to feature A3 double letter capture size and full OCR at distance Readit Improvement program Users are the best people to help us improve and develop our products so if you have any ideas or suggestions no matter how small please do contact us Suggestions contact information Please use the following methods to contact us regarding your suggestions Email suggestions vi...

Page 4: ... s program directory Copyright C 2000 2008 Intel Corporation all rights reserved Copyright C 2009 Willow Garage Inc all rights reserved Third party copyrights are property of their respective owners Box contents Your Readit Scholar HD box should contain the following items 1 16 megapixel Scholar HD portable digital capture reading system with integrated USB cable 2 Magnetic positioning guide for A...

Page 5: ...upwards 3 At the rear of the base the USB cable exists out of a small hole in the middle Feed approximately 4 cm of the cable inwards through the exit hole to help loosen the cable 4 Trace the cable around the two cable grippers and carefully unwind the additional length of cable that is required 5 Finally carefully pull the unwound cable through the exit hole and ensure the cable has been pulled ...

Page 6: ...ew easy steps 1 Firstly place the fingertips of one hand under the crossbar on the base and with your other hand grasp the centre of the cross bar and lift it upwards A locking pin will click into position to hold the arms upright once you have moved it far enough around 65 degrees 2 With one hand on the base using your other hand grasp one of the two bars between the camera head and the crossbar ...

Page 7: ... lowers down it should locate itself automatically so that it is square This will ensure it is in exactly the right position for photographing your documents 4 Pictured is the wedge shaped guide in the camera head that locates onto the wedge shaped guide on the camera stand as the Scholar HD camera head is titled downwards into the capturing position ...

Page 8: ...Page 8 5 The whole unfolding process should only take 10 seconds Once unfolded your Readit Scholar HD will look like this ...

Page 9: ...sure the camera is facing downwards in the standard picture taking position and with your left hand push and hold the top release button inwards It s on the left hand side of the crossbar facing away from you With the release button fully depressed gently lower the top part of the stand downwards 180 degrees with your other hand until it stops 2 Next grasp the crossbar with your right hand and the...

Page 10: ...o bottom side of USB connector for most computers USB Ports IMPORTANT Some computers have their USB ports fitted the other way up USB connectors will only plug into USB sockets one way round They do not require much force so take great care when inserting them into a socket Forcing a USB connector into its socket the wrong way round will break the socket and or the connector This is not covered by...

Page 11: ...ad and is slightly raised From off rather than standby Scholar HD will take approximately 25 seconds to start up Scholar HD s camera lens will briefly extend and then retract once it has completed starting up Turning off There is no need to turn off the Scholar HD camera after use if it is going to be used within the next few days The lens will automatically retract and it will go into a power sav...

Page 12: ... several USB ports that Scholar HD s camera might be plugged in to you may have to follow this procedure each time you plug Scholar HD s camera into a different USB port Windows Vista 7 8 When the camera is turned on the AutoPlay window will popup To disable the AutoPlay window from popping up do the following 1 Click Cancel on the window that has appeared 2 Left click Start 3 Left click Control P...

Page 13: ...are on to you as shown in the following picture 1 Tactile Alignment Magnetic Guide The Scholar HD includes a guide that magnetises into either the A4 Letter or A3 11 x 17 positions depending on its orientation It slots over two grooves in the base and provides a top left corner position for you to slide your documents into before photographing The default location of the guide is in the transport ...

Page 14: ... front of the base bar and simply slide it over to the left until it magnetises into position Positioning Magnetic guide for A4 Letter sized documents To locate the guide into the A4 position lift the guide up slightly and slide it towards you so that it s in line with the front A4 groove Then slide it to the left slightly until it magnetises into position ...

Page 15: ...d is visible on screen Depending on the aspect ratio of your screen black bars may appear on the left and right sides As long as your document is completely in view on screen it will be properly captured Visual alignment is the only way that distance capture can be achieved POSITIONING TIP Readit Scholar HD has powerful document straightening and rotation abilities but for the highest accuracy and...

Page 16: ...riting and capturing with optical zoom levels higher than 4x 2 Self viewing Failure to do so will mean Scholar HD will not focus 1 Grasp the edges of the close up lens located at the left side of the camera head and gently remove it from its magnetised holding 2 Position the lens on to the magnetised camera lens barrel IMPORTANT Always ensure the lens is returned to the left side of the camera bef...

Page 17: ...rder for the camera to focus correctly Most users will also wish to change the Readit software to mirror mode Please refer to the user manual or quick reference guide for how to achieve this Distance Viewing To view objects or text in the distance from the document capturing position simply lift the camera up towards you the same step as in Self Viewing and then rotate the camera around to face th...

Page 18: ...bled in future upgrades To retract the flash simply push it back in towards the camera head and it will click into place The flash is located on the right hand side of the front edge of the camera facing towards you when the camera is in the document capturing position WARNING Always ensure the pop up flash is in its closed position before transporting Failure to do so may lead to camera damage an...

Page 19: ... use the headphones or any other that you may already own simply plug them into the headphone socket on your PC or laptop To alter the headphone volume we recommend using the in line volume wheel located on the headphone wire It is also possible to adjust the volume of the headphones using the volume control on your computer In line volume control ...

Page 20: ...d medical devices To avoid risk of electrical damage keep your Scholar HD away from fluids and chemicals Use of the Scholar HD other than described in this manual will exclude it from warranty Appendix B Technical Information General information Dimensions folded LxWxH 27 x 8 x 5 5 cm 10 6 x 3 1 x 2 2 inches Dimensions unfolded LxWxH 27 x 8 x 40 2 cm 10 6 x 3 1 x 15 8 inches Weight 1 2 kg 3 3 lbs ...

Reviews: