background image


Version 1.0.0 
Release Date: July. 04.2013


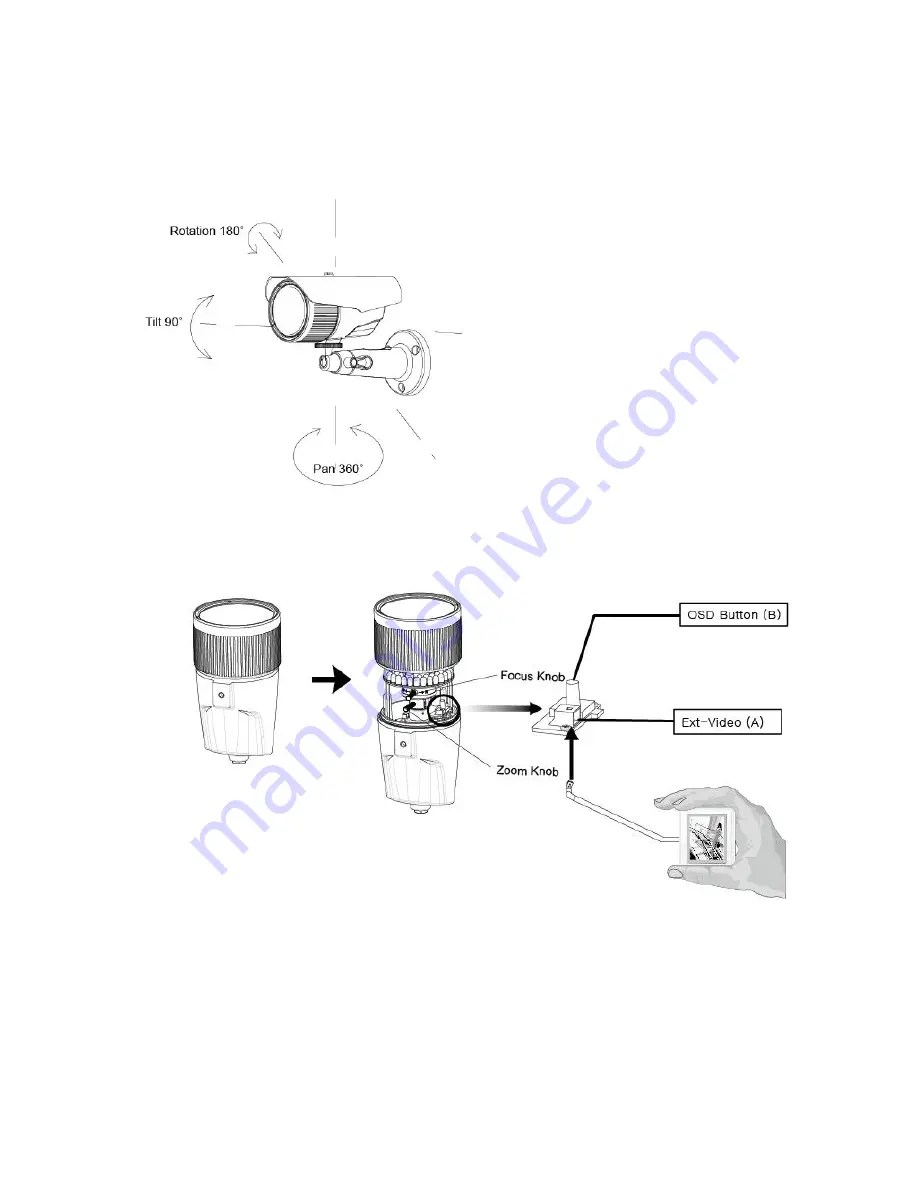
5-2. 3-Axis Adjustment 


Panning 360 degree 

          Turn the pan base right or left to   

        adjust the pan angle. 


Tilting 90 degree 

      Loosen the tilt lever on the right   

or left side of camera board. 

      Control the camera tilt angle and 

  fasten the tilt lever again. 


Rotation 180 degree 

      Grasp the front side of camera 

  board and turn it right or left to   

set the exact angle of image.


5-3. Lens external adjustment, Ext-Video 


- Focus (Near-Far) 

Unlock the focus lever by turning counterclockwise. 

Move the lever to adjust the focus. 

Lock the lever by turning clockwise. 


Summary of Contents for VN310SFHD

Page 1: ...1 Version 1 0 0 Release Date July 04 2013 VN310SFHD Full HD IR Outdoor Camera I IN NS ST TR RU UC CT TI IO ON N M MA AN NU UA AL L ...

Page 2: ... a Class A digital device pursuant to part 15 of the FCC Rules These limits are designed to provide reasonable protection against harmful interference when the equipment is operated in a commercial environment This equipment generates uses and can radiate radio frequency energy and if not installed and used in accordance with the instruction manual may cause harmful interference to radio communica...

Page 3: ...ount to ceiling wall 5 2 3 Axis Adjustment 5 3 Lens external adjustment Ext Video 5 4 Application of HD SDI output 6 Function and operation 9 18 6 1 On Screen Display OSD 6 2 Setting up the menu 6 3 LENS 6 4 EXPOSURE 6 5 WHITE BAL 6 6 DAY NIGHT 6 7 NR Noise Reduction 6 8 SPECIAL 6 9 ADJUST 6 10 RESET 6 11 EXIT 7 Trouble shooting guide 19 8 Dimension 20 9 Specification 20 21 ...

Page 4: ...ry to dismantle the camera To avoid electric shock never remove the screws or covers There are no parts inside that need maintenance by the user All maintenance should be carried out by qualified personnel Avoid installing the camera at a place of high humidity Avoid installing the camera at the place exposed to gas or oil Keep the top glass of the lens always clean in order to obtain the best pic...

Page 5: ...tation direct or indirect special consequential or exemplary arising out of or relating to the product 2 Personal injury or any damage caused by inappropriate use or negligent operation of the user 3 Unauthorized disassemble repair or modification of the product by the user 4 Inconvenience or any loss arising when images are not displayed due to any reason or cause including any failure or problem...

Page 6: ...pplied in the holes Fix the plastic anchors in the holes Position the mounting bracket on the screw points Fix the mounting bracket by tightening the screws Slightly loosen bolt A then adjust tilt 180 and rotation 360 of the camera using a serration on the bracket and tighten the bolt firmly Slightly loosen bolt B then adjust pan 360 of the camera and tighten the bolt firmly ...

Page 7: ...right or left side of camera board Control the camera tilt angle and fasten the tilt lever again Rotation 180 degree Grasp the front side of camera board and turn it right or left to set the exact angle of image 5 3 Lens external adjustment Ext Video Focus Near Far Unlock the focus lever by turning counterclockwise Move the lever to adjust the focus Lock the lever by turning clockwise ...

Page 8: ...Connect Extra video output connector A to camera tester or local monitor as shown in the above 5 4 Application of HD SDI output Impedance alliance in the system connection Make sure to connect the cable with the power off Please locate the impedance switches of each equipment as instructed Locate the switch to Hi z position for the interim equipments Locate the switch to 75Ω for the last equipment...

Page 9: ... SHUTTER ACCE AGC DEFOG SENS UP BACKLIGHT BRIGHTNESS RETURN WHITE BAL ATW AWC SET INDOOR OUTDOOR MANUAL DAY NIGHT AUTO COLOR B W EXT NR 2DNR 3DNR LEVEL SMART NR RETURN SPECIAL CAM TITLE LANGUAGE D EFFECT DEFECT MOTION RS485 PRIVACY VERSION RETURN ADJUST SHARPNESS NTSC PAL MOTION OSD LSC RETURN RESET FACTORY RETURN EXIT ...

Page 10: ...ion the cursor to point to the function you wish to operate MAIN menu Use UP DOWN selections SUB menu Use LEFT RIGHT selection 3 Change the status of the selected feature using the LEFT RIGHT selections When the LEFT or RIGHT selection is done available values and modes are displayed in order Please keep the selection until you get to the mode you wish to operate 4 When completed move the cursor i...

Page 11: ...1 50 000 sec NTSC 1 25 to 1 50 000 sec PAL You can select Digital Slow Shutter between x2 x30 DSS 2 AGC LOW Allows automatic gain control from 0 to 20dB MIDDLE Allows automatic gain control from 0 to 30dB HIGH Allows automatic gain control from 0 to 42dB Default 3 SENS UP Low light sensitivity is greatly improved with the use of this function Low light sensitivity level is adjustable from 2 to 30 ...

Page 12: ...th dark and bright clearly and this model realized its best set up for the most of different levels of backlit or contrast lighting situations 6 DEFOG Images in extraordinary environment such as fog or rain or in a very strong luminous intensity have DR dynamic range lower than ordinary images Contrast based defog function which is used to overcome such shortcoming ...

Page 13: ...e can be used within the color temperature range 2 000 20 000 K AWC SET Please press the Tact SW while the camera is directed at a piece of white paper to obtain the optimum state under current illumination If the environment including the light source is changed you have to adjust the white balance again INDOOR This is mode can be used within the color temperature range of 2 500 7 000 K OUTDOOR T...

Page 14: ...e turned on off IR SMART Intelligent IR response against IR saturation IR LED IR PWM Control the PWM duty RETURN Returns to the SETUP MENU 6 7 NR Noise Reduction Noise Reduction NR is used in order to obtain a high quality output image and enhance compression efficiency Offers Edge Preserving 2D NR and Motion Adaptive 3D NR 1 2DNR Cuts off the noise in low light condition 2 3DNR Cuts off the noise...

Page 15: ...ck in the letters by using the button When the letter is locked in the cursor moves to the next space Please repeat the above to input CAM TITLE 4 When a name has been chosen please select a position for the name to display Please move the cursor onto POS and then press the button The name will appear at the top right corner Please find the position you wish to display the name by using the 4 dire...

Page 16: ...ON RETURN Returns to the SPECIAL MENU 4 PRIVACY SELECT You can select up to 8 PRIVACY areas DISPLAY Determines whether to use the MD area selected in AREA SELECT COLOR Black Gray1 Gray2 White Orange Yellow Cyan1 Cyan2 Green1 Green2 Green3 Magenta1 Magenta2 Red Blue1 Blue2 DEFAULT Initialize all setting of the PRIVACY RETURN Returns to the SPECIAL MENU 5 LANGUAGE ENGLISH JAPANESE CHINESE 6 DEFECT L...

Page 17: ...T 1 SHARPNESS SHARPNESS ON OFF LEVEL Adjust the LEVEL 0 100 RESOLUTION ON OFF RETURN Returns to the ADJUST MENU 2 MONITOR A LCD GAMMA Adjust the LEVEL USER 1 00 BLUE GAIN Adjust the LEVEL 0 100 RED GAIN Adjust the LEVEL 0 100 RETURN Returns to the ADJUST MENU B CRT BLACK LEVEL Adjust the LEVEL 30 30 BLUE GAIN Adjust the LEVEL 0 100 RED GAIN Adjust the LEVEL 0 100 RETURN Returns to the ADJUST MENU ...

Page 18: ...SC or PAL according to local TV standard 6 RETURN Returns to the SETUP MENU 6 10 RESET 1 RETURN Resets the camera setting to the factory defaults CAMERA ID 485 TERM settings are not initialized 2 RETURN Returns to the SETUP MENU 6 11 EXIT Saves the current settings and exits the menu ...

Page 19: ...ntrast feature of the monitor If you have an interim device set the 75Ω Hi z properly The camera is not working properly and the surface of the camera is hot Please check that you have properly connected the camera to an appropriate power source Color is not correct Please check the setting of AWB menu The screen flickers continually Please check that direction of camera turns toward the Sun RS 48...

Page 20: ...ressive scan CMOS 2MegaPixel Total Pixels 2010 H X 1241 V 2 48 Mega pixel Effective Pixels 1984 H x 1105 V 2 19 Mega pixel Scanning System Progressive Scan Horizontal More than 1000 TVL S N Ratio More than 52dB Min Illumination 0 Lux Shutter Speed 1 30s Default Long Exposure Mode 1Sec Video Output 1920 x 1080 30P 1280 x 720 60P Mode Select ...

Page 21: ...e Distance 20M MTBF of IR 20 000 hours Power Source DC 12V DC12V AC24V Optional Power Consumption IR OFF 220mA DC12V 2 7W 280mA DC12V 3 5W 140mA AC24V 3 5W IR ON 460mA DC12V 5 6W 650mA DC12V 8 0W 290mA AC24V 7 0W Operating Temperature 10 C 50 C Storage Temperature 20 C 70 C Operating Humidity Under 90 Non condensing Measurement mm 80 5 W x 148 4 H x 206 D Weight Approx 800 g OSD LENS EXPOSURE WHIT...

Reviews: