background image

23

Vision-64 User Guide

Issue 1.03

Copyright 

©

 2002-2005 Digflex Pty Ltd
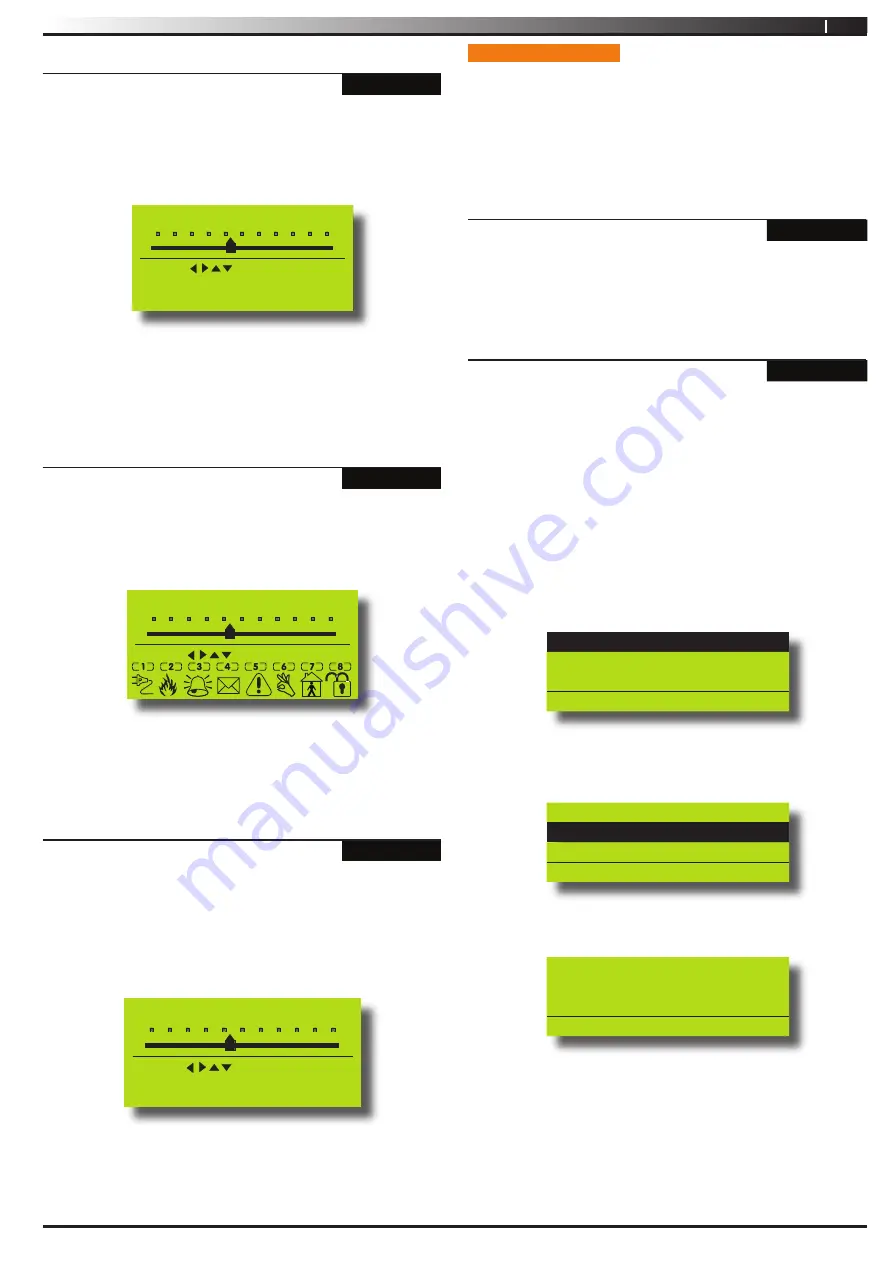
Devices > Keypads >

Volume

MENU  6-1-0

This menu allows you to adjust the volume of the keypad’s buzzer.  
Each keypad will need to have their volume adjusted separately.

1.  Press [MENU] + [6] + [1] + [0]. 

The keypad will display:

L

Keypad 001 Volume

Press

SAVE

OK to

H

2.  Use the [

] and [

] keys or use the [

] and [

] keys to 

increase or decrease the volume of the keypad buzzer until 

the desired volume has been reached.

3.  Press [OK] to save and exit, or press [MENU] to exit without 

saving.

Devices > Keypads >

Contrast

MENU  6-1-1

This menu allows you to adjust the contrast of the keypad’s LCD 
display.  Each keypad can have their display adjusted separately.

1.  Press [MENU] + [6] + [1] + [1].
 

The keypad will display the contrast screen.

L

Keypad 001 Contrast

Press

SAVE

OK to

H

2.  Use the [

] and [

] keys to adjust the bar until the desired 

contrast is reached.
Press [OK] to save and exit, or press [MENU] to exit without 

saving.

Devices > Keypads >

Backlight

MENU  6-1-2

This  menu  allows  you  to  adjust  the  brightness    of  the  keypad’s 
LCD display backlight.  Each keypad can have their display adjusted 
separately.

1.  Press [MENU] + [6] + [1] + [2].
 

The keypad will display the backlight screen.

L

Keypad 001 Backlight

Press

SAVE

OK to

H

Use the [

] and [

] keys to adjust the bar until the desired 

backlight is reached.
Press [OK] to save and exit, or press [MENU] to exit without 

saving.

3.

2.

3.

SYSTEM EVENTS

Options  in  this  section  relate  to  programming  of  system  wide 
options and interpretation of system trouble events when and if 
they occur. Some events such as open zones will appear and single 
events while other may be grouped together. In this case you need 
to drill down to see the specific detail for each event. Your installer 
will advise you how to interrogate system trouble events.

System > Commands >

Panel Status

MENU  7-0-0

The panel staus menu displays the panel software version 

information as well as highlighting any system troubles that 

are currently in effect. This is a view only location.

System > Commands >

System Trouble

MENU  7-0-1

The System Trouble Menu displays all current system troubles in a 
list format. Some trouble events require you to drill down and non-
system trouble that are curent within the Vision control panel.

1.  Press [MENU] + [7] + [0] + [1].
 

The keypad will display a list of all current system and non 

system trouble conditions.


To determine the system trouble condition, highlight the 

panel number (P001 to P002) that you want to view using 

the [

] and [

] keys, then press [OK] to select.

P001 System Trouble

Z001 Zone 1 Name
Z002 Zone 2 Name
Press 



 OK or MENU


To determine the non system (zone) trouble condition, 

highlight the zone number Z001 to Z064) that you want to 

view using the [

] and [

] keys, then press [OK] to select.

P001 System Trouble

Z001 Zone 1 Name

Z002 Zone 2 Name
Press 



 OK or MENU

2.  If viewing system trouble conditions, the keypad will display 

similar to the following:

Panel 001 P001
Voltage= 13.9V Temp=36
Date And Time
Press OK or MENU


The third line of the keypad display scrolls between all 

current system trouble events.


If viewing non-system trouble conditions, the keypad will 

display similar to the following:

Summary of Contents for VISION-64

Page 1: ...User Guide VISION 64 Security Controller Issue 1 03...

Page 2: ...it level from this device is set as a fixed level and because of this there may be circumstances where the performance is less than optimal Before reporting such occurrences as faults please check the...

Page 3: ...n 14 Turn All Areas Off 14 Move To Area 14 Chime On Off 14 Area Name 15 Inputs 15 Zone Status 15 Bypass Zones 15 Set Chime Zones 16 Set Part 2 Zones 16 Smoke Sensor Reset 17 Zone Name 17 Walk Test All...

Page 4: ...1 Area Properties 3 1 0 Zone Name 4 9 0 External Siren Test 1 2 Token 2 1 0 Area Name 4 9 1 Internal Siren Test 1 2 0 Add Token 3 9 Input Testing 4 9 2 Strobe Test 1 2 1 Delete Token 3 9 0 Walk Test...

Page 5: ...before reading the rest of this guide Zones A Zone is a detection device or group of devices connected to your security system Zones are identified by the area they monitor such as a front door bedro...

Page 6: ...cursor left when programming text or telephone numbers The key allows you to move the cursor right when programming text or telephone numbers The key allows you to navigate through menus or to toggle...

Page 7: ...a continuous siren tone It sounds for the time set by your security company Trouble Tone When a system component is not functioning properly your keypad sounds 4 fast short beeps followed by a 5 secon...

Page 8: ...ed the keypad will display the Part On icon 5 To turn the system off enter your PIN then press OFF TURNING THE SYSTEM OFF When the system is on you must enter through a designated entry door to preven...

Page 9: ...o exit without saving Your PIN has now been changed PROGRAMMING TEXT USING THE KEYPAD When programming text via the keypad various keys on the keypad operate differently A group of characters is assig...

Page 10: ...d to the same area s as the Master user At factory default each PIN is fixed to 4 digits in length The default PIN for User 1 Master user is 2580 Enter MENU 1 1 2 A list of users will display on the k...

Page 11: ...ned to the same area s as the Master user A Master user cannot delete their own PIN Access Token Delete Token MENU 1 2 1 This menu allows a Master user the ability to delete a token for those users th...

Page 12: ...the master user has been assigned to At factory default each user is assigned to operate Area 1 1 Enter MENU 1 4 1 A list of users will display on the keypad 2 To assign areas to a user use the and k...

Page 13: ...3 Name Press OK or MENU Use the up and down arrow keys to highlight the Access Group then press the ON key to select or the OFF key to deselect Access Group 1 Access Group 2 Access Group 3 Press OK ON...

Page 14: ...least one area that has a keypad assigned to it to be disarmed before you can access this command 1 Enter MENU 2 0 3 Areas Commands Move To Area MENU 2 0 4 This menu allows you to operate multiple ar...

Page 15: ...le as standard with an additional 48 wireless zones available when the optional radio received is fitted Your installer will advise you on the exact makeup and configuration of your system Inputs Comm...

Page 16: ...me is OFF To turn ON Press ON To Go Back Press OK If the zone is programmed for chime the keypad will prompt Zone 1 Name Z001 Zone Chime is ON To turn OFF Press OFF To Go Back Press OK 4 Press ON or O...

Page 17: ...allows you to test all zones within an area at the same time To successfully walk test each zone you must open and close each zone 1 Press MENU 3 9 0 The keypad will display a list of areas that are a...

Page 18: ...U to exit without saving Outputs Commands Turn Output On Off MENU 4 0 1 This menu allows you to turn outputs that have been programmed by your security company on or off These outputs can be programme...

Page 19: ...nu allows you to test any internal sirens which have been connected by your installer The test will last for 5 seconds 1 Enter MENU 4 9 1 If the system has been partitioned the keypad will display a l...

Page 20: ...t Domestic Phone Number MENU 5 1 5 Domestic reporting allows the Vision control panel to send reports to personal telephone numbers eg mobile telephone numbers Up to three different telephone numbers...

Page 21: ...and right For special characters eg pause or etc use the and keys 3 Press OK to save and exit or press MENU to exit without saving Comms Commands Call Forward Off Number MENU 5 1 7 When you enter your...

Page 22: ...le Voltage Temperature and Area Assignment information 1 Press MENU 6 0 0 Kp001 Keypad 001 Kp002 Keypad 002 Exit Press OK or MENU 2 Use the and keys to select the keypad that you want to view then pre...

Page 23: ...rpretation of system trouble events when and if they occur Some events such as open zones will appear and single events while other may be grouped together In this case you need to drill down to see t...

Page 24: ...Only Line 2 Displays the source of the event eg zone name and zone number or user name and user number Line 3 Displays the event description 1 Press MENU 7 0 2 The keypad will display the most recent...

Page 25: ...our security company Comms Test Fail The system has failed to send its periodic report to the monitoring station You should contact your security company Buss Trouble The system has failed to communic...

Page 26: ...op times in 24 hour format 00 00 to 23 59 hours 4 Press OK to save and exit or press MENU to exit without saving System Schedules Day MENU 7 5 2 This menu programs which days of the week the timer exe...

Page 27: ...eases above the maximum temperature the keypad will display High temp xx xx programmed temperature to be monitored 1 Press MENU 7 7 3 The keypad will display the current temperature settings Keypad Hi...

Page 28: ...take up to two minutes to complete and the keypad will display the voltage of the battery during the test 1 Press MENU 7 9 2 The keypad will display the battery voltage whilst under test Battery test...

Page 29: ...29 Vision 64 User Guide Issue 1 03 Copyright 2002 2005 Dig ex Pty Ltd Installation Details INSTALLED BY DATE PHONE FAX EMAIL SERVICE PHONE FAX EMAIL MONITORED BY PHONE FAX EMAIL WARRANTY EXPIRES NOTES...

Page 30: ...rt Send 21 D Date Time 24 F Features 5 H Holidays Name 26 Start Stop Days 27 I Inputs Chime Zones 16 Part 2 Zones 16 Zone Bypass 15 Zone Status 15 K Keypad Display 23 Hi Lo Temperature 27 Icon Descrip...

Page 31: ...Forward Off 21 Call Forward On 21 Domestic 20 Testing Battery Test 28 Walk Test All Zones 27 Test Report Send 21 Timer Groups 12 Trouble 23 Turn Off 8 U User Area Assignment 12 W Walk Test All Zones 1...

Page 32: ...Digiflex Pty Ltd P N MACC110 U DIGIFLEX PTY LTD Unit 5 8 Millennium Court Silverwater NSW 2128 AUSTRALIA Phone 612 97417000 Facsimile 612 97417042 www digiflex com au Our Vision Is Your Peace Of Mind...

Reviews: