background image

Basic


Operation

1. Turning the Unit On / Off

Press  any  button  to  turn  the  unit  on, 
WELCOME will be displayed on the LCD to 
indicate it is ready for use. Press and hold 
the POWER button to turn the unit off. 

2. Mode Selection

Press the MODE Button to cycle between 
AUX, RADIO and CD modes.

3. Volume

Use the VOL +/- Buttons to adjust the vol-
ume level. The higher the VOL number, the 
higher the volume level.

4. Bass

Press  the  “SEL”  Button  until  the  display 
shows “BAS”. Use the VOL +/- Buttons to 
adjust. When DSP is ON, the Bass control 
is not available.

5. Treble

Press “SEL” Button until the display shows 
“TRE”. Use the VOL +/- Buttons to adjust. 
When DSP is ON, the treble control is not 
available.

6. Balance

Press “SEL” Button until the display shows 
“BAL”,  then  use  the  VOL  +/-  Button  to 
adjust the balance between the left & right 
speakers.

7. Fader

Press  “SEL”  Button  five  times  and  the 
display shows “FAD”, then use the VOL +/- 
Button to adjust the balance between the 
front & rear speakers.

8. Clock

1.  While  listening  to  the  radio,  press  the 

“CLK”  button  until  the  cock  is  dis-
played

2.  Press  and  hold  the  “CLK”  button  until 

the time starts to flash

3.  Press  the  VOL  +  Button  to  adjust  the 

hour

4.  Press  the  VOL  –  button  to  adjust  the 

minutes

5.  Press  the    “CLK”  button  again  or  just 

leave the the unit idle for a few new set-
tings to take effect.

9

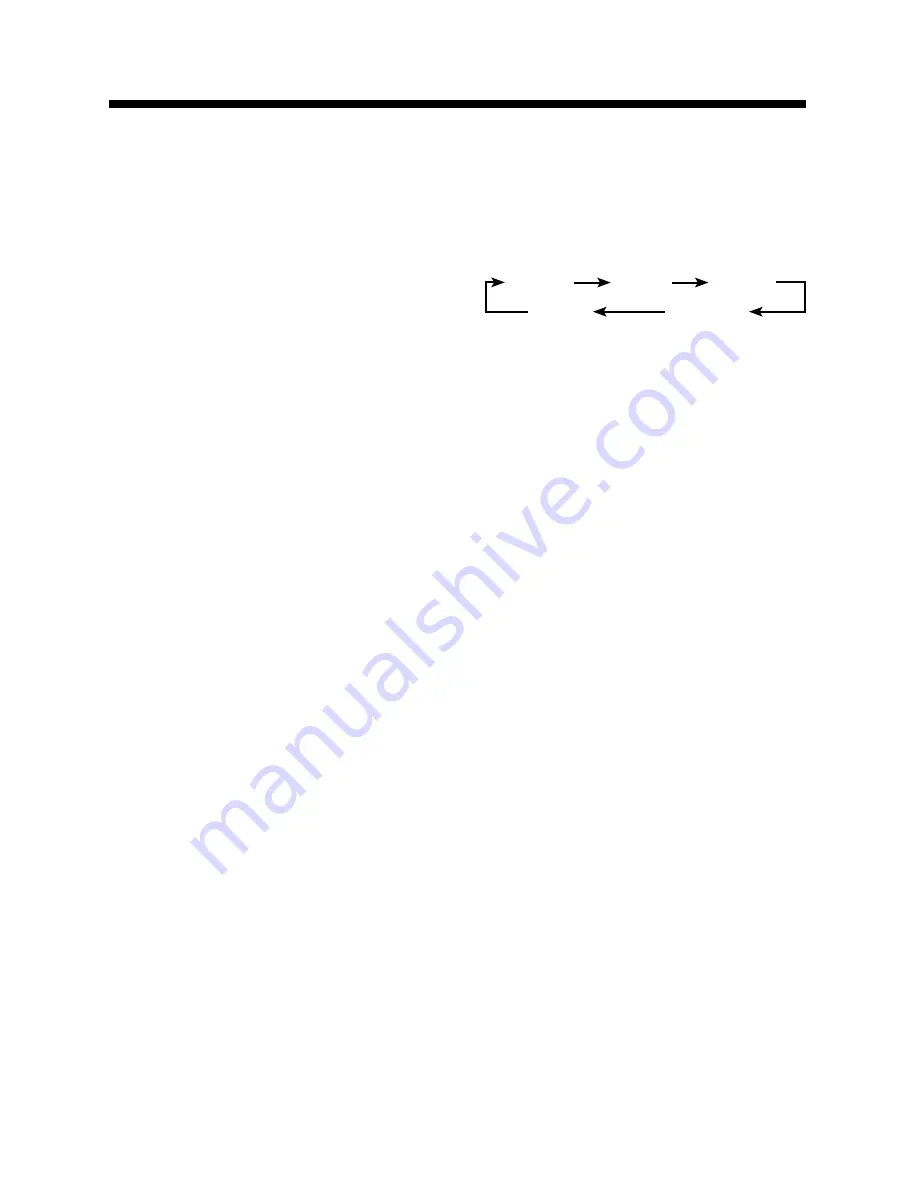
. DSP-Preset Equalizer Function

1.  Press  and  hold  the  “SEL”  button  until 

you hear a beep.

2. Press the “SEL” button to cycle through 

the  menu  choices  until  you  see  DSP 
OFF.  3.  Press  the  +/-  buttons  to  cycle 
through the pre-set EQ settings.

4. Leave the unit idle for the new setting to 
take effect.

10. Loudness

1.  Press  and  hold  the  “SEL”  Button  until 

you hear a beep.

2. Press the “SEL” Button until the display 

shows “LOUD OFF”. 

3.  Use  the  +/-  Buttons  to  select  “LOUD 

ON”  (Loudness  effect  ON)  or  “LOUD 
OFF” (Loudness effect OFF). 

4. Leave the unit idle for the new setting to 

take effect

11. Preset Beep Sound Off

1.  Press  and  hold  the  “SEL”  Button  until 

you hear a beep.

2. Press the “SEL” Button until the display 

shows “BEEP ON”. 

3.  Use  the  +/-  Buttons  to  select  “BEEP 

ON”  (beep  sound  on)  or  “BEEP  OFF” 
(beep sound off). 

4. Leave the unit idle for the new setting to 

take effect.

12. Preset Volume Level

You can set the default volume level for the 
unit when it is turned ON. 
1.  Press  and  hold  the  “SEL”  Button  until 

you hear a beep.

2. Press the “SEL” Button until the display 

shows “VOL LAST”. 

3. Press the +/- Buttons to enter “VOL ADJ “ 

will be displayed. 

4. Press the “SEL” Button and “A- VOL 15” 

will  be  displayed.  The  number  after  A-
VOL indicates the volume level the unit 
will default to the next time you turn the 
unit ON.

9

DSP OFF            POP M            ROCK M   

     FLAT M                       CLASS M

Summary of Contents for VRCD220FD

Page 1: ...VRCD220FD CD MP3 WMA Player AM FM Stereo Receiver with RDS Auxiliary Input and Detachable Face ...

Page 2: ... NUMBER FROM THE U S A AND CANADA 1 800 445 1797 and ask to speak with a member of our technical service team or submit your questions by e mail to customerservice vr 3 com and a member of our technical service team will respond by e mail to your questions Our in house technical service team will expedite delivery of your part advise you on installation or help troubleshoot a problem with you If y...

Page 3: ...ore turning on your unit This unit will only play the following discs 2 Type of disc Label on the Disc Recorded Material Size of Disc CD Audio only 12 cm MP3 WMA N A Audio only 12 cm Care of Discs Handle the disc by its edge to keep the disc clean Do not touch the disc s surface Do not use a CD with paste or ink residue on it Do not use CDs with labels or stickers attached The label may leave a st...

Page 4: ... into mounting sleeve otherwise it may fall out Be careful not to drop or shock the unit it may break or crack because it contains glass parts The unit is only designed for use with 4 speakers Do not combine output for use with 2 speakers Do not ground negative speaker leads to the chassis ground Do not open the top or bottom cover and do not install the unit in a place where it is exposed to dire...

Page 5: ...l they click Pull to re move the old unit from the dashboard 1 Remove the Old Unit from the Dashboard DIN Front Mount DO NOT DISCONNECT WIRES AT THIS TIME A Remove the outer trim frame Marking the polarity of the speaker wires will make it easier to connect the existing speakers to the VRCD220FD Consult wiring diagram of existing head unit before disconnecting any wires If a wiring diagram is not ...

Page 6: ...ides then bend them to secure the mounting sleeve in the dash board Fig 1 Fig 1 Fig 2 Follow the diagram in Fig 2 for in stalling the rear mounting strap to the head unit The rear mounting strap will help keep the head unit from moving around inside the dash board Lever Frame Fig 3 Insert fingers into the groove in the front of frame to remove it Insert the keys supplied with the unit in the groov...

Page 7: ...g on the shape of the screw holes in the bracket 3 Vehicle s Factory Mounting Bracket 4 Dashboard or Console 5 Hook Remove this part Note The mounting sleeve outer trim ring and the mounting strap are not used for this method of installation Installation 6 PARTS 2 Keys 1 Hex Nut 2 Lock Washers 1 Sheet Metal Screw 1 Metal Support Strap 2 Flat Washers 1 Mounting Bolt 1 Faceplate Case 1 Faceplate not...

Page 8: ...ING CONNECTIONS 7 GIVE US A CALL WE LL HELP YOU INSTALL 1 800 445 1797 PLEASE DO NOT RETURN PRODUCT TO STORE Visit us on the WEB www vr 3 com For Information and Technical Assistance Call Toll Free in U S A and Canada ...

Page 9: ...utton 11 F PS Button 12 Power Button 13 Pre set 6 Up 10 14 Pre set 5 Down 10 15 Pre set 4 Random 16 Pre set 3 Repeat 17 Pre set 2 Intro 18 Pre set 1 Pause Play 19 TA Button 20 Volume Down Button 21 AF Button 22 Eject button 23 Reset button 24 Americas Europe Switch 25 Disc Slot 26 Red LED 8 10 11 12 13 14 15 16 19 20 23 24 25 26 To Remove the Faceplate 1 Press the Open Button to open the faceplate...

Page 10: ... Press the CLK button again or just leave the the unit idle for a few new set tings to take effect 9 DSP Preset Equalizer Function 1 Press and hold the SEL button until you hear a beep 2 Press the SEL button to cycle through the menu choices until you see DSP OFF 3 Press the buttons to cycle through the pre set EQ settings 4 Leave the unit idle for the new setting to take effect 10 Loudness 1 Pres...

Page 11: ...strongest frequency then stop 3 Save Your Preset Stations There are six numbered preset buttons which can store and recall stations for each band While listening to a radio station you would like to save as a pre set press and hold one of the buttons numbered 1 6 until you hear a beep The button you pressed is now the pre set button for that station 4 Automatic Store Preset Scan A Automatic Scan S...

Page 12: ... the PTY button once to show the music type Then press the 1 6 buttons to choose the different music types available Press the PTY button twice to show Talk Show programing you can search for then press a number button 1 6 to choose a different Talk Show type program Each number button can display 3 Talk Show programs for you to choose There are up to 31 pre defined program types that allows users...

Page 13: ...ect the disc from the slot If the disc is not removed from the slot within 5 seconds it will automatically be loaded into the slot again When the disc is ejected and removed the unit will automatically switch to radio mode 2 Selecting Tracks On the Head Unit press the SEEK Button to advance CD to the next track Track numbers will be shown on the dis play Press and hold SEEK to fast forward Press t...

Page 14: ...en the Button is released Press the Button to go to a previous track The track num bers will be shown on the display Press and hold the Button to fast reverse Disc will play normally when the Button is released On the Remote Control the or Buttons operate the same as on the Head Unit 4 Play Pause CD On the Head Unit press the No 1 Button to pause the CD Press this button again to resume playback 5...

Page 15: ...m cable Insert the cable s RCA plugs into the Red White AUX IN jacks on the rear of the unit Route the end of the cable with the 3 5mm jack to an area that is safe and convenient to the headphone jack of any external audio device such as walkman and disc man Press the Mode button to choose AUX Connect any portable audio device such as a DVD player or VCD player to the AUX IN cable Use the volume c...

Page 16: ...CD is already loaded in the player Eject CD Songs keep skipping The CD is dirty or damaged File information shows in LCD but will not play Your file may be corrupt Specifications GENERAL Operating Power 11 to 16 Volts DC Negative Ground Total Maximum Power 140 Watts RMS Power 4x7 Watts at 4 Ohms 1 THD N Output Wiring Designed for using four speakers only RCA line out low level outputs 1000MV Outpu...

Page 17: ...uct damage to tapes speakers accessories or car electrical systems 7 VIRTUAL REALITY SOUND LABS will not be responsible for any charge incurred for installation OWNER S RESPONSIBILITIES VIRTUAL REALITY SOUND LABS will make every effort to provide warranty service within a reasonable period of time SHOULD YOU HAVE ANY QUESTIONS ABOUT SERVICE RECEIVED OR IF YOU WOULD LIKE ASSISTANCE IN OBTAINING SER...

Page 18: ...llectual Solutions Inc All rights reserved All designs logos and images are the exclusive property of Intellectual Solutions Inc and or its affiliates US and Foreign patents pending 010408 Printed in China 00000 ...

Reviews: