background image

Maintenance

6

2.3 Cleaning and Replacing UV Sensor

Mineral deposits and sediment may accumulate on the sensor window decreasing the UV energy detected. Good 
maintenance of pre-treatment equipment will reduce the accumulation of residues. If the system indicates that the UV 
intensity is low, one cause may be a stained quartz sleeve and/or sensor window.

Prerequisites:

Disconnect the main power source and allow the system to cool for 10 minutes.

Shut off water supply and drain all lines.

Depressurize the unit. Place a small pail near the openings to catch any spills.

Remove the UV lamp. Refer to 

Section 2.1

.

Remove and clean the quartz sleeve. Refer to 

Section 2.2

.

Note: 

The quartz sleeve and UV sensor should be cleaned at the same time.

Procedure:.

WA R N I N G

The UV sensor is very delicate instrument. Extreme care is required when handling and cleaning. The sensor window itself is constructed from quartz 

which is extremely fragile, be careful you do not chip or break this quartz window. Manufacturer’s warranty does not cover damage due to neglect or 

misuse.

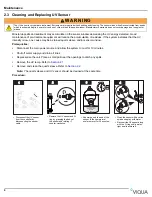
1

•   

Disconnect the UV sensor 
from the controller by 
disconnecting the sensor 
cable.

2

•   

Remove the UV sensor and O-

ring by grasping the body of 
the sensor and rotating it 
counter-clockwise.

Commercial 
     Scale
   Remover

3

0

30

15

45

30 mins

•   

Submerge only the end of the 
sensor in the commercial 
scale remover for 30 minutes.

4

1

2

•   

Clean the sensor with a cotton 

swab and spray with water.

•   

Re-insert the UV sensor along 

with the O-ring until a water-
tight seal is achieved.

Summary of Contents for Hi-Flo

Page 1: ...could result in serious personal injury or damage to the equipment Make sure that the protection provided by this equipment is not impaired Do not use or install this equipment in any manner other tha...

Page 2: ...rate injury Thermal Hazard Allow UV lamps UV chamber to cool for a minimum of 10 ten minutes before handling When there is no water flow the water in the chamber will become hot To prevent scalding al...

Page 3: ...seasonal home or leaving the unit in an area subject to freezing temperatures NOTICE Do not use water during replacement of UV lamp 1 Shut off the water line to chamber and release system pressure be...

Page 4: ...e connector is fully seated onto the UV lamp 9 1 2 Slide the lamp connector up to the retaining nut Rotate the retaining nut locking tabs to lock the lamp connector in place Connect the ground cable a...

Page 5: ...f the system is put on a temporary by pass or if it becomes contaminated after the disinfection system it is necessary to shock the system with household bleach for a full 20 minutes before resuming t...

Page 6: ...2 2 Note The quartz sleeve and UV sensor should be cleaned at the same time Procedure WA RN IN G The UV sensor is very delicate instrument Extreme care is required when handling and cleaning The senso...

Page 7: ...425 Clair Rd W Guelph Ontario Canada N1L 1R1 t 1 519 763 1032 tf 1 800 265 7246 US and Canada only t 31 73 747 0144 Europe only f 1 519 763 5069 e mail info viqua com www viqua com...

Reviews: