background image

8

Connecting to a PC

9

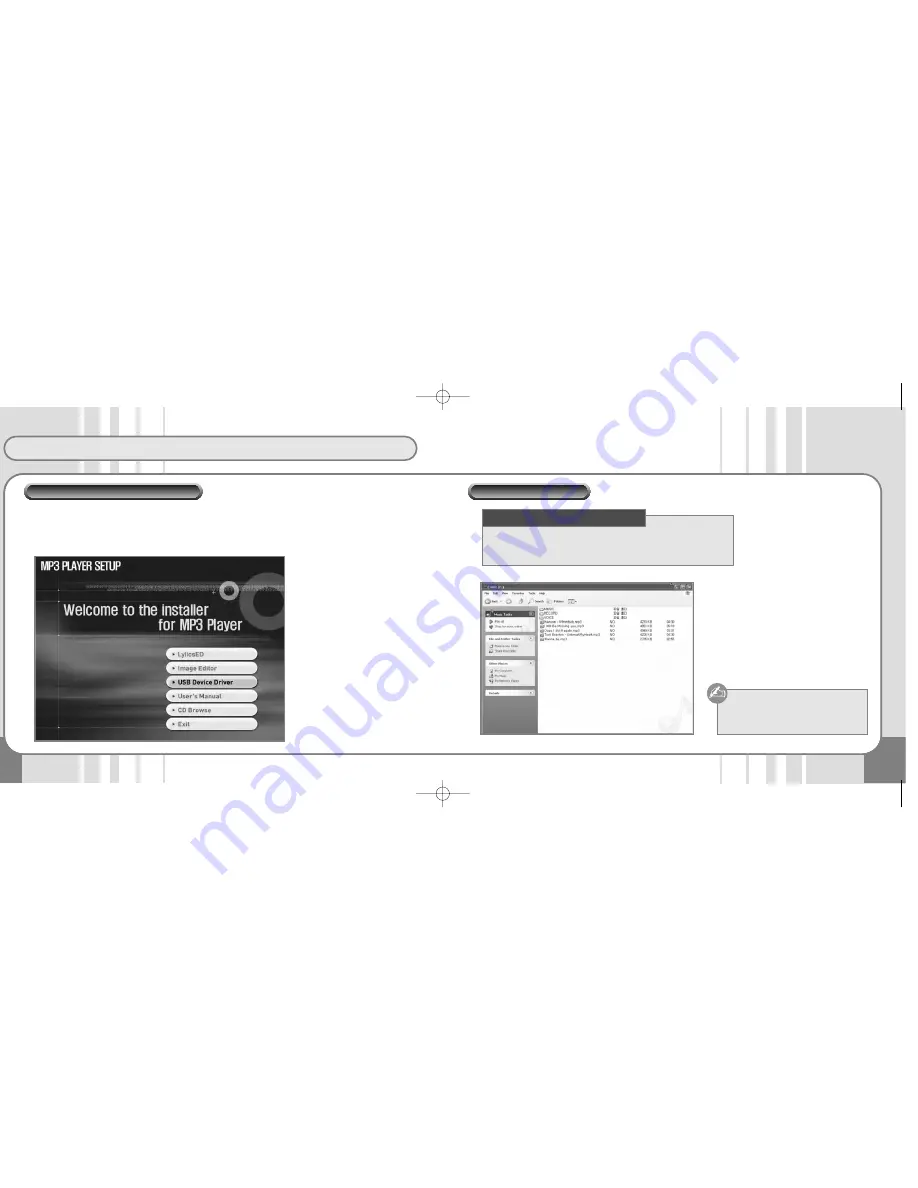
The USB Device Driver is only for PCs using the Windows 98/SE OS.

Insert the Software Installation CD supplied with the product into the CD-ROM drive. Next, select "USB
Device Driver", and the program on the CD will be automatically opened. Press the "Next" Button fol-
lowing the instructions on the installation window.

Power on the VIODIO.

Connect VIODIO to USB Port of PC. "
Mobile Disk " will be indicated in your
"Removable Disk" Folder.

After selecting the files you want to transfer

from your PC , drag and drop or Copy it to
the VIODIO.

• CPU: Pentium MMX or better
• OS : Win98SE/ME/2000/XP/Mac/Linux
• Peripherals : CD-ROM Drive/At least 50MB HDD/ USB Port

Caution : Do not remove the USB

jack while files are
transferring. 

Minimum Hardware Requirements

USB Device Driver Installation

Connecting to a PC

SF2000B-VMP407(eng)  9/2/04 11:37 AM  Page 8

Summary of Contents for VMP407

Page 1: ......

Page 2: ... into MP3 files with out using a PC Lyrics Editor Provides an Lyrics Editing Program and dis plays three line lyrics 96X64 dot 2 Color Orange Blue 16 gray OLED Uses OLED which can display high definition image files and moving picture frames Convenient Firmware Upgrade Download upgrade files restart the player and files are automatically upgraded This function enables you to always use the latest ...

Page 3: ...y cause an accident if you turn up the volume of the earphones while walking on streets especially while using pedestrian crossings 5 Be careful not to let the player s neck strap get caught in doors or other obstacles Optimal Conditions for Use Temperature 5 C 35 C 23 F 95 F Humidity 10 75 Do not expose to extremely high temperatures over 35 C 95 F low tempera tures below 5 C 23 F direct sunlight...

Page 4: ...it Rate Display File Format Display Folder Type Display Mode Type Display and HOLD Indicator Using the PC link Using the adapter Turn the computer power on and connect the VIODIO to the USB port of computer The Battery Charging LED on the main unit lights up during charg ing and is turned off when the bat tery is fully charged 2 3 hours Charging times vary depending on the computer s USB port avai...

Page 5: ...lation window Power on the VIODIO Connect VIODIO to USB Port of PC Mobile Disk will be indicated in your Removable Disk Folder After selecting the files you want to transfer from your PC drag and drop or Copy it to the VIODIO CPU Pentium MMX or better OS Win98SE ME 2000 XP Mac Linux Peripherals CD ROM Drive At least 50MB HDD USB Port Caution Do not remove the USB jack while files are transferring ...

Page 6: ...not dissconnect VIODIO REMOVABLE The file transfer is completed You may disconnect the VIODIO ROOT File Management Disconnect the Main Unit from PC Power ON Press the Play Pause button for 1 2 Seconds shortly Power OFF Press the Play Pause button for over 2 seconds The LCD displays Bye Bye and the power turns off HOLD Switch Push the HOLD switch in the direction of the arrow to disable all buttons...

Page 7: ...s and hold the EQ button for a few seconds during playback and the book marks are saved in sequential order Search Bookmarks Press the EQ button while paused and the Bookmark List appears Move to the bookmark using the key of the Jog Button on the front side of the VIODIO and press the FF key The LCD then shows the selected bookmark position Use the button in the same way as for Navigation Delete ...

Page 8: ...as an antenna There are two station search modes Autoscan Preset Press the Jog Key shortly and two modes are displayed in the order Autoscan Preset Autoscan Mode Push and hold the Jog Key to the REW or FF direction and stations are automatically searched as the frequencies go up and down EX 89 1 91 9MHZ Manual Mode Push the Jog Key to the REW or FF direction to find the stations that you want to l...

Page 9: ...imit is used up Recording Time based on 256MB 128 kbps 4 hours 64 kbps 9 hours 32 kbps 18 hours 16 kbps 36 hours Voice Recording Press and hold the REC button for a few seconds and Recording Mode is started Press and hold the REC button in Recording Mode and recording is started Pause Voice Recording Press the Play Pause button during recording during recording to pause Press the button again to r...

Page 10: ...rt the Program Mode Select MENU CONTROL PROGRAM and the Program Mode is displayed Create Program Select file names to add to the list in Navigation Mode and press the EQ button shortly The files are then added to the program in sequence Press the Jog Key on the VIODIO in PROGRAM Mode shortly and the File List is shown At this point you can select any files you want to add to the program and so cre...

Page 11: ...FO MEM INFO POWER OFF CONTROL BLUETOOTH LANGUAGE PLAY MODE PROGRAM RECORDING SLEEP TIME STUDY KEY PLAY SPEED VOLUME LIMIT RADIO CTRL MODE MUSIC You can listen to a variety of music files such as MP3 WMA Select M o v e FM This mode is to listen to or record FM radio VOICE This mode is to record voice or to play recorded files ENCODING This mode is to record and play audio signals from external devi...

Page 12: ...r ra as se e Confirm SYS INFO To check the MP3 device firmware version YES NO YES NO YES NO YES NO Select M o v e SYSTEM MEM INFO Display information such as the total memory size memory in use and memory available for use in the player USED Memory in use REMAIN Available memory remaining for use POWER OFF The system is automatically powered off after a predefined time in the Pause state You can d...

Page 13: ...elect files that you want using the Jog Key Next designate the selected files by pressing the EQ button shortly How to Play Programs in Order Select MENU CONTROL PROGRAM by pressing the Jog Key for a few seconds and the Program List is shown Select the files that you want and push the Jog Key in the FF direction The files are then played in the order specified in the Program List 1 BLUETOOTH 2 LAN...

Page 14: ...ion is useful for files which need long time for recording such as language learning files if set 00 Disabled the STUDY function is disabled PLAY SPEED Adjust the playback speed 100 00 is the normal speed and adjustments provide slow and fast playback 6 SLEEP TIME 7 STUDY KEY 8 PLAY SPEED 9 VOLUME LIMIT 10 RADIO CTRL 11 RETURN CONTROL STUDY KEY 130 Sec 26 03 56 02 VOLUME LIMIT It is function to se...

Page 15: ...AREA 4 CLR LOGO 5 RETURN 1 DISABLE 2 BLANK 3 MUSIC INFO 4 RETURN CLR LOGO Select whether to display the logo and image screen when the power is on 1 CONTRAST 2 SCR SPEED 3 SCR SAVER 4 LCD OFF 5 ADDITION 6 RETURN DISPLAY 1 FILE SEL 2 WAIT TIME 3 MASK AREA 4 CLR LOGO 5 RETURN ADDITION CLR LOGO Confirm YES NO DISPLAY LCD OFF The LCD is automatically turned off after a prede fined time to save battery...

Page 16: ... Turn SRSWOW ON OFF SRS Adjust 3D sound effects TRUBASS Emphasize the bass FOCUS Emphasize the sensitivity of trebles and tones 7 USER EQ SRSWOW 9 RETURN 1 NORMAL 2 ROCK 3 JAZZ SOUND 1 TURN ON 2 SRS 3 TRUBASS 4 FOCUS 5 RETURN SRSWOW FOCUS 12 7 USER EQ SRSWOW 9 RETURN 1 NORMAL 2 ROCK 3 JAZZ SOUND 1 TURN ON 2 SRS 3 TRUBASS 4 FOCUS 5 RETURN SRSWOW TRUBASS 11 Root Directory The highest directory level...

Page 17: ...oduct malfunctions please contact your vendor for a speedy response Product VIODIO MP3 Player Mode VMP407 Purchase Date Vendor VIODIO MP3 Player VMP407 Consumer s Name Consumer s Address This warranty has to be submitted in order to obtain repair This warranty will not be reissued so please keep it in a safe place Free Service Free service only applies for malfunctions that occur with in one year ...

Reviews: