background image

EXTENDED

RETRACTED

...............4

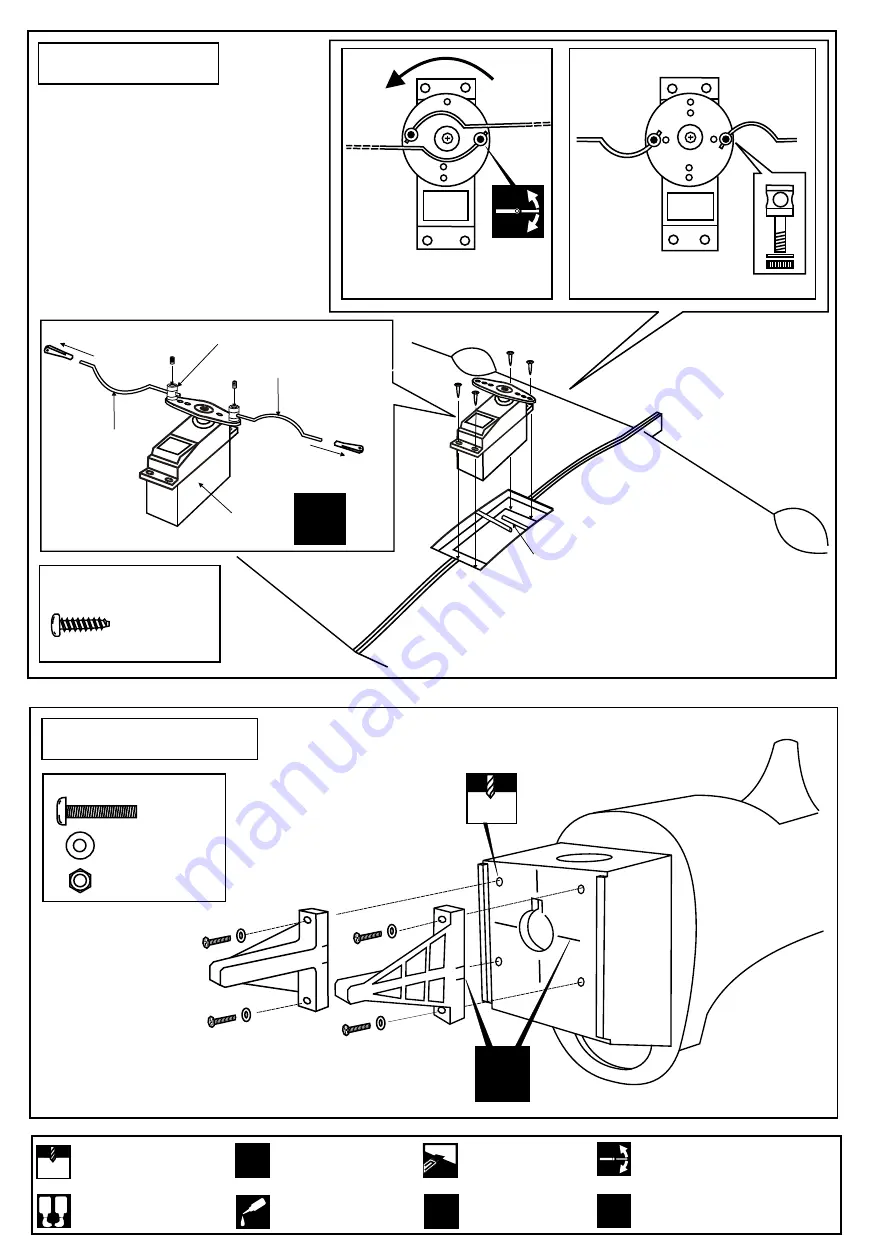
2 x 10 mm screw

TOP VIEW

X

To retract gear

To retract gear

Retract servo

Retract push rod

Retract push rod

Linkage Stopper

7-Main Wing

Retract push rod: Cut off excess,

If rod interfer, bend “C” linkage rod.

8-Engine mount

4x30 mm screw

..........4

..........4

..........4

In case of 4T engine.

4.2mm

!

Align the mark on both mounts

with the mark on the fuselage

1.5mm

A B

!

CA

L/R

Assemble left and right 

sides the same way.

X

Drill holes using the stated

size of drill 

(in this case 1.5 mm Ø)

Use epoxy glue

Take particular care here

Hatched-in areas:

remove covering

 film carefully

Not included.

These parts must be

purchased separately

Check during assembly that these

parts move freely, without binding

Apply cyano glue

Summary of Contents for P-40 "Curtiss KittyHawk"

Page 1: ...ENGINE 58 61 2C 70 91 4C READ THROUGH THIS INSTRUCTION MANUAL FIRST IT CONTAINS IMPORTANT INSTRUCTIONS AND WARNINGS CONCERNING THE ASSEMBLY Almost ready to fly Manufactured by VQ Model Aircraft MADE IN VIET NAM R C Model Aircraft Semi Scale WING AREA APPROX 676 sq in ...

Page 2: ... cycle engine For 70 91 4 cycle engine 12x6 12x7 12x7 14x6 Minimum 6 channel radio for airplane with 6 standard servos 6th channel for retract with retract servo 58 61 2 cycle 70 91 4 cycle Purchase separately Linkage Stopper REQUIRED FOR OPERATION Purchase separately ...

Page 3: ...5 mm Ø Use epoxy glue Take particular care here Hatched in areas remove covering film carefully Not included These parts must be purchased separately Check during assembly that these parts move freely without binding Apply cyano glue 3 Main wing 8 3x12 mm screw 2mm To retract servo Plastic bell crank Retract push rod Z bend L R BOTTOM VIEW 4mm Stopper 4mm Stopper 3x10mm screw Nylon strap Gear moun...

Page 4: ...CA L R 5 Main Wing R R For right wing L For left wing RIGHT BOTTOM LEFT BOTTOM 6 Main Wing CA CA Cut away only the film Top View 1 5mm A B CA L R Assemble left and right sides the same way X Drill holes using the stated size of drill in this case 1 5 mm Ø Use epoxy glue Take particular care here Hatched in areas remove covering film carefully Not included These parts must be purchased separately C...

Page 5: ...rew 4 4 4 In case of 4T engine 4 2mm Align the mark on both mounts with the mark on the fuselage 1 5mm A B CA L R Assemble left and right sides the same way X Drill holes using the stated size of drill in this case 1 5 mm Ø Use epoxy glue Take particular care here Hatched in areas remove covering film carefully Not included These parts must be purchased separately Check during assembly that these ...

Page 6: ...st at factory Step 3 Cut here Cut here Step 5 Side Bottom view Step 1 Step 2 Ply engine mount plate Align the mark on both mounts with the mark on the ply engine mount plate Step 4 1 5mm A B CA L R Assemble left and right sides the same way X Drill holes using the stated size of drill in this case 1 5 mm Ø Use epoxy glue Take particular care here Hatched in areas remove covering film carefully Not...

Page 7: ... glue Take particular care here Hatched in areas remove covering film carefully Not included These parts must be purchased separately Check during assembly that these parts move freely without binding Apply cyano glue Securely glue together If coming off during fly you lose control of your air plane CA CA 2 2x15 mm self tapping screw 2x20 mm screw 4 CORRECT 2x15mm self tapping screw 2x20 mm screw ...

Page 8: ... servo Fuel tank 14 Installing the RC system Fuselage Bottom view Switch Elevator push rod Elevator push rod Rudder push rod Throttle push rod 1 5mm A B CA L R Assemble left and right sides the same way X Drill holes using the stated size of drill in this case 1 5 mm Ø Use epoxy glue Take particular care here Hatched in areas remove covering film carefully Not included These parts must be purchase...

Page 9: ... Cowling 3 2x10 self tapping mm screw IN CASE OF 4CYCLE ENGINE 3 5 mm 2x10 self tapping mm screw X Silicon tube 1 5mm A B CA L R Assemble left and right sides the same way X Drill holes using the stated size of drill in this case 1 5 mm Ø Use epoxy glue Take particular care here Hatched in areas remove covering film carefully Not included These parts must be purchased separately Check during assem...

Page 10: ...nel sticker 7 7 5 4 2 3 1 6 6 6 5 4 2 2 7 3 3 1 6 6 Canopy frame stickers CA Do not use to much or it will make the canopy white residue 18 Canopy Apply the pilot figure if you wish into the cock pit CA CA 19 Sheel ...

Page 11: ...rt can be use for the placement of the decal CG WARNING Securely install the receiver and power pack ensuring they will not come loose or rattle during flight Never fly before checking the Cg s required position In order to obtain the CG specified reposition the receiver and power pack 21 Balance 100 105 mm ...

Reviews: