background image

 24/28 NT00000704-JBRB-ECOWATT-AN-210301

7.4  Electric fan replacement

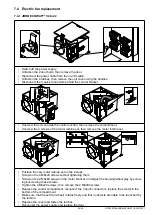
7.4.1 JBRB ECOWATT

®

 04 to 22

• 

Switch off the power supply.

• 

Unfasten the 2 door bolts, then remove the door.

• 

Disconnect the power cable from the on-off switch.

• 

Unfasten the 4 latches, then remove the unit cover using the handles.

•  Disconnect the 3 quick connectors behind the control bracket.

• 

Unscrew the screw inside the control section, then remove the compartment.

• 

Unscrew the 4 screws of the motor turbine set, then remove the motor turbine set.

•  Position the new motor turbine set on the 2 stops. 
•  Screw on the 4 M8x20 screws without tightening them.
•  Screw on the 2 M8x80 screws in the motor bracket, and adjust the housing/wheel play by screw-

ing/unscrewing these screws.

•  Tighten the 4 M8x20 screws, then remove the 2 M8x80 screws.
•  Replace the control compartment, reconnect the 3 quick connectors, replace the screws in the 

bottom of the compartment.

•  Make sure that the set (fan wheel) rotates freely and that no objects are liable to be launched by 

the turbine.

•  Replace the cover and fasten the latches.
•  Reconnect the power supply and replace the door.

Summary of Contents for JBRB ECOWATT

Page 1: ...WIRING COMMISSIONING MAINTENANCE AFNOR CERTIFICATION ISO 14001 Environnement AFNOR CERTIFICATION ISO 9001 Q u a l i t JBRB ECOWATT Tertiary buildings ventilation ECM motor extractor unit 400 C 1 2hr C...

Page 2: ...14 5 4 Description of the drive for model 30 to 92 15 5 5 Pressure switch connection 16 5 6 Relay electrical connection 16 5 7 Relay functioning 18 5 8 REB ECOWATT or CVF remote electrical connection...

Page 3: ...tmosphere Low salinity atmosphere without corrosive chemical agents 1 2 Safety instructions Put on appropriate PPE Personal Protective Equipment before any work Before installing the ventilation unit...

Page 4: ...ga cross piec es sizes 48 to 92 High performance galvanised steel backward INTZ installed wired lockable safety switch BDEZ pressure switch installed connected to the aeraulic network to adjust on sit...

Page 5: ...50 100 150 200 250 0 200 400 600 800 1000 1200 P Pa stat Pabs W 100 75 50 Qv m3 h 41 73 38 71 37 71 Qv m3 h 0 100 200 300 400 500 600 0 100 200 300 400 500 600 0 500 1000 1500 2000 2500 P Pa stat Pab...

Page 6: ...3 h 100 200 300 400 500 600 700 Pstat Pa 200 400 600 800 1000 1200 1400 Pabs W 100 75 50 51 79 51 79 53 81 JBRB ECOWATT 82 JBRB ECOWATT 92 0 100 200 300 400 500 600 0 300 600 900 1200 1500 1800 0 1000...

Page 7: ...767 683 701 511 355 709 661 252 237 252 239 45 JBRB ECOWATT 30 1 019 820 873 568 400 892 797 267 271 267 271 64 JBRB ECOWATT 38 1 153 938 971 631 500 1 036 907 306 331 306 331 78 IS version 27mm JBRB...

Page 8: ...98 661 239 219 252 239 45 JBRB ECOWATT 38 1 468 1 024 631 500 400 1 396 908 306 281 306 331 83 IS version 27mm JBRB ECOWATT 48 82 92 horizontal discharge D configuration C F B D2 D2 C D1 A E G H J I C...

Page 9: ...355 709 661 252 237 236 271 38 JBRB ECOWATT 30 973 820 873 565 400 892 797 267 271 248 286 64 JBRB ECOWATT 38 1 106 938 971 637 500 1 036 907 306 331 315 350 78 IS version 27mm JBRB ECOWATT 48 70 82 9...

Page 10: ...998 661 239 219 236 271 45 JBRB ECOWATT 38 1 426 1 025 637 500 400 1 396 909 306 281 315 350 83 IS version 27mm JBRB ECOWATT 48 82 92 vertical discharge D configuration C F B D2 D2 C D1 A E G H J I C...

Page 11: ...move the unit These handles are only to open the unit cover JBRB ECOWATT 04 to 38 JBRB ECOWATT 48 to 92 3 3 Choice of location JBRB ECOWATT 04 to 38 JBRB ECOWATT 48 to 92 C C C C C C Leave the height...

Page 12: ...ical discharge authorised if connected to an aeraulic network The unit fastening mode must be sufficient to ensure it is held well in place in case of fire 3 5 Accessories assembly 3 5 1 Circular conn...

Page 13: ...Orientation rejet horizontal Orientation rejet vertical Enligne L Doubleaspiration D Modulablecoud 90 doubleaspiration 90 M Orientation rejet horizontal Orientation rejet vertical Enligne L Doubleaspi...

Page 14: ...2 3 1 400 0 72 1 5 JBRB ECOWATT 70 450 1 24 5 4 450 1 24 2 6 JBRB ECOWATT 82 500 1 40 6 0 JBRB ECOWATT 92 500 1 70 3 5 5 3 Electrical connection of the local on off switch The on off switch is used to...

Page 15: ...terminal block One phase Three phase Running status LED RJ 12 Modbus connectors Command terminal block The various control functions are defined in the operating instructions A B Gnd 10V 0 10V GND D2...

Page 16: ...surement of pressure P at threshold P0 of pressure switch setting Interrupting capacity Resistive load cos 1 Inductive load cos 0 6 Mechanical lifespan Cable gland Protection index Pressure connection...

Page 17: ...one or several motor wires are disconnected Stop of the motor after 5 restarts caused by the same default during 60 minutes 24 VDC external power supply overloaded Overload or short circuit of the 24...

Page 18: ...w the modification of the relay functioning Other functioning Running spin the relay switches when the minimum fan speed is reached Single error alarm the relay switches at the first error first attem...

Page 19: ...r built into the unit to connect the CVF or REB ECOWATT remote potentiometer instead JBRB ECOWATT 04 to 22 single phase wiring Lockable safety switch REB ECOWATT CVF Gnd Consigne 0 10V 10V L N L N 1 2...

Page 20: ...difying the initial airflow pressure step point JBRB ECOWATT 04 to 22 single phase or three phase wiring M 10V Entr e 0 10V Gnd N L Thermocontact N O Thermocontact N O Interrupteur REB ECOWATT 10V Con...

Page 21: ...ch defined according to IEC947 3 695 2 1 must be open and locked in this position according to NF C 15 100 6 2 Setting the volume pressure curve Put the switch disconnector to the OFF position Set the...

Page 22: ...e rotation speed v2 v1 x N2 N1 where N is the rotation speed 6 2 2 Speed adjustment by ETDZ models 30 to 92 ETDZ wires on the RJ12 A Modbus connector of the terminal block ETDZ optional tactile comman...

Page 23: ...ing between mobile parts and stationary parts Controller Check the connections particularly the connection to the earth electrode Tighten the terminals if necessary check the ampere rating On off swit...

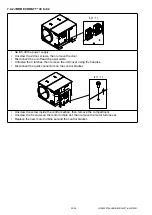
Page 24: ...he motor turbine set then remove the motor turbine set Position the new motor turbine set on the 2 stops Screw on the 4 M8x20 screws without tightening them Screw on the 2 M8x80 screws in the motor br...

Page 25: ...off switch power cable Unfasten the 4 latches then remove the unit cover using the handles Disconnect the quick connectors on the control bracket B B 1 1 Unscrew the screw inside the control section...

Page 26: ...e for JBRB ECOWATT 48 single phase 1571250003 Drive 1 VENTIDRIVE 1 5kW Drive for JBRB ECOWATT 48 Three phase 1571220001 Drive 1 VENTIDRIVE 1 1kW Drive for JBRB ECOWATT 70 single phase 1571250004 Drive...

Page 27: ...27 28 NT00000704 JBRB ECOWATT AN 210301...

Page 28: ...tinuously improving equipment the manufacturer reserves the right to make any technical modifications without giving prior notice VIM Les pr s de M gy Sud SOUDAN CS 60120 79401 ST MAIXENT L ECOLE CEDE...

Reviews: