Viking VK10 User Manual Download Page 11


6) Custom Programs 


● 

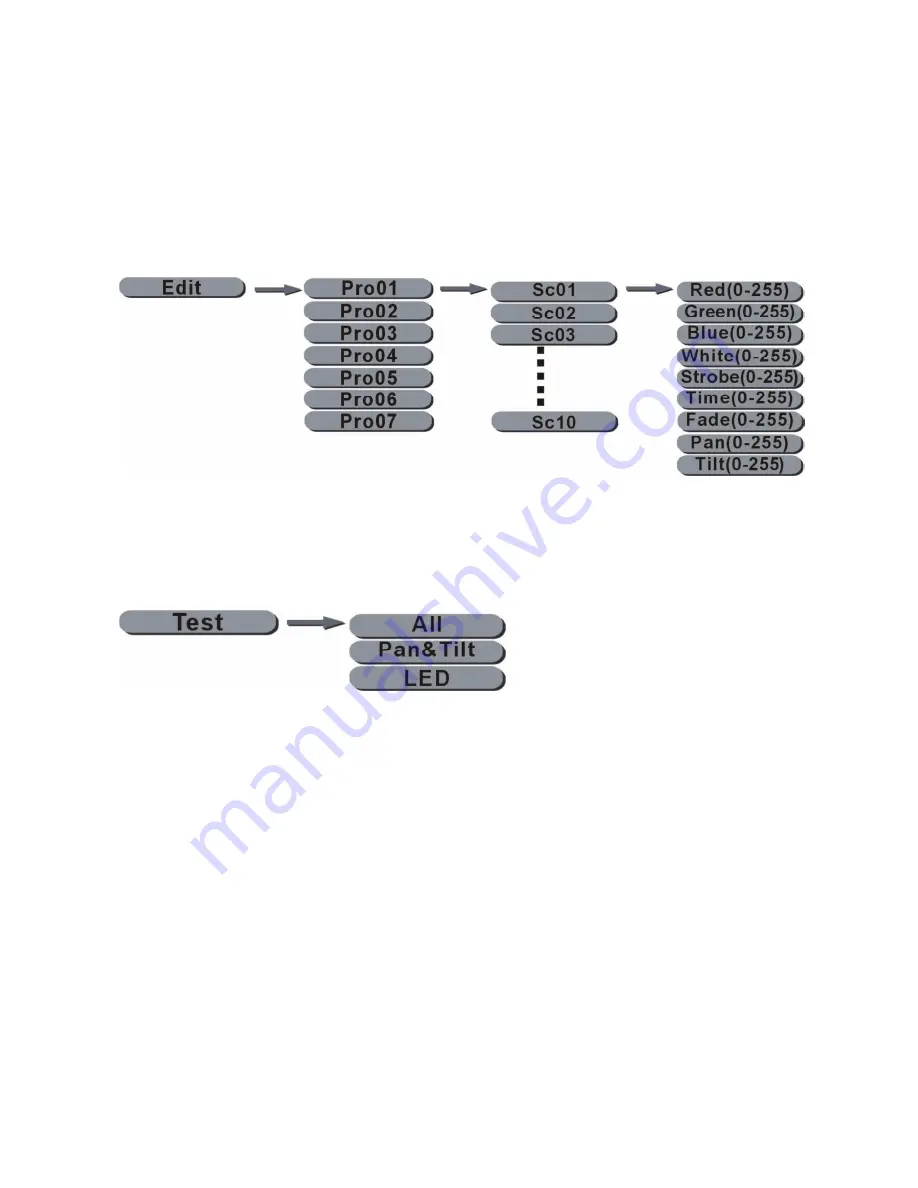
The VK10 Vortex can store 7 custom programmable programs, each with 10 scenes and individual head positions and, 

colours and fade times. 

 Press MENU

until it shows 

Edit

】,

and then press ENTER. 

 Press UP or DOWN to choose the program number to edit 

Pro01

-

Pro07

, and press ENTER

choose each 

scene to edit

Sc01

-

Sc10

,  press enter. and select the following parameters for each scene; 

Red 0-255

】、


Green 0-255

】、【

Blue 0-255

】、【

White 0-255

】、【

Strobe 0-255

】、【

 Time 0-255

】【

Fade 0-255

】、【

Pan 

0-255

】、【

 Tilt 0-255

. 

Note: to leave a scene blank ie; not used then set time=0 otherwise there Must be a value greater than 0 in the time field 
or the scene will not be included.


7) Test Procedure


 Press MENU

until it shows 

Test

】,

and then press ENTER. 

 Press UP or DOWN to choose 

All

】、【

Pan&Tilt

 and 

LED

】。

Select 

All

】,

to test the motor and LED, 

Select 

Pan&Tilt

 to test the motor

or 

LED

to test each led in functioning correctly


8) User Custom Operating Settings 


● 

Press MENU

until it shows

Set

】,

and then press ENTER. 

● 

Press UP or DOWN to choose 

Fan control

】、【

Disp.setting

】、【

Pan

】、【

Tilt

】。 

● 

When selecting 

Fan control

】,

press ENTER

press UP or DOWN to choose the 3 kinds 

of Fan control.

Auto

mode will according the lamp’s head to auto control the fan’s speed

High

mode is the fan’s high speed operation,

Low

mode is fan’s low speed 

operation. 

● 

When selecting 

Disp.setting

】,

press ENTER

press UP or DOWN to choose 

Shut off 

time

】、【

Flip display

】、【

Key lock

or 

Disp flash

】, 

If selecting

Shut off time

】,

press ENTER 

press UP or DOWN

it can be set LCD backlight close from 2-60 mins.  

If selecting

Flip display

】,

press ENTER

press UP or DOWN

press

ON/OFF

to choose

ON

,the display will 

then rotate through 180°

。 


When selecting

Key lock

】,

press ENTER

press UP or DOWN

press

ON/OFF

to choose

ON

,when the 

backlight is off, the button keys are locked, & operation is invalid at this time. You must enter Up

Down

Up

Down

press ENTER to confirm the unlock.

。 

When selecting

Disp flash

】,

press ENTER

press UP or DOWN, choose

ON

】 

and the screen’s backlight begin to 

blink when the equipment is receiving the DMX signal,  The screen’s backlight will be off when there is no signal. 

● 

When selecting

Pan

or

Tilt

】,

press ENTER

operate UP or DOWN

Choose

Normal

or 

Reverse

to 

set the forward and reverse operation


Summary of Contents for VK10

Page 1: ...VK10 VORTEX MOVING HEAD USER MANUAL Rev 2 01...

Page 2: ...oad wall outlets and extension cords as this can result in fire or electric shock Do not allow anything to rest on the power cord Do not locate this fixture where the cord may be damaged by persons wa...

Page 3: ...w the fixture to cool approximately 5 minutes prior to examination This fixture should not be placed in a built in installation unless proper ventilation is provided Only operate the fixture after hav...

Page 4: ...esurethatsafety relatingandmachine technicalinstallations areapprovedbyan expert before taking into operation for the first time and after changes before taking into operation another time The operato...

Page 5: ...holder with M10 bolt and lock nut through the hole in the holder 2 Fasten the omega holders on the bottom of the base by inserting both quick lock fasteners into the holes of the base and tighten full...

Page 6: ...of failure DMX Signal Connection 1 Use standard 3 pin DMX cable to plug into the 1st light male and daisy chain further lights as Required The DMX signal conforms to industry standard protocol as per...

Page 7: ...he installation in different places Indoor operation only Temperature 20 C 40 C 5 DMX modes 21 35 78 92 96 Channels Dimmer 0 100 linear dimmer Pan tilt 16bit fine pan tilt control Smooth and accurate...

Page 8: ...etting the light on the LCD display is with the aid of the 4 buttons for navigation Button Function MENU Choose Menu or function exit ENTER Current show menu or enter into the current selected functio...

Page 9: ...unit becomes the Master in Master slave setups Sound2 Select Sound2 program this unit becomes the Master in Master slave setups Slave Select Slave quit to main menu so light is set as Slave 3 DMX Use...

Page 10: ...If choosing Power on press ENTER to enter into the equipment XXXX hours If selecting Ttl Life hrs press ENTER to enter into the equipment total operation time XXXX hours If selecting Last Run Hrs pres...

Page 11: ...n control Disp setting Pan Tilt When selecting Fan control press ENTER press UP or DOWN to choose the 3 kinds of Fan control Auto mode will according the lamp s head to auto control the fan s speed Hi...

Page 12: ...5 Pan Fine 16 16 16 16 16 0 255 Tilt 17 17 17 17 17 0 255 Tilt Fine 18 18 18 18 18 0 255 Function 19 19 19 19 19 0 255 Reset 20 20 20 20 20 0 255 Zoom 21 21 21 21 21 0 255 Zoom Rotation 22 Shape Shape...

Page 13: ...d 6 54 B Led 11 54 R Led 9 54 R Led 7 55 R Led 12 55 G Led 9 55 G Led 7 56 G Led 12 56 B Led 9 56 B Led 7 57 B Led 12 57 W Led 9 57 R Led 8 58 R Led 13 58 R Led 10 58 G Led 8 59 G Led 13 59 G Led 10 5...

Page 14: ...17 86 R Led 17 86 B Led 17 87 G Led 17 87 R Led 18 88 B Led 17 88 G Led 18 89 W Led 17 89 B Led 18 90 R Led 18 90 R Led 19 91 G Led 18 91 G Led 19 92 B Led 18 92 B Led 19 93 W Led 19 94 R Led 19 95 G...

Reviews: