background image

Troubleshooting

©2012 Viking Preferred Service

13

To avoid risk of electrical shock, personal injury, or death, disconnect electrical power source to unit, unless test 

procedures require power to be connected. Discharge capacitor through a resistor before attempting to service. 

Ensure all ground wires are connected before certifying unit as repaired and/or operational.
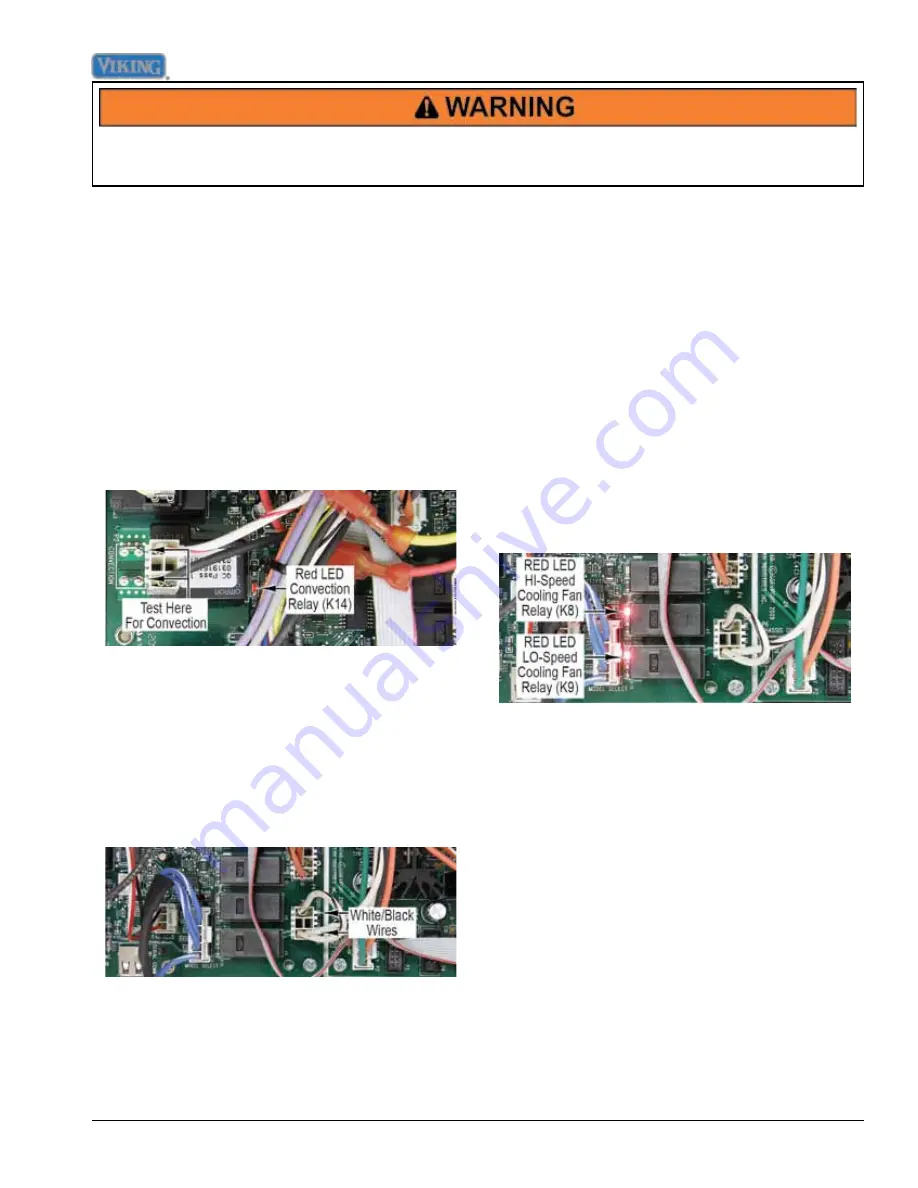
Convection Relay

When the convection element is selected by the oven 

control board, voltage is sent to the convection relay 

coils. A red LED in front of each coil verifies coil voltage 

is being sent to that particular relay. This does not 

indicate however that the relay is functioning. When the 

convection element relay is energized, (L1-black) power 

is sent through the relay to the convection element. (L2 

power is controlled by the line break relay.)

To test, select a Convection cooking program. When 

the convection relay contact is energized (red LED lit at 

base of relay), check for 240 VAC between the yellow 

wire at the line break relay and the white/red wire on 

P2. If 0 VAC is read, disconnect power and remove P2 

Molex plug.

Reconnect power and using your ohmeter, check for 

continuity between the two relay contacts (refer to photo, 

above). If you read infinite ohms (∞) when the relay is 

energized, this indicates a faulty relay and you will need 

to replace the control board. If you read 0 ohms, the 

relay contact is closing.

Cooling Fan

Locate the P11 terminal connections on the control 

board. The P11 connections will have Molex plug 

containing two white/black wires.

With the P11 board connection removed, use an 

ohmeter to measure resistance between either white/

black wire and P1 white wire on the power supply board. 

The resistance should be approximately 18 ohms. If no 

resistance is read, remove fan to repair/replace (Follow 

the cooling fan disassembly procedure).

With the white/black wires attached to the P11 board 

connection, use a voltmeter to measure voltage between 

the white/black wires on the board and P1 white on the 

power supply board. The voltage should be 120 VAC 

when a cooking mode is selected. If 120 VAC is present 

and no fan rotation, replace the cooling fan (follow 

cooling fan disassembly procedure). If no voltage is 

present, verify wiring. If wiring is OK, replace the oven 

control board.

Cooling Fan Relay

The oven control board is designed to operate a two-

speed cooling motor. The oven utilizes a one-speed 

motor so both the HI and LO speeds are jumped 

together on the board. On initial startup, the oven control 

board selects the fan power relay (K8) and the LO speed 

(K9). When the oven temp reaches 250˚F temp, the 

board will switch the speed relay to HI. However, both 

are jumped together so this change is not noticed. If a 

fan error is shown, proceed with the test shown below.

When the unit is switched ON, voltage is sent to both 

relay coils. A red LED in front of each coil verifies coil 

voltage is being sent to that particular relay. This does 

not indicate however that the relays are functioning.

To test, connect power. With your meter set for AC 

voltage, check between P1 white on power supply board 

and the white/black wires on P11 (refer to photo above). 

The reading should be 120 VAC. If 0 volts are shown 

and the red LED is lit, then the oven control board is 

defective.

Summary of Contents for RDSCD230-5B

Page 1: ...to be used by qualified appliance technicians only Viking does not assume any responsibility for property damage or personal injury for improper service procedures done by an unqualified person This...

Page 2: ...ot Spark 19 Troubleshooting Guide 20 LED Error Codes 22 Selector and Thermostat Characteristics 23 Disassembly 24 Access Control Board Assembly 24 Control and Power Board Removal 24 Motor Capacitor Re...

Page 3: ...and others All safety messages will be preceded by the safety alert symbol and the word DANGER WARNING or CAUTION These words mean IMMEDIATE HAZARDS WHICH WILL RESULT IN SEVERE PERSONAL INJURY OR DEA...

Page 4: ...ners Range Features 11 19 17 18 16 12 15 13 14 1 2 3 4 5 6 7 8 9 10 1 Interior oven light switch 2 Left rear burner control knob 3 Left front burner control knob 4 Center burner control knob 5 Oven fu...

Page 5: ...m the appliance before operating it Keep area around appliance clear and free from combustible materials gasoline and other flammable vapors and materials If appliance is installed near a window prope...

Page 6: ...se substances can be minimized by properly venting the oven to the outdoors by opening the windows and or door in the room where the appliance is located during the self clean cycle Important Notice R...

Page 7: ...aces may get hotter than usual therefore children should be kept away DO NOT store items of interest to children over the unit Children climbing to reach items could be seriously injured Before Using...

Page 8: ...Troubleshooting 8 2012 Viking Preferred Service Oven Control Board Connections...

Page 9: ...18 8 W P1 white P11 white black Door Latch Motor 240 VAC 12 86 kW K17 red P12 black white Door Latch Switch Door Unlocked 7 86 VDC Open P15 brown orange disconnected from board 0 VDC 0 W Closed P15 b...

Page 10: ...rogram When the relay contact is closed red LED lit at base of relay check for 240 VAC between the yellow wire and black L1 If 0 VAC is read disconnect power and remove the red and yellow wires off th...

Page 11: ...relay contact is closing Outer Bake Relay Select a Bake cooking program When the outer relay contact is energized red LED lit at base of relay check for 240 VAC between the yellow wire at the line bre...

Page 12: ...ms when the relay is energized this indicates a faulty relay and you will need to replace the control board If you read 0 ohms the relay contact is closing Outer Broil Relay Select a Broil cooking pro...

Page 13: ...res With the P11 board connection removed use an ohmeter to measure resistance between either white black wire and P1 white wire on the power supply board The resistance should be approximately 18 ohm...

Page 14: ...se FWD Low Speed When closed it sends power to the common terminal of the K6 relay direction and is an SPDT relay The output from K5 is connected to the C common terminal of K6 When it is not energize...

Page 15: ...this indicates a faulty relay and the oven control board will need to be replaced Also check wiring to the main power supply and repair replace as needed Testing The Capacitors The range uses two 2mF...

Page 16: ...k the S1 contact opens When the plunger catches the door liner and pulls inwards the S2 switch plunger is actuated The switch contact is closed and a completed circuit is made at the P15 connection be...

Page 17: ...tion the S1 switch N O is activated by the motor cam Shown below are the switch positions and wire colors To test check continuity between the blue white and brown wires The reading should be 0 ohms T...

Page 18: ...g removed use an ohmeter to measure resistance between the violet and grey wires in the Molex connector At ambient temperature you should read around 1090 ohms 10 An open reading indicates either a br...

Page 19: ...burner head 8 Disconnect the black wire from the back of the spark module 9 Check for 0 ohms between the black wire and the metal top of the igniter If open replace wire 10 If 120 VAC is present in st...

Page 20: ...selector Replace selector Open thermostat Replace thermostat Open relay K12 K13 or K17 Replace oven control board Open oven control board Replace oven control board Defective oven wiring shorted open...

Page 21: ...tat Replace thermostat Open relay K3 Replace oven control board Open oven control board Replace oven control board Defective oven wiring shorted open or burned Repair or replace defective wiring No se...

Page 22: ...wiring shorted open or burned Repair or replace defective wiring LED Error Codes The LED error codes are displayed on the control panel using the cycle and clean lights Refer to the chart below to det...

Page 23: ...kW 1 80 VDC Med Broil 10 0 kW 5 VDC 7 20 kW 3 66 VDC 2 72 kW 1 26 VDC Low Broil 10 0 kW 5 VDC 8 28 kW 4 21 VDC 1 58 kW 0 77 VDC Self Clean 10 0 kW 5 VDC 9 41 kW 4 82 VDC 443 W 0 22 VDC Resistance chec...

Page 24: ...emove screws and lift kick plate from keyhole screws 2 Remove keyhole screws and lower access grill from range 3 Remove screws and slide control panel assembly from range Note During installation make...

Page 25: ...emoval 1 Open door completely Place pins supplied with unit in pin holes Important For personal safety only use pins supplied with unit Pins can be ordered if needed 005116 000 2 Remove screws and hin...

Page 26: ...erse procedure for installation Door Handle Removal 1 Remove outer door panel assembly see Outer Door Panel Assembly Removal 2 Remove screws and handle assembly from outer door panel assembly 3 Remove...

Page 27: ...Remove oven door see Door Assembly Removal 2 Remove screws that attach the sensor to the back of the oven liner 3 Pull the sensor connector into the oven cavity and disconnect sensor connector Note D...

Page 28: ...oven rack support see Rack Support Removal 2 Remove screws and fan cover from oven cavity 3 Reverse procedure for installation Smoke Eliminator Removal 1 Remove convection fan cover see Convection Fan...

Page 29: ...e broil assembly to the top of the oven liner Note Use care when pulling broil assembly into the oven cavity Make sure the connectors remain on the broil assembly 5 Carefully pull connectors through t...

Page 30: ...ents see Control Components Accessed 2 Disconnect connector from the oven thermostat 3 Remove screws bezel and thermostat from control panel 4 Reverse procedure for installation Indicator Light Remova...

Page 31: ...pull out 3 Replace with halogen bulb using volt and wattage requirements listed on glass cover 4 Replace the light cover by snapping glass cover onto metal box 1 2 3 4 Top Light Housing Removal 1 Acce...

Page 32: ...of the range 2 Remove screws and backguard from range 3 Reverse procedure for installation Surface Burner Valve Removal Gas leak hazard To avoid risk of personal injury or death leak testing of the ap...

Page 33: ...from burner valve 4 Reverse procedure for installation Stack Valve Igniter Module Removal 1 Remove the control panel assembly see Control Panel Assembly Removal 2 Disconnect connectors from module 3 R...

Page 34: ...nd slide tubing nut away from jet holder 5 Remove inverted screws from jet holder 6 Lift jet holder to remove from tubing 7 Reverse procedure for installation 8 Perform gas leak test Pressure Regulato...

Page 35: ...2 Remove backguard assembly see Backguard Assembly Removal 3 Remove screws and lift kick plate from keyhole screws 4 Remove screws and side trim from range 5 Remove keyhole screw from front of range 6...

Page 36: ...r cord from panel 7 Reverse procedure for installation Cooling Blower Motor Removal 1 Remove back panel see Back Panel Removal 2 Remove three screws from blower motor 3 Remove four screws and blower m...

Page 37: ...INGLE POINT SPARK MODULE SINGLE POINT SPARK MODULE SINGLE POINT SPARK MODULE SINGLE POINT SPARK MODULE INP GND 5Vdc TSTAT POT RTD CYCLE SEL L1 DL MTR OVEN LITE 1 P1 DOOR P13 POWER SUPPLY P2 CONVECTION...

Reviews: