


13
If service is required, call your dealer or authorized service agency.
The name of the authorized service agency can be obtained from the
dealer or distributor in your area or online at vikingrange.com
Have the following information readily available.
• Model number
• Serial number
• Date purchased
• Name of dealer from whom purchased
Clearly describe the problem that you are having. If you are unable to
obtain the name of an authorized service agency, or if you continue
to have service problems, contact Viking Range, LLC at
1-888-845-4641, or write to:
VIKING RANGE, LLC
PREFERRED SERVICE
111 Front Street
Greenwood, Mississippi 38930 USA
Record the information indicated below. You will need it if service is
ever required.
The model and serial number for your hood is located
behind the baffle filter on the left side panel in the lower right corner.
Model no. _ _ _ _ _ _ _ _ _ _ _ _ _ _ _ _ _ _ _ _ _ Serial no. _ _ _ _ _ _ _ _ _ _ _ _ _ _ _ _ _ _ _ _ _ _ _ _
Date of purchase _ _ _ _ _ _ _ _ _ _ _ _ _ _ _ Date installed _ _ _ _ _ _ _ _ _ _ _ _ _ _ _ _ _ _ _
Dealer’s name _ _ _ _ _ _ _ _ _ _ _ _ _ _ _ _ _ _ _ _ _ _ _ _ _ _ _ _ _ _ _ _ _ _ _ _ _ _ _ _ _ _ _ _ _ _ _ _ _ _
Address _ _ _ _ _ _ _ _ _ _ _ _ _ _ _ _ _ _ _ _ _ _ _ _ _ _ _ _ _ _ _ _ _ _ _ _ _ _ _ _ _ _ _ _ _ _ _ _ _ _ _ _ _ _ _ _
_ _ _ _ _ _ _ _ _ _ _ _ _ _ _ _ _ _ _ _ _ _ _ _ _ _ _ _ _ _ _ _ _ _ _ _ _ _ _ _ _ _ _ _ _ _ _ _ _ _ _ _ _ _ _ _ _ _ _ _ _ _ _
If service requires installation of parts, use only authorized parts to ensure
protection under the warranty.
THIS MANUAL SHOULD REMAIN WITH THE HOOD FOR FUTURE
REFERENCE.
12
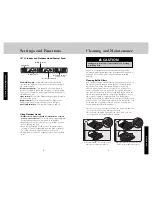
Cleaning Ductless Venting Chamber
(Professional Hoods Only)
1. Remove the middle vent by gently raising up and pulling
out.
2. Use the same cleaning directions as in “Cleaning the Hood
Canopy” section.
3. After cleaning, replace the middle vent.
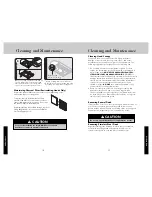
Replacing the Light Bulbs
When removing bulbs use an oven mitt to protect your hand
in case the bulb breaks.
LED Lights - Indoor Models (All except 10” H.)
1. Unscrew bulb.
2. Replace the bulb with a 120 volt, Phillips R20 8-watt LED bulb
(8R20/F90 2700 DIM). Can be purchased locally.
Halogen Lights - 10” H. Indoor and Outdoor Hoods
1. Unscrew halogen bulb.
2. Replace the bulb with a 120 volt, 50-watt halogen bulb.
Infrared Heat Lamp
1. Unscrew infrared bulb from heat lamp socket.
2. Replace the bulb with an R40, 120 volt, 250-watt infrared
bulb. (not included with product)
1
2
1
1
1
2
2
Pr
oduct Car
e
Service Information
Cleaning and Maintenance


