background image

SPA SURFACE CARE

Do not use abrasive solvents or cleaners to clean spa

surfaces.  Only use the following: Lemon Juice, Amonia,

Vinegar or Soap and Water.

LONG-TERM STORAGE (90 days or more)

We strongly urge you to contact your dealer to winterize

your spa.

If you are not going to use your spa for an extended period

of time, drain it as described above. You will also have to drain the
pump. Water left in the spa during long-term storage may cause freeze
damage.*

To drain the pump, remove the drain plug from the face of the pump.
Additional water removal is required to prevent freeze damage to the
spa plumbing assembly.  Remove the piping assembly between the
pump and the heater by loosening the union at the pump and the
union at the heater.  Once the piping is removed, use a wet/dry shop
vac to vacuum water from both the pump side and the heater side
openings.  Once all water is removed from these lines, we also recom-
mend that you place the vacuum over each jet and the suction fittings
and vacuum any remaining water that may be trapped in these lines.
You may now reinstall the piping assembly that was removed earlier
and reinstall the pump plug.

NOTE:

We also recommend vacuuming each jet opening to ensure

that all of the water is out of the plumbing lines.

*FREEZE DAMAGE TO THE SPA PLUMBING IS NOT COV-

ERED UNDER THE WARRANTY.

SPA PILLOW MAINTENANCE 

• Your spa pillows need to be washed and rinsed periodically to
remove any chemical residue.  This should help to eliminate pillows
becoming stiff and discolored. Note: Your spa pillows are not covered
under your warranty.
• If the spa is not to be used for a period of time, pillows should be
removed. This will extend the life of the pillow. 

17

Summary of Contents for Aurora 3

Page 1: ...2021 Owner s Manual...

Page 2: ...structions Topside Control Instructions 10 Waterfall Adjustability 11 LED Lighting Feature 11 Spa Jets and Air Controls 12 Filling Directions Stereo Operation 14 Vibrosonic Jet Operation 14 Fill the S...

Page 3: ...er flow created by the pump Should the need arise to replace the suction fittings or the pump be sure that the flow rates are compatible Never operate the spa if the suction fittings are broken or mis...

Page 4: ...dication before or during spa use may lead to unconsciousness with the possibility of drowning d Persons suffering from obesity or with a medical history of heart disease low or high blood pressure ci...

Page 5: ...to the system at the main power source breaker NOTE A READILY ACCESSIBLE DISCONNECTING MEANS SHALL BE PROVIDED DURING INSTALLATION SAVE THESE INSTRUCTIONS PERSONAL SAFETY PRECAUTIONS 1 Please use the...

Page 6: ...rranty BALCONIES AND DECK REQUIREMENTS Decking must be constructed to support 85 pounds per sq ft Balconies must be constructed to meet current state and local codes Gates must be self closing and sel...

Page 7: ...220 VOLT 6 Green ground connection located on left side of control panel WHITE BLACK RED GREEN...

Page 8: ...GFCI WIRING INSTALLATION 220V 7...

Page 9: ...rom current source to spa and the current rating as stated on the ID label that is attached to the equipment control enclosure 5 All wiring installed in conduit must be approved for usage by state and...

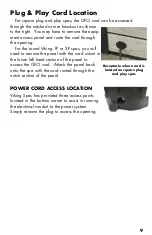
Page 10: ...d to remove the panel with the cord cutout in the lower left hand section of the panel to access the GFCI cord Attach the panel back onto the spa with the cord routed through the notch section of the...

Page 11: ...all owner s manual power connection instruc tions Installation must be performed by a licensed elec trician and all grounding connections must be properly installed 10 Use the Accompanying QR code for...

Page 12: ...ith an LED light system This light ing which encompasses the interior of the spa is also incorporated into the light in the foot well of these models The LED Lighting system consists of a 7 position c...

Page 13: ...o remove jet insert turn jet face counter clockwise to the shut off point Continue turning until the jet unscrews from body To rein stall the jet insert jet into body and turn clockwise until the jet...

Page 14: ...ddle of the lounger Turn the valve to activate the jet Note this valve directs one of the pumps and will effect the flow this pump used to power other jets in the spa Due to the substantial amount of...

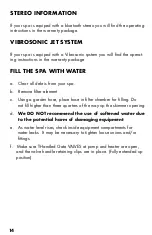
Page 15: ...move filter element c Using a garden hose place hose in filter chamber for filling Do not fill higher than three quarters of the way up the skimmer opening d We DO NOT recommend the use of softened wa...

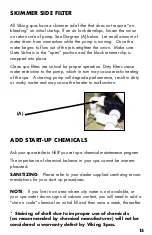
Page 16: ...atic heating of the spa A starving pump will degrade performance result in dirty or murky water and may cause the heater to malfunction ADD START UP CHEMICALS Ask your spa retailer to HELP you set up...

Page 17: ...dels 1 Twist cap off and attach a garden hose to the opening 2 Turn the outside body counter clockwise until it stops 3 Pull on the drain that the hose is connected to until you hear a pop 4 Drain the...

Page 18: ...e piping is removed use a wet dry shop vac to vacuum water from both the pump side and the heater side openings Once all water is removed from these lines we also recom mend that you place the vacuum...

Page 19: ...objects fall into the filter cavity They can cause obstruction to water movement Remove filter cartridges as shown in figures below The filter must be cleaned every month more often with heavy use to...

Page 20: ...kimmer prior to slid ing assembly into place Refer to filter cleaning procedure for Viking IP Viking 2P Viking 3 on previous page Note Spas with this filter uti lize 50 sq ft cartridge filters FILTER...

Page 21: ...e filter cycles only We recommend the F4 setting which means your spa will filter a total of 8 hours 4 hours twice a day This should pro vide adequate ozonation provided there is proper chemical balan...

Page 22: ...nce needs pH Up Test water add pH Up pH irritation rashes to be corrected pH pH Down Down or Total A as needed allergies total alkalinity Total A Excessive chlorine or Add fresh water and or wait brom...

Page 23: ...ion with trapped air Solution Open bleed plug on face of pump and cycle pump to high speed for approximately 30 seconds If not has the spa been drained and refilled Solution Make sure water level thre...

Page 24: ...ot tub and Avertissement Pour eviter des blessures user de prudence en entrant dans une cuve de relaxation et en sortant Warning Do not use drugs or alcohol before or during the use of a spa or hot tu...

Page 25: ...2725 Prairie St SW Wyoming MI 49519 www vikingspas com Email info vikingspas com 2020 Viking Spas Inc...

Reviews: