background image

VIKING TECHNICAL SUPPORT 1.800.908.0884

1 5

GATE OPERATOR INSTALLATION

Limits Setup

STEP 1

Position the Limit Cams:

1.  Position the gate to either the open or closed limit position.

2.  Rotate the corresponding Limit Cam until the Limit Switch is engaged. The Limit 

Switch will “click” when engaged.

!


TECHNICAL TIP:

 The Limit Cam can be rotated by hand with limited resistance and does 

not need to be tightened further.

3.  Repeat step 1 for the opposite limit position.

4. Complete the electrical installation on the following pages.

5.  Run the operator 2 full cycles without interruption to determine if further limit 

adjustments are required.

RED

BROWN

ORANGE

YELLOW 

CLOSE LIMIT

OPEN LIMIT

Adjust the Bolt to

make firm contact 

with the Primary Arm

Tighten the Bolt Nuts

against the Bracket

STEP 2

Adjust the Positive Stop

1.  Run the gate to the Closed Limit position 

and adjust the Positive Stop Bolt to 
securely contact the Primary Arm. Tighten 
the securing nuts to the Bracket.

!


TECHNICAL TIP:

 The Positive Stop is 

designed to precisely align the gate(s) 
closed. You may remove the Positive 
Stop that corresponds to the Open Limit 
position. 

Positive Stop
Closed Position

Limit Switches

Limit Cams

Summary of Contents for X-390

Page 1: ...INSTALLATION INSTRUCTIONS AND SAFETY INFORMATION SINGLE AND DUAL GATE SYSTEMS C L A S S I C L A S S I I C L A S S I I I A N D C L A S S I V Residential and Commercial Vehicular Swing Gate Operator ...

Page 2: ...e sensitivity Adjustable delay for overlapping dual gates Hold Open Timer to automatically close the gate Modular connectors for easy access control and accessory installation Regulated power supply for your external accessories LED indicators display gate and operator status for easy troubleshooting On Board LCD Display provides diagnostics operator status settings and real time volt and amp read...

Page 3: ...ate Operator 14 Limits Setup 15 ECU BOX INSTALLATION 17 ELECTRICAL INSTALLATION 18 21 High Voltage Supply Option 18 Low Voltage Supply Option 19 Solar Supply Option 19 Motor Cable 20 21 Monitored UL Sensor Connections 22 LIMITS INDICATIONS 23 CONTROL BOARD SETUP 24 27 Initial Settings 24 25 Obstruction Detection Sensor ODS 26 Heater 27 ACCESSORY CONNECTIONS 28 35 Access Control Connections 28 29 R...

Page 4: ... mm diameter sphere from passing through the openings anywhere in the gate and in that portion of the adjacent fence that the gate covers in the open position c ALL EXPOSED PINCH POINTS ARE ELIMINATED OR GUARDED AND d GUARDING IS SUPPLIED FOR EXPOSED ROLLERS 2 The Operator is intended for installation only on gates used for vehicles Pedestrians must be supplied with a separate access opening The p...

Page 5: ... entrapment or obstruction exists such as a the leading edge trailing edge and post mounted both inside and outside of a vehicular horizontal slide gate refer to page 6 b One or more contact sensors shall be located at the bottom of a vehicular vertical lift gate c One or more contact sensors shall be located at the pinch point of a vehicular vertical pivot gate d A hardwired contact sensor shall ...

Page 6: ...e These instruction must be kept and forwarded to all possible future users of the system This product must be used only for that which it has been expressly designed Any other use is to be considered improper and therefore dangerous The manufacturer cannot be held responsible for possible damage caused by improper erroneous or unreasonable use Avoid operating in the proximity of the hinges or mov...

Page 7: ...ng WARNING Not Following these instructions may cause severe injury or death IMPORTANT SAFETY INFORMATION Install the gate operator only when The operator is appropriate for the construction of the gate and the Usage Class of the gate UL325 Gate Operator Classifications GLOSSARY RESIDENTIAL VEHICULAR GATE OPERATOR CLASS I A vehicular gate operator or system intended for use in garages or parking a...

Page 8: ...n sensor s may render the gate operator INOPERABLE The gate can be moved manually Refer to page 7 Consult the installation manual of the sensor for detailed information about the usage installation and maintenance Use only UL and or ETL Recognized Edge Sensors and Photoelectric Sensors Refer to pg 3 SWING GATE ENTRAPMENT ZONE Locations between a moving gate or moving exposed operator components an...

Page 9: ...tored Terminal STEP 1 Connect the monitored entrapment protection sensor s to the Viking control board as illustrated STEP 2 Execute the Learn Process Toggle the Diagnose button until you see UL LEARN NO LEARN on the LCD Display Press and hold the Stop button Toggle the Diagnose button once The number of Monitored sensors connected to the UL or Re Open terminals will now be displayed EXAMPLE UL LE...

Page 10: ...rts of the gate and out of reach of children a Controls intended for user activation must be located at least six feet 6 away from any moving part of the gate and where the user is prevented from reaching over under around or through the gate to operate the controls Outdoor or easily accessible controls shall have a security feature to prevent unauthorized use b The Stop and or Reset button must b...

Page 11: ...tes Warning Placard Installation All Warning Placards must be installed where visible in the area of the gate A minimum of two placards shall be installed A placard is to be installed in the area of each side of the gate and be visible CLOSE STOP OPEN Locate Control Buttons Within sight of the gate At a minimum height of 5 feet so small children are not able to reach it and At least 6 feet away fr...

Page 12: ... Accessory Power 24VDC 750mA Power Consumption Sleep 28mA Motor Current Draw Typical 2 0A Operating Temperature 20 F 28 C to 131 F 55 C Opening Angle 120 IMPORTANT Cable shall be shielded with drain wire Connect drain wire to chassis ground of both the Operator and the ECU MOTOR CABLE LENGTH GAUGE 40 Feet 16 AWG 60 Feet 14 AWG 80 Feet 12 AWG 120 Feet 10 AWG More than 120 Feet Not Recommended 5 4 1...

Page 13: ... Diagnostics LCD Display pg 38 40 16 FEATURE ACTIVATION PIN HEADERS activate features by placing a jumper onto the pin headers pg 25 17 AUX PWR Terminal Block used for solar applications in motion warning devices pg 19 25 18 ON BOARD 3 BUTTON STATION controls the gate during set up 19 Siren Terminal Block Vikings UL Siren is connected here pg 8 26 20 CONTROL BOARD MOUNTING HOLES secures and ground...

Page 14: ... and adjacent structures to reduce the risk of entrapment when opening and closing 2 Swing gates are not to open into public access areas Varying from the dimensions provided above may severely affect the speed and performance of the gate operator B C 90 A 2 Closed Open B C 120 A 2 Closed Open A B C 2 6 4 4 24 20 6 10 4 4 22 19 10 11 4 4 19 18 12 18 4 4 24 18 For best performance decrease C as you...

Page 15: ...tor will PUSH the gate open 1 The gate must be installed in a location so that enough clearance is provided between the gate and adjacent structures to reduce the risk of entrapment when opening and closing 2 Swing gates are not to open into public access areas Varying from the dimensions provided above may severely affect the speed and performance of the gate operator A 1 B C 90 Closed Open A B C...

Page 16: ...d below c Position the Mounting Chassis and Positive Stop Brackets to the gate post according to pages 12 or 13 d Ensure the chassis is level and secure in place TIP Alternatively the Positive Stop Brackets and Mounting Chassis may be welded STEP 3 Mount the Gate Operator a Remount the operator and connect the articulated arms b Manually Release the operator Refer to page 7 Ensure the gate moves f...

Page 17: ...allation on the following pages 5 Run the operator 2 full cycles without interruption to determine if further limit adjustments are required RED BROWN ORANGE YELLOW CLOSE LIMIT OPEN LIMIT Adjust the Bolt to make firm contact with the Primary Arm Tighten the Bolt Nuts against the Bracket STEP 2 Adjust the Positive Stop 1 Run the gate to the Closed Limit position and adjust the Positive Stop Bolt to ...

Page 18: ...VIKING TECHNICAL SUPPORT 1 800 908 0884 16 THIS PAGE LEFT BLANK INTENTIONALLY ...

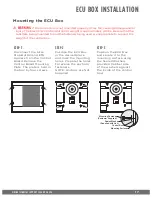
Page 19: ...Supplied STEP 3 Position the ECU Box and secure it to the mounting surface using the Sealed Washers provided rubber side of the washers against the inside of the control box Mounting the ECU Box WARNING If the control box is not mounted properly it may fall causing damage and or injury The Electronic Control Unit ECU weight is approximately 40 lbs Be sure that the substrate being mounted to and th...

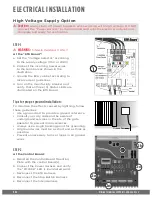
Page 20: ... and verify that all three 3 Status LEDs are illuminated on the EMI Board Tips for proper ground installation To minimize the effects caused by lightning follow these guidelines Use a ground rod to provide a ground reference Consult your city code and be aware of underground services in the site of the gate operator to prevent inconveniences Always use a single bonding point for grounding All grou...

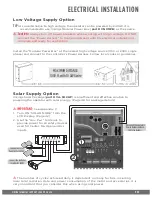
Page 21: ...guidelines Disconnect the operators Power Harness and use the Solar Harness Connect the batteries in series for 24VDC Connect the Solar Panel s for 24VDC Solar Supply Option Vikings Solar Package part VA SOCHP is an efficient and effective solution to powering the operator with solar energy Page 48 for package details The number of cycles achieved daily is dependent on many factors including local...

Page 22: ...imary Motor a Connect motor cable to the Motor Connector at the Primary Control Board as illustrated according to the printed color code b Attach the grounding wire non insulated to the Board Mounting Plate using the screw provided STEP 4 Primary Open Left or Open Right Place the terminal block in the proper location for the gate opening direction OPEN RIGHT Connector if the gate opens Inside to t...

Page 23: ...g the screw provided STEP 5 Secondary to Primary Connections a Ensure that the Secondary Power Harness is connected as illustrated Polarity is important Red to Black to b Ensure that the Primary Secondary Communication Cable is connected as illustrated 5a 5b 6b 6a Secondary Motor BLUE BLACK NOT USED YELLOW BROWN RED ORANGE Primary Motor BLUE BLACK NOT USED YELLOW BROWN RED ORANGE 7 STEP 7 Secondar...

Page 24: ...connected device it triggered Pages 6 7 Check for proper operation When a connected device is triggered the Re Open LED will illuminate and if more than one Monitored device connected the Stop LED will flash rapidly to indicate an input If more than one Monitored device is connected to this terminal the Re Open LED will be illuminated This alone is inconsequential Check for proper operation When a...

Page 25: ...e operator uses positive stop limits Therefore the limits cannot be set electronically by this controller The Limit Buttons on the control board have been rendered inactive by the controller Refer to page 18 for specific instructions on how to set the limits for this gate operator Open Limit LED indicates the gate is at the open limit Close Limit LED indicates the gate is at the close limit Limit ...

Page 26: ...se command to close the gate Speed Motor Speed Increases or decreases the speed of gate travel Overlap Overlap Delay Delays the gate from opening for the selected amount of time from 1 6 seconds For Primary Secondary or dual applications the Primary will delay to open and the Secondary will delay to close ODS Obstruction Detection Sensor Sets the amount of force required to trip the inherent obstr...

Page 27: ...s for an audio or visual warning 3 seconds prior to gate motion and will continue 1 Until gate reaches closed limit Magnetic Lock terminals provide a contact between COM and N O 2 While gate is moving AUX PWR terminals provide 24VDC EXT Available for future developments Last Open Power Failure Option Opens the gate automatically when the battery backup voltage is critically low Auto Open Power Fai...

Page 28: ... entrapment events sensed by the Inherent Entrapment Protection of the Gate Operator The audio alarm will sound for a period of 5 minutes or until a Stop command or the Alarm Reset switch has been actuated refer to page 8 When the Obstruction Sensor detects an obstruction it will 1 Stop the gate s movement and reverse it momentarily 2 Bring the gate to a resting position 3 Disable the Hold Open Ti...

Page 29: ... Limit 1 Use the Diagnose button to scroll through the LCD Display to HEATER CLS 2 Press and hold the Stop button on the control board 3 Press and release the Diagnose button to turn this feature ON and OFF NOTE If the application requires the gate to be held open for any reason set the HEATER ON for both limit positions HEATER OPN ON To set the heater to turn on at the Open Limit 1 Use the Diagno...

Page 30: ...al 28V DC Positive GND DC Negative GND Relay Common C Radio N O If Timer OFF Open Stop Close If Timer ON Open Reopen if closing UL see pages 6 7 22 N O If stopped Prevents the gate from moving If traveling Stops then reverses gate momentarily Re Open see pages 6 7 22 N O If stopped No function If closing Stops then Opens gate ATG Anti Tailgate N O Input is received Stops gate if closing Input is r...

Page 31: ...als 4 Relay The component of an access control or safety device that provides an input or command to the Viking control board 5 C Relay Common Terminal This is the relay terminal that makes contact a short to the N O terminal when the device is activated Always wire this relay terminal to any GND terminal at the control board 6 N O Relay Normally Open Terminal The relay terminal that has an open c...

Page 32: ... ODS Timer Sync Auto Open MS Max Min Normal 6 0 3 100 0 60 Off 4A 15A FAAC XR2 Terminals Wiring Harness Radio Station RED 28V BLACK GND COM GREEN GND N O WHITE Radio STEP 1 Wire the Radio Receiver as illustrated TECHNICAL TIP The supplied Radio Receiver is IP44 rated for water resistance and can mounted outside of the ECU Cabinet STEP 2 Program the FA XT4RC Radio Transmitters to the FA XR2C Radio ...

Page 33: ... Open Master Low Bat Power Radio Rec UL Sens ReOpen Sens Center Loop Open Stop Close Speed Overlap ODS Timer Sync Auto Open Max Min Normal 6 0 3 100 0 60 Off Aux Pwr Magnetic Lock N O N C COM Guard Station GND Close Stop Open Loop Connector GND Center GND ReOpen GND UL GND 28V Radio Station GND GND Radio 28V 28V Class 2 Supply 28V Master Slave Siren Limit Close Limit Open Slave Limit Close Limit O...

Page 34: ...oop Rack that plug in type loop detectors can be connected to This provides a convenient alternative to the box type loop detectors that would need to be wired to the control board Viking does not provide either type of loop detectors Loop Rack Part VA LR Loop Rack Wiring Harness Part VA LRH ACCESSORY CONNECTIONS ...

Page 35: ...tector unit as needed 5 5 5 A A 5 Gate in Open Position Inside Re Open Loop Center Loop Outside Re Open Loop Exit Loop Make Even with Open Gate Dimension A 5 for Single Gate 6 for Dual Gate Twist Wire Outside the Loop 6 Twists Foot Until Its Connection to the Loop Detector 1 8 to 1 4 Saw Slot Provide Additional Saw Cuts to Eliminate Sharp Corners Continuously Wind Wire in Loop Slot for the Require...

Page 36: ... Class 2 external power supply or plug in transformer must be used for the magnetic lock or lock solenoid This will prevent rapid drainage of the battery in the event of power failure The control boards Magnetic Lock relay is rated for 10A 250VAC TECHNICAL TIP The Magnetic Lock Relay LED will indicate status of the on board relay even if a lock is not connected to the control board Refer to page 3...

Page 37: ...elay to open until the Viking gate operator reaches its Open Limit 3 Barrier Arm will close first the Viking gate operator will delay to close until the Barrier Arm reaches its Close Limit STEP 2 Figure A B Connect the Barrier Arms designated sync output terminals to the Strike input at the Viking gate operator STEP 1 Figure A At the Barrier Arm operator connect the device s that will be used as t...

Page 38: ... Normal Condition SOLID Batteries are low Check power supply to the operator pg 18 19 1 2 FLASHING Batteries critically low Check power supply to the operator pg 18 19 1 2 4 POWER SOLID Normal Condition FLASHING Operator is running on batteries only pg 18 19 1 2 OFF No power to control board 1 2 4 5 5 Radio OFF Normal Condition SOLID Control Board is receiving an input from a device connected to t...

Page 39: ...Open Limit Primary OFF Gate is not at the open limit position SOLID Gate is at the open limit position FLASHING Indicates a problem with the limit switches or wires 16 21 22 18 ODS OFF Normal Condition SOLID Obstruction event has been detected on the Primary motor pg 24 26 11 13 1 2 FLASHING Overload event has been detected on the Primary motor pg 24 26 11 13 1 2 19 Timer OFF If gate is at the ope...

Page 40: ...ing GATE IS CLOSING Gate is closing GATE IS OPENED Gate is at the limit open position GATE IS CLOSED Gate is at the limit close position STOP BY OBSTRUCT Primary or Single motor has stopped due to an obstruction of the gate system Also refer to the ODS LED pg 24 26 36 4 37 18 11 12 13 STOP BY OVERLOAD Primary or Single motor has stopped due to an overload of the gate system Also refer to the ODS L...

Page 41: ...tage of speed set by the Speed adjustment on the control board pg 24 OVERLAP _ _ SEC Shows the number of seconds set by the Overlap Adjustment on the control board ODS SENS ___ Shows the force setting selected to trip the obstruction sensor pg 24 26 TIMER __ SEC Shows the amount time set or remaining to hold the gate at the Open Limit position before the gate starts to close pg 24 HEATER CLS OFF T...

Page 42: ... 1 2 3 4 ERR FUSE 15 AMP 15 Amp motor fuse is blown on the Primary or Single Control Board 7 11 12 ERR EMI NO EMI No EMI board detected 15 ERR EMI NO FUSE 4 Amp main fuse is blown on Power Supply Panel Assembly 2 ERR EMI NO AC There is no AC voltage detected from the EMI Board 19 ERR EMI Unknown There is a problem with the communication between the EMI Board and the VFlex Board 15 ERR EMI PROTECT ...

Page 43: ... board is receiving an input from any external devices or if the ODS has been triggered pg 24 26 36 38 10 Remove the external devices from the control board to determine if the control board is responding to an input or problem with the external device or wiring pg 28 35 36 37 11 Check the ODS setting on the control board pg 24 26 12 Check that the gate can be moved manually with low resistance th...

Page 44: ...onnect the operators Power Harness and use the Solar Harness Connect the batteries in series for 24VDC Connect the Solar Panel s for 24VDC 3 6 9 8 Solar Mode will change the following 1 Viking Wireless Konnect Modules are not compatible for Solar Mode 2 Heaters will be disabled Refer to page 27 3 Auto Open feature will be disabled Refer to page 25 4 Last Open feature will be available Refer to pag...

Page 45: ...VIKING TECHNICAL SUPPORT 1 800 908 0884 43 THIS PAGE LEFT BLANK INTENTIONALLY ...

Page 46: ...Description Part No 1 Protective Cover FA 727292 2 Limit Switch Cover LSC390 3 Limit Switch 1 and Cam 1 FA 390682 4 Limit Plate XLP390 5 Mounting Frame FA 722471 6 Motor Gear Assembly FA 104579 7 Manual Release Key FA 713001 8 Positive Stop Assembly X390PSE 9 Articulated Arm Steel FA 7387051 ...

Page 47: ...Comm Cable Dual Controller only VECUMSC 6 Secondary Module Dual Controller only VFLEXSMU18 7 Board Mounting Plate VECUBMP 8 EMI Board DUEMI10 9 EMI Comm Cable VWEMICC 10 Toroid Transformer 10 amp DUTT10 11 Battery DUBB12 12 Battery Switch DUMRS10 13 ECU Cabinet Chassis VNXECUBB 14 Alarm Reset Switch ECURW 15 ECU Key Cylinder Key s ECUKEYC20 16 ECU Access Key s ECUKEY20 17 Fuse Kit DUFSKNX 18 Strai...

Page 48: ...parts thereof which have been repaired or altered without Seller s written consent outside of Sellers s workshop or altered in any way so as in the judgment of Seller to affect adversely the stability or reliability of the product s or has been subject of misuse negligence or accident or has not been operated in accordance with the product s instructions or has been operated under conditions more ...

Page 49: ...mage to property and injury to or death of any persons This limited warranty extends only to wholesale customers who buy directly through the Seller s normal distribution channels The Seller does not warrant its products to end consumers Consumers must inquire from their selling dealer as to the nature and extent of that dealer s warranty if any THE LIMITED WARRANTY OFFERED HEREIN IS THE SOLE AND ...

Page 50: ...tage power supply of your gate operator Connecting the AC Surge Pro in parallel to the EMI Board provides a dual layer of protection from surges up to 20 000 Volts 10 000 Amps Part VA SURGEPROAC VIKING MONITOR Off site access to operator diagnostics and perform firmware updates from just about anywhere with cellular service With the Viking Monitor App this tool allows you to monitor and label mult...

Page 51: ...earning algorithms redundancy design in both hardware and software to ensure operation and functionality protection from lightning short circuit and power surges and our exclusive helical gearing offering the highest efficiency rating in the industry Our entire product line is continually modified and improved based on the latest technology and our customer s valuable feedback The results are prod...

Page 52: ...____________________________ COMPANY INSTALLER ________________________________ CONTACT __________________________________________ SERIAL NUMBER S ____________________________________ A LL I N S TA LL ATI O N M AI NTEN A N C E A N D R EPAI R WO R K M U S T B E D O C U M ENTED A N D M A D E AVAI L A B LE TO TH E U S ER Member of ...

Reviews: