background image

15

ViewSonic


PJ588D/PJ568D/PJ508D

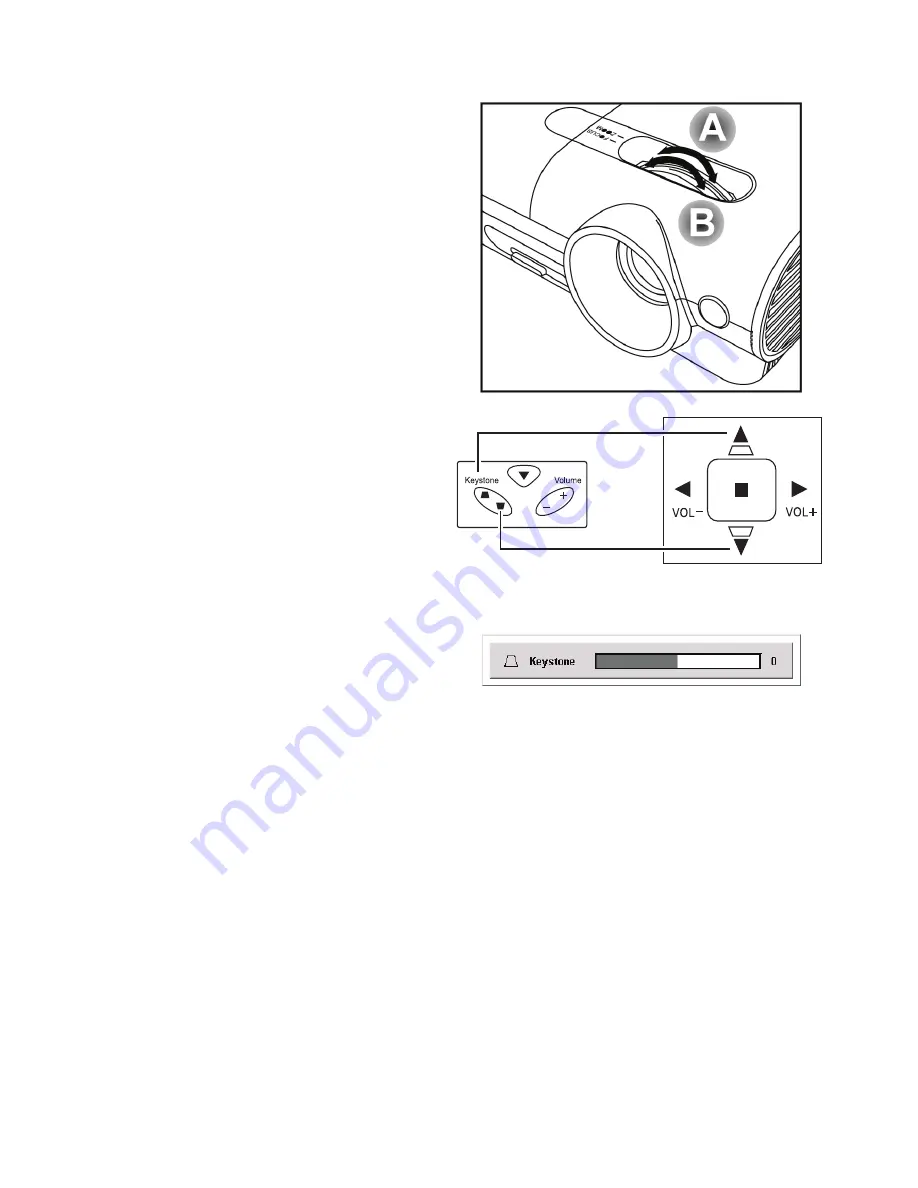
Adjust the Zoom, Focus and Keystone

1.

Use


the


Image

-

zoom


control


[

A

]

 (

on


the


projector


only

to


resize


the


projected


image


and


screen


size

.

2.

Use


the


Image

-

focus


control


[

B

]

 (

on


the


projector


only

to


sharpen


the


pro-

jected


image

.

3.

Use


the


Keystone


buttons

 (

on


the


pro-

jector


or


the


remote


control

to


correct


image

-

trapezoid

 (

wider


top


or


bottom

effect

.


The


keystone


control


appears


on


the


display

.

Summary of Contents for PJ508D

Page 1: ... Projector ViewSonic Model No VS11581 VS11580 VS11579 User Guide Guide de l utilisateur Bedienungsanleitung Guía del usuario Guida dell utente Guia do usuário Användarhandbok Käyttöopas Pyководство пользователя 使用手冊 繁體 使用手冊 简体 ...

Page 2: ...e interference by one or more of the following measures Reorient or relocate the receiving antenna Increase the separation between the equipment and receiver Connect the equipment into an outlet on a circuit different from that to which the receiver is connected Consult the dealer or an experienced radio TV technician for help Warning You are cautioned that changes or modifications not expressly a...

Page 3: ...two blades and a third grounding prong The wide blade and the third prong are provided for your safety If the plug does not fit into your outlet consult an electrician for replacement of the outlet 10 Protect the power cord from being tread upon or pinched particularly at the plug and the point where if emerges from the equipment Be sure that the power outlet is located near the equipment so that ...

Page 4: ... 0 1 Polybrominated biphenyls PBB 0 1 0 1 Polybrominated diphenyl ethers PBDE 0 1 0 1 Certain components of products as stated above are exempted under the Annex of the RoHS Directives as noted below Examples of exempted components are 1 Mercury in compact fluorescent lamps not exceeding 5 mg per lamp and in other lamps not specifically mentioned in the Annex of RoHS Directive 2 Lead in glass of c...

Page 5: ...rformance or use of this product In the interest of continuing product improvement ViewSonic Corporation reserves the right to change product specifications without notice Information in this document may change without notice No part of this document may be copied reproduced or transmitted by any means for any purpose without prior written permission from ViewSonic Corporation Product Registratio...

Page 6: ...NG THE PROJECTOR LEVEL 13 ADJUST THE ZOOM FOCUS AND KEYSTONE 15 ADJUSTING THE VOLUME 16 ON SCREEN DISPLAY MENU SETTINGS 17 ON SCREEN DISPLAY MENU CONTROLS 17 Navigating the OSD 17 OSD Menu Overview 18 SETTING THE OSD LANGUAGE 19 MAIN MENU 20 Main Menu Functions Available for Connected Source 21 SETUP MENU 22 Setup Menu Functions Available for Connected Source 22 Advanced Feature 23 User Color 25 C...

Page 7: ...TROUBLESHOOTING 35 LED ERROR MESSAGES 36 IMAGE PROBLEMS 36 LAMP PROBLEMS 37 REMOTE CONTROL PROBLEMS 37 AUDIO PROBLEMS 38 HAVING THE PROJECTOR SERVICED 38 SPECIFICATIONS 39 SPECIFICATIONS 39 Input output connectors 39 PROJECTION DISTANCE VERSUS PROJECTION SIZE 40 TIMING MODE TABLE 42 DIMENSIONS 43 ...

Page 8: ...IDE CARRYING CASE Contact your dealer immediately if any items are missing appear damaged or if the unit does not work Caution Avoid using the projector in dusty environment Leave the power cable plugged in for 5 10 minutes until the projector cools down to room temperature before placing the projector inside the soft case Placing the projector into the case right after switching off the power cou...

Page 9: ... receiver Receiver for IR signal from remote control 4 5 Lens cap Attach the lens cap to protect lens when not in use 6 Height adjuster Adjuster drop down when adjuster button is pushed 14 7 Screw covers Lift covers to remove lid screws 32 Important Grill openings on the projector allow for good air circulation which keeps the projector lamp cool Do not obstruct any of the grill openings ViewPen s...

Page 10: ...age trapezoid narrower top effect Navigates and changes settings in the OSD 15 4 Enter Select settings in the OSD 17 5 Volume right cursor Increase volume Navigates and change settings in the OSD 16 6 Power Turn the projector on or off 12 7 Auto Open exit the On Screen Display OSD 17 8 Keystone down cursor Correct image trapezoid narrower bottom effect Navigate and change settings in the OSD 15 9 ...

Page 11: ... Power Ready LED LED light displays when unit is powered on 6 Video Connect a composite video cable not sup plied from a video device 11 7 S Video Connect the supplied S video cable from a video device 8 Audio in Connect the audio cable not supplied from the input device 9 USB Connect the USB cable not supplied for a computer 10 Security lock Secure to permanent object with a Kensington Lock syste...

Page 12: ...GE 1 Height adjuster button Push to release adjuster 14 2 Ceiling mount hole Contact your dealer for information on mounting the projector on a ceiling 3 Height adjuster Adjuster drops down when adjuster button is pushed 14 4 Tilt adjuster Rotate adjuster lever to adjust angle position ...

Page 13: ...tructs the path between the remote control and the projector If the path between remote and projector is obstructed you can bounce the remote signal off certain reflective surfaces such as projector screens ITEM LABEL DESCRIPTION SEE PAGE 1 IR transmitter Transmit signals to projector 2 Status LED Light when the remote control is used 3 Laser Press to operate the on screen pointer 4 Up Up arrow wh...

Page 14: ...Zoom out 15 Freeze Freeze unfreeze the on screen picture 16 Blank Make the screen blank 17 Source Detect the input device 18 Auto Auto adjustment for phase tracking size position 19 Menu Open the OSD 17 20 Status Open the OSD Status menu the menu only opens when an input device is detected 31 21 Keystone top bottom Correct image trapezoid wider top bottom effect 15 22 Left cursor Navigate and chan...

Page 15: ... to the sides or the rear of the projector the remote functions within a radius of about 7 meters 23 feet and 30 degrees above or below the projector level If the projector does not respond to the remote control move a little closer towards the projector Projector and Remote Control Buttons The projector can be operated using the remote control or the buttons on the top of the projector All operat...

Page 16: ... ViewSonic PJ588D PJ568D PJ508D Some buttons on the projector have two functions For example item 5 12 on the projector functions both as the volume down button and as the left cursor key in OSD menus ...

Page 17: ...liding the cover in the direction of the arrow 2 Insert the supplied batteries taking note of the polarity as shown here 3 Replace the cover Caution Only use AAA batteries Alkaline battery is better Dispose of used batteries according to local ordinance regulations Remove the batteries when not using the projector for prolonged periods ...

Page 18: ...ional RGB in 1 Connect a VGA cable not supplied from a computer RGB in 2 Connect a VGA cable not supplied from a computer RGB out Connect a VGA cable not supplied to a monitor Video Connect a composite video cable not supplied from a video device S Video Connect the supplied S video cable from a video device Audio in Connect an audio cable not supplied from the computer s audio out connector USB C...

Page 19: ...nd connected devices are detected If the connected device is a PC press the appropriate Fn hot keys on the computer keyboard to switch the display output to the projector Check the PC user manual to deter mine the appropriate Fn hot keys to change display output 5 If more than one input device is connected press the Source button repeatedly to switch among devices 6 To turn off the projector press...

Page 20: ...e the password contact your reseller for information on clearing the password 7 Press the Menu button to open the OSD menu 8 Press the cursor button to move to the Setup menu 9 Press the cursor button to select Advanced Feature and press Enter or 10 Press the cursor button to select Security Lock 11 Press the cursor button to select Enable White text is selected A password dialog box automatically...

Page 21: ...Be sure cables are not in the way or can not cause the projector to be knocked over 1 To raise the level of the projector lift the projector upwards and press the height adjuster button B to allow the height adjuster C to drop 2 To lower the level of the projector press the height adjuster button B and push down on the projector 3 To adjust the angle of the picture turn the tilt adjuster D right o...

Page 22: ...rojector only to resize the projected image and screen size 2 Use the Image focus control B on the projector only to sharpen the pro jected image 3 Use the Keystone buttons on the pro jector or the remote control to correct image trapezoid wider top or bottom effect The keystone control appears on the display ...

Page 23: ...me but tons on the projector or the remote control The volume control appears on the display 2 Use the Volume buttons to adjust the level 3 Press the Mute button on the remote control only to turn off the volume 4 Press Volume or Mute on the remote control to turn off mute ...

Page 24: ... corresponding buttons on the remote control and on the projector A To open the OSD press the Menu but ton B There are six menus Press the cursor button to move through the menus C Press the cursor button to move up and down in a menu D Press to change values for settings E Press Menu to close the OSD or leave a submenu Note Depending on the video source not all items in the OSD are available For ...

Page 25: ... 2 R ght Lamp Hours 3 Center 1 ECO 4 Down 2 Normal 5 Up 3 Boost Menu D splay 10 20 seconds Lamp Hour Reset 1 0 1 on 2 25 2 off 3 50 4 75 User Color Red 0 100 5 100 Green 0 100 Blue 0 100 Color Temperature Warm Cyan 0 100 Normal Magenta 0 100 Cool Yellow 0 100 User Color Wh te 0 100 1 Red 0 100 Reset 2 Green 0 100 3 Blue 0 100 Advanced Feature User Color Wh te Peak ng 0 10 Setup Hor zontal pos t on...

Page 26: ...ion Set the OSD language to your preference before continuing The default language is English 1 Press the Menu button The Main menu appears 2 Press the cursor button until Language is highlighted 3 Press the until your language is displayed Range English Italiano 4 Press the cursor button to confirm the language and Menu close the OSD ...

Page 27: ... Press the cursor button to adjust the display sharpness Range 1 5 3 Color Temperature Press Enter to adjust the color temperature settings Color Saturation Press the cursor button to adjust the video saturation Range 0 100 50 Color Tint Press the cursor button to adjust the video tint hue Range 0 100 50 Gamma Press the cursor button to adjust the gamma correction of the display Input Gamma Bright...

Page 28: ...o open the OSD menu Press to move to the Main menu Press to move to the Color Temperature menu and then press Enter or Press to move up and down to select a color Press to change values for settings ITEM DESCRIPTION DEFAULT Warm Press the cursor button to select the warm color temperature Normal Press the cursor button to select the normal color temperature Cool Press the cursor button to select t...

Page 29: ...he image up or down Range 0 100 50 Keystone Press the cursor button to correct distortion of the projected image Range 50 50 0 Aspect Ratio Press the cursor button to toggle between the 4 3 standard format and the 16 9 High Definition TV HDTV format 4 3 Advanced Feature See Advanced Feature on page 25 Reset Reset Keystone and Aspect Ratio to default values Setup Menu Functions Available for Connec...

Page 30: ... intense Press to select a color Press to adjust the selected color Range 0 100 80 White Peaking White Peaking increases the output in the brightest whites without changing the blacks and dark grays It crushes the whites slightly but it does not appear to clip them or seriously obscure white detail If you prefer a stronger image adjust toward the maximum setting For a smoother more natural image a...

Page 31: ...rder and con firm to set the password When the password is enabled it must be entered every time after you power on the projector See Setting an Ac cess Password Security Lock on page 13 for steps on setting the password Disable Reset Press Enter or to reset advanced feature settings to default values Note If Security Lock is enabled you must enter the password every time the projector is turned o...

Page 32: ...or button to adjust the red color level Range 0 100 10 Green Press the cursor button to adjust the green color level Range 0 100 10 Blue Press the cursor button to adjust the blue color level Range 0 100 10 Cyan Press the cursor button to adjust the cyan color level Range 0 100 10 Magenta Press the cursor button to adjust the magenta color level Range 0 100 10 Yellow Press the cursor button to adj...

Page 33: ...atic source detection Range On Off On Auto Power Off Press the cursor button to enable or disable automatic shut down of lamp after 10 minutes of inactivity Range On Off Off Volume Press the cursor button to adjust the audio volume level Range 0 8 4 Menu Position Press the cursor button to position the OSD on screen Range Left Right Center Down Up Center Menu Display Press the cursor button to det...

Page 34: ... the cursor button to select the video standard Range Auto NTSC PAL SECAM Auto Projection Press the cursor button to choose from four projection methods Desktop front Desktop mount front of the screen Desktop mount rear of the screen Ceiling mount front of the screen Ceiling mount rear of the screen Frequency Press the cursor button to adjust the A D sampling clock Range 0 180 Auto detected Tracki...

Page 35: ... in before you can open the Pan menu Use the cursor buttons to pan the zoomed image Press the Menu button to exit Reset Reset Video Type Video Projection and Digital Zoom to default values Utility Menu Functions Available for Connected Source Function RGB Component Video Composite Video S Video Video Type x x Projection x x x x Frequency x Tracking x Digital Zoom x x x x Reset x x x x x available ...

Page 36: ...e menu Press the cursor button to move up and down in the Language menu Select the value and then press Enter to confirm the new setting ITEM DESCRIPTION DEFAULT Language Press the cursor to select the desired language Language options English French Spanish German Portuguese Chinese Simplified Chinese Traditional Russian Italian English ...

Page 37: ...lay only Active Source Display the active source Software Version Display information about the software version Lamp Hours Show the number of hours lamp has been in use for Eco Normal and Boost modes Lamp Mode Press the cursor button to choose the lamp mode Range Eco Normal Boost Eco mode uses less power and extends lamp life but decreases lamp brightness Normal Lamp Hour Reset After replacing th...

Page 38: ...d touching the glass surface of the new lamp Doing so may shorten its operation life Warning Be sure to turn off and unplug the projector at least an hour before replacing the lamp Failure to do so could result in severe burn It is recommended that you do not attempt to replace the lamp while the projector is installed on a ceiling If you do attempt this wear protective goggles to prevent glass fr...

Page 39: ...e the two screws from the lamp module A and then lift the module handle up B 4 Pull up firmly to remove the lamp module 5 Reverse Steps 1 to 4 to install the new lamp module Note The lamp module should be oriented as shown here when replacing ...

Page 40: ...tor interior while cleaning leave the projector unplugged in a well ventilated room for several hours before using If a lot of water gets into the projector interior when cleaning have the projector serviced Cleaning the Lens You can purchase optic lens cleaner from most camera stores Refer to the following to clean the projector lens 1 Apply a little optic lens cleaner to a clean soft cloth Do no...

Page 41: ...ishes and wipe the case 3 Rinse all detergent from the cloth and wipe the projector again Caution To prevent discoloration or fading of the case do not use abrasive alcohol based cleaners Using the Kensington Lock If you are concerned about security attach the projector to a permanent object with the Kensington slot and a security cable Note Contact your vendor for details on purchasing a suitable...

Page 42: ...ons are securely attached Ensure the attached device is turned on Ensure a connected PC is not in suspend mode Ensure a connected notebook computer is configured for an external display This is usually done by pressing an Fn key combination on the notebook Tips for Troubleshooting In each problem specific section try the steps in the order as suggested This may help you to solve the problem more q...

Page 43: ...rder Problem The image is blurred 1 Adjust the Focus on the projector 2 Press the Auto button on the remote control or projector 3 Ensure the projector to screen distance is within the 8 meter 26 feet specified range 4 Check that the projector lens is clean 5 Make sure the output resolution from the PC is 800 x 600 SVGA model or 1024 x 768 XGA model the native resolution of the projector Problem T...

Page 44: ...laced the lamp recently try resetting the lamp connections 5 Replace the lamp module 6 Put the old lamp back in the projector and have the projector serviced Problem The lamp goes off 1 Power surges can cause the lamp to turn off Press the power button twice to turn off the projector When the Lamp Ready LED is on press the power button 2 Replace the lamp module 3 Put the old lamp back in the proje...

Page 45: ...storted 1 Check the audio cable connection 2 Test the source audio output with other speakers 3 Have the projector serviced Having the Projector Serviced If you are unable to solve the problem you should have the projector serviced Pack the projector in the original carton Include a description of the problem and a checklist of the steps you took when trying to fix the problem The information may ...

Page 46: ...ront Data compatibility IBM PC or compatibles VGA SVGA XGA SXGA UXGA Mac HDTV 720p 1080i SDTV EDTV HDTV 480i 576i 480p 576p 720p 1080i Video compatibility NTSC NTSC 4 43 PAL B G H I M N 60 SECAM H Sync 15 31 70 kHz 15 31 90 kHz V Sync 50 85 Hz Safety certification FCC B UL cUL CB CE CCC PSB NOM EK Mark Korea GOST C Tick UL AR BSMI Ukraine Operation temperature 5 C 35 C Dimensions 30 0 x 24 3 x 9 4...

Page 47: ...3 32 66 66 49 99 72 24 57 79 43 34 3 60m 2 38m 1 90m 1 43m 2 06m 1 65m 1 24m 11 81 93 74 74 99 56 24 81 27 65 01 48 76 4 00m 2 65m 2 12m 1 59m 2 29m 1 83m 1 38m 13 12 104 15 83 32 62 49 90 30 72 24 54 18 4 40m 2 91m 2 33m 1 75m 2 52m 2 02m 1 51m 14 43 114 57 91 66 68 74 99 33 79 46 59 60 4 80m 3 17m 2 54m 1 90m 2 75m 2 20m 1 65m 15 74 124 98 99 99 74 99 108 36 86 69 65 01 5 20m 3 44m 2 75m 2 06m 2...

Page 48: ...9 99 44 99 3 60m 2 50m 2 00m 1 50m 2 14m 1 71m 1 29m 11 81 98 43 78 74 59 06 84 36 67 49 50 62 4 00m 2 78m 2 22m 1 67m 2 38m 1 90m 1 43m 13 12 109 36 87 49 65 62 93 74 74 99 56 24 4 40m 3 06m 2 44m 1 83m 2 62m 2 10m 1 57m 14 43 120 30 96 24 72 18 103 11 82 49 61 87 4 80m 3 33m 2 67m 2 00m 2 86m 2 29m 1 71m 15 74 131 23 104 99 78 74 112 49 89 99 67 49 5 20m 3 61m 2 89m 2 17m 3 10m 2 48m 1 86m 17 06...

Page 49: ...40 x 480 43 269 85 008 Ο Ο 800 x 600 CVT 30 998 50 Ο Ο 800 x 600 35 156 56 25 Ο Ο 800 x 600 37 879 60 317 Ο Ο 800 x 600 48 077 72 188 Ο Ο 800 x 600 46 875 75 Ο Ο 800 x 600 53 674 85 061 Ο Ο 1024 x 768 39 634 50 Ο Ο 1024 x 768 48 4 60 0 Ο Ο 1024 x 768 56 5 70 1 Ο Ο 1024 x 768 60 0 75 0 Ο Ο 1024 x 768 68 7 85 0 Ο Ο 1280 x 1024 64 60 0 Ο Ο Apple Macintosh 13 16 19 640 x 480 35 0 66 7 Ο Ο 832 x 624 49...

Page 50: ...43 ViewSonic PJ588D PJ568D PJ508D Dimensions ...

Page 51: ... com United Kingdom www viewsoniceurope com uk www viewsoniceurope com uk Support Calldesk htm Europe Middle East Baltic countries North Africa www viewsoniceurope com Contact your reseller Australia New Zealand www viewsonic com au AUS 1800 880 818 NZ 0800 008 822 service au viewsonic com Singapore Malaysia Thailand www ap viewsonic com T 65 6461 6044 service sg viewsonic com South Africa Other c...

Page 52: ...ory lamps purchased separately are warranted for 90 days Who the warranty protects This warranty is valid only for the first consumer purchaser What the warranty does not cover 1 Any product on which the serial number has been defaced modified or removed 2 Damage deterioration or malfunction resulting from a Accident misuse neglect fire water lightning or other acts of nature unauthorized product ...

Page 53: ...d based upon inconvenience loss of use of the product loss of time loss of profits loss of business opportunity loss of goodwill interference with business relationships or other commercil loss even if advised of the possibility of such damages 2 Any other damages whether incidental consequential or otherwise 3 Any claim against the customer by other party Effect of state law This warranty gives y...

Page 54: ......

Reviews: