background image

ViewSonic

                                                                                                         N4785p

16

ENGLISH

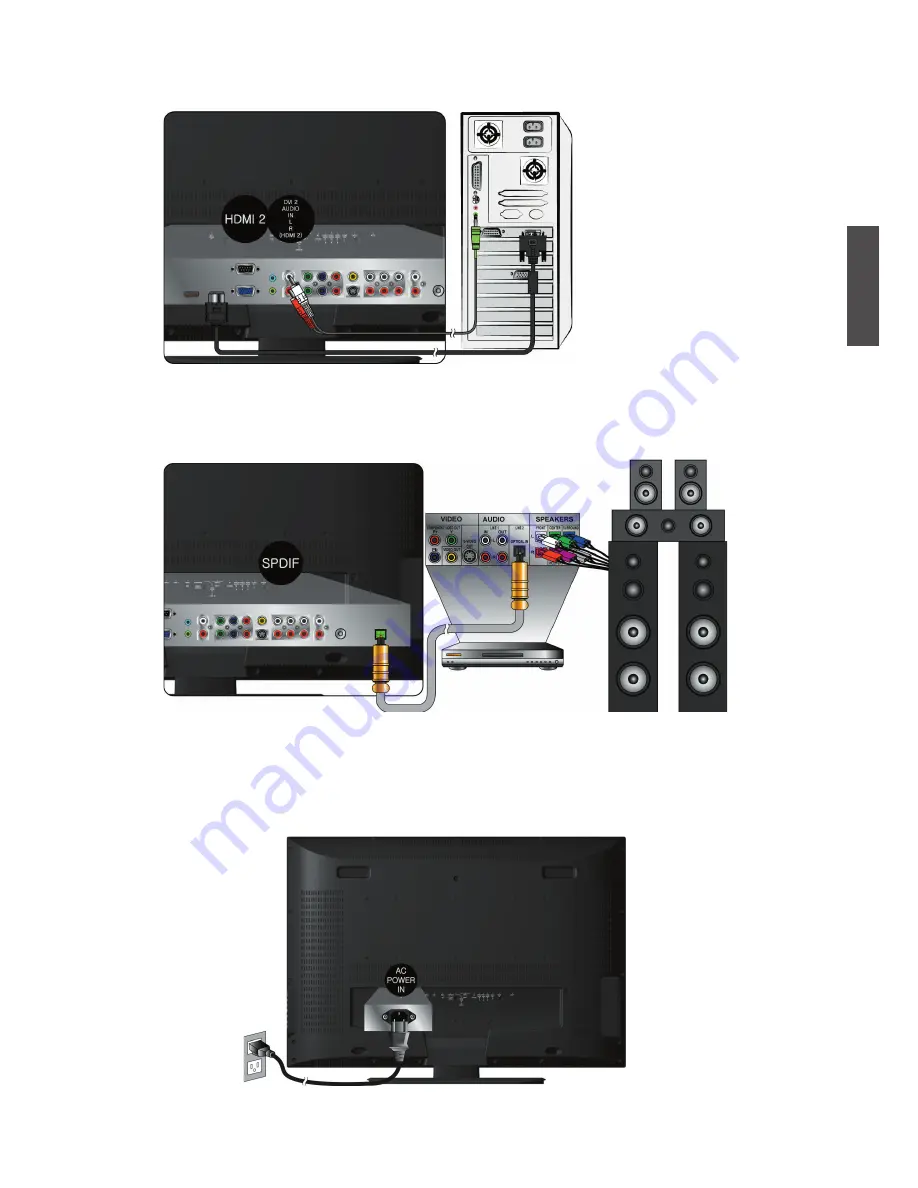
8. Connecting with the power cord 

     Connect the power cord to the AC inlet on the back of your LCD TV, after all 

     connections have been completed, and plug the other end of the power cord into 

     a correctly grounded electrical outlet.

AC wall socket

SPDIF Optical Cable 

(not supplied)

A/V Device

Stereo System

Audio Cable 

(not supplied)

7. Connecting to A/V Device with SPDIF input 

     Connect SPDIF optical cable from A/V device into the SPDIF output connector of   

     LCD TV.

HDMI-DVI Cable (not supplied)

PC

Audio Cable 

(not supplied) 

Summary of Contents for N4785p - 47" LCD TV

Page 1: ...anner as well as registering your product for future service Warranty information contained in this User Guide will describe your limited coverage from ViewSonic Corporation which is also found on our...

Page 2: ...5 Getting Started Package Contents 6 Mounting ViewSonic LCD TV to the wall 6 Front View of the Product 7 Rear and Side View of the Product 8 Remote Control 9 Installation 11 Basic Operation 17 OSD Fu...

Page 3: ...articular installation If this equipment does cause harmful interference to radio or television reception which can be determined by turning the equipment off and on the user is encouraged to try to c...

Page 4: ...1 Polybrominated biphenyls PBB 0 1 0 1 Polybrominated diphenyl ethers PBDE 0 1 0 1 Certain components of products as stated above are exempted under the Annex of the RoHS Directives as noted below Exa...

Page 5: ...nd the third prong are provided for your safety If the plug does not t into your outlet consult an electrician for replacement of the outlet 10 Protect the power cord from being tread upon or pinched...

Page 6: ...oduced or transmitted by any means for any purpose without prior written permission from ViewSonic Corporation Product Registration To meet your future needs and to receive any additional product info...

Page 7: ...cated in the vicinity of overhead power lines or other electric light or power circuits or where it can fall into such power lines or circuits When installing an outside antenna system extreme care sh...

Page 8: ...at might hinder moving the LCD TV Set the LCD TV on a table or work surface placing the screen face down on a towel or woolen blanket to protect the screen surface from damage while installing plate I...

Page 9: ...R To highlight a control in OSD menu CH Up Channel up when source is at TV or select a control while in OSD menu CH Down Channel down when source is at TV or select a control while in OSD menu Menu Tu...

Page 10: ...ht Connect this port to the RCA audio output connectors of your A V device YPbPr 2 signal input Connect this port to the YPbPr output of A V device YPbPr 1 signal input Connect this port to the YPbPr...

Page 11: ...ViewSonic N4785p 9 ENGLISH Remote Control...

Page 12: ...program guide EPG 11 FAV A D To skip or restore Favorite Channels 12 UP DOWN LEFT RIGHT ENTER button UP DOWN for OSD function select and LEFT RIGHT for function adjust ENTER Enter the function setting...

Page 13: ...ble in the Auto Scan function See page 23 Note Users can select either Air or Cable TV cable to be connected to the TV DTV IN jack To watch both of them use an adapter to connect both Air and Cable ca...

Page 14: ...o Audio cables from compatible devices into the back panel of LCD TV 1 With AV cable RCA A V Cable not supplied VCR or DVD Player 2 With S Video cable VCR or DVD Player S Video Cable not supplied Audi...

Page 15: ...r DVD Player 4 With HDMI 1 HDMI 2 or HDMI 3 cable HDMI Cable not supplied VCR or DVD Player DVD Player should have the HDMI output terminal HDMI DVI Cable not supplied DVD Player should have the HDMI...

Page 16: ...VD Player 4 Connecting to External Stereo System to Listen to LCD TV Sound Connect the audio output terminal of the LCD TV to audio in terminal of the stereo system stereo system sold separately Stere...

Page 17: ...dio Connection not supplied HDMI DVI Cable not supplied PC Audio Connection not supplied PC 1 With VGA cable Connect the VGA cable from VGA output of computer to the VGA terminal input of your LCD TV...

Page 18: ...and plug the other end of the power cord into a correctly grounded electrical outlet AC wall socket SPDIF Optical Cable not supplied A V Device Stereo System Audio Cable not supplied 7 Connecting to A...

Page 19: ...The power LED indicator lights blue when the LCD TV is on Selecting input source To select the required input source Press the INPUT button on the remote control Use to select the required input sour...

Page 20: ...el in DTV Ex Your desired number is 80 3 Press 8 press 0 press press 3 Whether in ATV or DTV after you input the channel numbers press ENTER button to direct to the channel immediately or wait for 3 s...

Page 21: ...ptions to adjust various settings by using the remote control The basic operation is as following Press MENU to display OSD Menu Press to select your desired top Menu and press ENTER or to enter the n...

Page 22: ...between User Cinema Sport Vivid and Hi Bright Noise Reduction To reduce the noise level of connected equipment Press to select from Medium Strong Off or Low Brightness To adjust luminance of video rig...

Page 23: ...can be adjusted separately Auto Adjust Press ENTER to auto adjust picture s horizontal position vertical position ne tune and H Size VGA Press ENTER to adjust VGA setting H Position To adjust the hori...

Page 24: ...rt Living Room Hall Bathroom Cave Arena Church or Off Equalizer To select equalizer modes from Rock POP Live Dance Techno Classic Soft or Off SPDIF Type To select SPDIF Type from Dolby Digital PCM or...

Page 25: ...le TV channels Press MENU again at any time to interrupt scanning MTS To select audio mode from Mono Stereo or SAP when available Audio Language To select audio language from English Spanish or French...

Page 26: ...l Time Setup To set Time Zone Time Sleep Timer and Auto Sleep Time Zone To select the time zone appropriate to your location Time To set the current time Auto Synchronization When Auto Synchronization...

Page 27: ...adcaster or Custom When Custom is selected use to select the desired controls to adjust detailed settings Font Size To select a font size from Large Small or Medium Font Color To select a font color f...

Page 28: ...wever when in AV S Video YPbPr 1 YPbPr 2 HDMI 1 HDMI 2 HDMI 3 or VGA source the TV option on the left does not appear Enter password and the screen below will show The default password is 0000 Channel...

Page 29: ...n the US You can select between G PG PG 13 R NC 17 or X The TV Ratings in the US are de ned as following Use ENTER button to block or unblock the ratings and use MENU to exit TV Y All children TV PG P...

Page 30: ...atings and use MENU to exit Block Unrated To block unrated movie or TV programs The movie Ratings in the US are de ned as following Use ENTER button to block or unblock the ratings and use MENU to exi...

Page 31: ...to unblock Change Password To change the password press ENTER and the following screen appears Enter the new password from the remote control and then enter the new password again to con rm Note Plea...

Page 32: ...THD 10 Audio Output 1 stereo RCA jack 1 SPDIF optical 1 Headphone jack Power Voltage 100 240 VAC 50 60 Hz auto switch Display area Full Scan 1039 68mm H x 584 82mm V 40 9 H x 23 02 V Operating conditi...

Page 33: ...connected The picture may appear dim in a brightly lit room Adjust brightness contrast saturation color and tint referring to the user guide Check the input signal setting No sound Check your audio c...

Page 34: ...f the unit has increased Remove any objects blocking the vent or clean as necessary No CATV reception or no reception above CH13 Is the AIR CABLE option set correctly Please set the AIR CABLE option t...

Page 35: ...untry Region Web Site Telephone United States www viewsonic com support 800 688 6688 Canada www viewsonic com support 866 463 4775 Renta y Datos 29 SUR 721 COL LA PAZ 72160 PUEBLA PUE Tel 01 222 891 5...

Page 36: ...e 1 For information about receiving service under warranty contact ViewSonic Customer Support You will need to provide your product s serial number 2 To obtain warranted service you will be required t...

Page 37: ...ntact ViewSonic Customer Support Please refer to the attached Customer Support page You will need to provide your product s serial number so please record the product information in the space provided...

Page 38: ...huahua Chih Tel 4136954 E Mail Cefeo soluglobales com Cuernavaca Compusupport de Cuernavaca SA de CV Francisco Leyva 178 Col Miguel Hidalgo C P 62040 Cuernavaca Morelos Tel 01 777 3180579 01 777 31240...

Page 39: ...ViewSonic...

Reviews: