background image

24

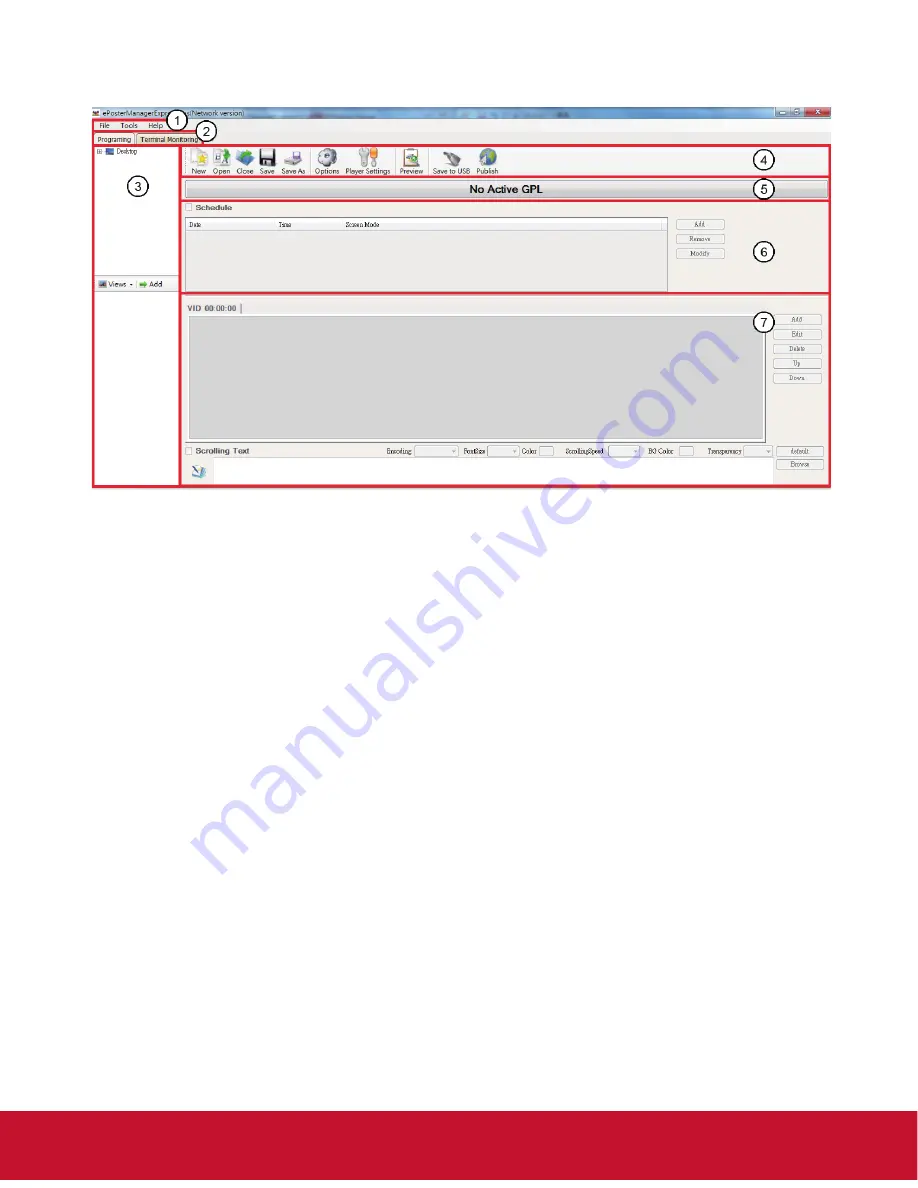
Programing Mode Interface

1. Menu Bar: Provide access to all the features of this software.
2. To displsy Programing or Terminal Monitoring mode.

3. Media Library: Help user to locate media files on your computer and give 

previews in the bottom box. Supported formats include:

• 

 Video: *.mpg, *.mpeg, *.avi, *.mp4, *.divx, *.vob, *.mkv, *flv, *.mov, *.rm, 
*.rmvb, *.ts, *.tp

• 

Image: jpg, bmp, png, gif, jpeg

• 

Audio: mp3, wma, ogg, aac, wav

• 

Text: txt

4. Tool Bar: Provide access to the main functions.

• 

New - create a new program.

• 

Open - open a program file already exists. 

• 

Close - close all the current works and clear the work space.

• 

Save/Save As - save your current work with the name as *.gpl.

• 

 Options – allow user to setup a playback duration and transition style for all 
the images.

• 

Player Settings – allow the user to change the settings on their screens.

• 

Preview - preview the current file.

• 

Save to USB - save the content and schedule a USB disk.

• 

Publish - send the content and schedule to selected ePoster directly.

Summary of Contents for EP2203r

Page 1: ...nner as well as registering your product for future service Warranty information contained in this User Guide will describe your limited coverage from ViewSonic Corporation which is also found on our web site at http www viewsonic com in English or in specific languages using the Regional selection box in the upper right corner of our website Antes de operar su equipo lea cu idadosamente las instr...

Page 2: ...s equipment in a residential area is likely to cause harmful interference in which case the user will be required to correct the interference at his own expense Reorient or relocate the receiving antenna Increase the separation between the equipment and receiver Connect the equipment into an outlet on a circuit different from that to which the receiver is connected Consult the dealer or an experie...

Page 3: ... the third prong are provided for your safety If the plug does not fit into your outlet consult an electrician for replacement of the outlet 9 Protect the power cord from being tread upon or pinched particularly at the plug and he point where if emerges from the equipment Be sure that the power outlet is located near the equipment so that it is easily accessible 10 Only use attachments accessories...

Page 4: ...er the Annex III of the RoHS2 Directives as noted below Examples of exempted components are 1 Mercury in cold cathode fluorescent lamps and external electrode fluorescent lamps CCFL and EEFL for special purposes not exceeding per lamp 1 Short length 500 mm maximum 3 5 mg per lamp 2 Medium length 500 mm and 1 500 mm maximum 5 mg per lamp 3 Long length 1 500 mm maximum 13 mg per lamp 2 Lead in glass...

Page 5: ...your future needs and to receive any additional product information as it becomes available please register your product on the Internet at www viewsonic com The ViewSonic Wizard CD ROM also provides an opportunity for you to print the registration form which you may mail or fax to ViewSonic For Your Records Product Name Model Number Document Number Serial Number Purchase Date EP2203r EP3203r EP32...

Page 6: ...etwork Settings 9 3 4 Date Time 13 3 5 On Off Timer 14 3 6 Screen Mode 17 3 7 File Management 18 3 8 Exit 18 4 Other Setting 19 4 1 Source Setting 19 4 2 Image Setting 19 5 ePoster Manager Express Plus Introduction 20 5 1 Installation 20 5 2 Playlist Creation 25 5 3 Player Settings 31 5 4 Save to USB 32 5 5 Terminal Creation 34 6 Content Update 36 6 1 Update content directly 36 6 2 Update content ...

Page 7: ...equirement 1 2 Product function Built in 4GB flash memory can store thousands of high definition pictures Plenty of different transition modes are available Support scrolling text function Set the timer On Off function by daily and weekly Set different schedule and playback it accordingly Horizontal and vertical modes are available Support multi zone screen function different templates are availab...

Page 8: ... files from internal flash memory or USB stick directly 1 4 Supported media files format Image File extension jpg jpeg gif bmp png Codec Standard RGB Max image resolution Baseline JPG 4096 x 4096 GIF 1920 x 1080 BMP 1920 x 1080 PNG 1920 x 1080 Max file name length 128 letters Video File extension mpg avi mkv flv mov mp4 rm rmvb ts tp Codec Bitrate MPEG 1 MPEG 4 H 264 AVC VC 1 RM bitrate 20Mbps bit...

Page 9: ...tup button only works in Internal Storage channel Power on or off Change video input Digital signage setup Play Confirm selection Stop the selected file Navigation button Previous Program Next Program Mute Raise Volume Lower Volume Image Setting Exit the image setting To HDMI source To VGA source To internal storage source ...

Page 10: ...4 3 Main Menu Operation Instructions Currently the digital poster has 8 menu functions System Settings Palyback Control Network Settings Date Time On Off Timer Screen Mode File Management and Exit ...

Page 11: ... Down buttons to select System Settings and press Play button to display System Settings options There are 7 options available in all OSD Lnaguage Clock Display Scrolling Text USB Port Sync Settings Restore to Factory Settings and Return to Main Menu OSD Language Simplified Chinese English ...

Page 12: ...Bottom Right Off Scrolling Text Off or On USB Port On or Off Sync Settings Off Host Slave Note When Host or Slave had selected Previous Program and Next Program functions will disable Restore to Factory Settings Restore the menu settings to default ...

Page 13: ...s will enable Note When Work Mode has changed please select Save and Reboot first Storage Priority This is used to set the Multimedia Digital Poster to read media files from Internal Storage or USB Disk There are two options as pictured below Internal Storage The Multimedia Digital Poster reads media files from internal storage only USB Disk The Multimedia Digital Poster reads media files from USB...

Page 14: ...st without encryption by using the ePoster Manager Express Plus software the Multimedia Digital Poster will read the media files directly Note Under the Free Playback Mode the Multimedia Digital Poster will playback the media files according to the file name For example it will playback like this 001 avi 002 jpg 003 mov or a avi b jpg c mov Do Not use special characters in the file name and blank ...

Page 15: ...Type according to the current network environment through the remote control Press Setup button to enter menu setup home page Press Up Down buttons to select Network Settings and press Play button to display Network Settings options There are totally 6 options available Server Settings Machine ID MAC Address Get IP Type Save and Reboot and Return to Main Menu ...

Page 16: ... button to confirm If you need to modify the Server ID you can press PLAY button to display the numeric soft keyboard Use the naviga tion buttons on the remote control to select numbers on the soft keyboard The range is 0000 9999 Select Save to exit the settings ...

Page 17: ...11 Machine ID Machine ID is the serial number SN of the terminal and can only be viewed MAC Address This information can only be viewed ...

Page 18: ...P Type DHCP and Static IP available The former can obtain an IP address automatically the latter can be specified through the soft keyboard Save and Reboot Select the Save and Reboot menu to save your settings ...

Page 19: ...t buttons to select Year Month Day Hour or Minute When one option is selected press Up and Down buttons to specify the values After changes are made press Left and Right buttons to select Update Date Time then press Play button to save ...

Page 20: ...14 3 5 On Off Timer Two settings available Weekly Daily ...

Page 21: ...00 on 22 00 off 1 Select Weekly in the On Off Timer menu press PLAY PAUSE to confirm 2 Select Control Mode to Timer then three Timer items are valid 3 Set Status of Timer 1 to ON then adjust On Time to 09 00 and Off Time to 22 00 4 Select Save New Settings to finish the setting Note When using multiple schedules only 1 schedule can have an ON value greater than the OFF value Over night ...

Page 22: ...On after connecting the power cable the product will keep power on C Always Off after connecting the power cable or turn on the unit by remote control the product will power off automatically one minute later D Disable turn on and off normally Note When using multiple schedules only 1 schedule can have an ON value greater than the OFF value Over night ...

Page 23: ...17 3 6 Screen Mode Set the screen to horizontal or vertical display for landscape or portrait use ...

Page 24: ...18 3 7 File Management Here user can check the storage and Format the disk Format Disk will erase all data 3 8 Exit Exit the main menu ...

Page 25: ... HDMI Display the content from external HDMI signal port VGA Display the content from external VGA signal port Internal storage Display the content from internal storage 4 2 Image Setting Press to set Brightness Contrast Saturation Color Temp and Reset Press to exit the image setting or waiting 5 sec to exit automatically ...

Page 26: ... Transfer that content by using a USB stick and plug it into the LCD display to run the content no additional hardware is needed 5 1 Installation Double click on the installer ePosterManagerExpressPlus exe and follow the on screen instructions Note If your computer has never install Microsoft Net Framework FinalCodecs and Vcredist_X86 files the procedure will ask you to install these files first I...

Page 27: ...21 Install FinalCodecs ...

Page 28: ...22 Install Visual C ...

Page 29: ...23 Install ePoster Manager Express Plus ...

Page 30: ... wma ogg aac wav Text txt 4 Tool Bar Provide access to the main functions New create a new program Open open a program file already exists Close close all the current works and clear the work space Save Save As save your current work with the name as gpl Options allow user to setup a playback duration and transition style for all the images Player Settings allow the user to change the settings on ...

Page 31: ...een layout 7 Playlist Section Allow user to add media files to the playback zones 5 2 Playlist Creation New Screen First choose the screen mode Click File New in the menu bar or click the button New on the tool bar to get below dialog box Select the appropriate screen mode this must be the same as the screen mode in the main menu otherwise it will affect the display performance ...

Page 32: ...tra new schedule Remove delete the selected schedule Modify edit the selected schedule To add a new schedule click Add to get Schedule Editor as below Selecting the checkboxes Date and Time allows the user to setup the playback duration It also allows user to change the screen mode ...

Page 33: ...ng text at bottom Below is the suggested size of the media files TIPS 2 One period time allows one schedule only otherwise conflict alert will be given If you don t set the Date and Time the content will display continually The playlist with specific playback date and time will be played prior to those with no pre definition Take the following schedule for example The second playlist will be playe...

Page 34: ...dit content for the zone VID video zone PIC image zone BOT bottom zone Add Add a media file to the current zone Edit Allow user to edit a media file in the playlist Delete Remove a media file from the playlist Up Down Allow user to adjust the playback sequence of listed items For example in VID tab clicking Add to get PlayList Item Editor ...

Page 35: ...ly be available when an image is selected as the media file Duration Set the period that the image will be played User can define the playback duration for each image by entering a figure in the time box or dragging the time bar The supported maximum duration is 2 hours Transition Style The transition effect is used to introduce the next image User can define the transition style for each image Fi...

Page 36: ...NOTE Only text file is supported To edit a scrolling text just enter the text in the edit box To delete a scrolling text just uncheck Scrolling Text User can set the Encoding Font size Color Scrolling speed back ground color and Transparency of the scrolling text The scrolling text will be displayed at the bottom of the screen in full screen mode or in BOT zone in split screen mode Now the user ca...

Page 37: ...ings can be imported to the player via the feature Save to USB TIPS To import these settings to players the user needs to enable this feature by clicking Player Settings box in the Save to USB window Click Player Settings to get the window pictured below The above menu is the same as the Main Menu set by remote control ...

Page 38: ...n Password Setting to change the password if necessary Please note that the password should be the same as the player password otherwise the playlist cannot be imported into the LCD display TIPS The password can also be setup via Tools Password Setting and the player password via Tools Player Password Update The default password is 12345678 Player Settings This step is not necessary Select the che...

Page 39: ...stop reboot power off power on or volume order to the selected terminal 2 Terminal Block Help user to locate group or terminal 3 Terminal Information To display terminal status First times to catch the status it ll spend 3min Online Offline Unknow Play the content Stop Power off Connect to internet Download the content 4 Change the display mode ...

Page 40: ...34 5 5 Terminal Creation Server ID setting Click Tools NetWork Settings The number must the same as ePoster Server ID Add Group and Terminal To select Terminal Monitoring mode to add Group first ...

Page 41: ...35 To add Terminal please make sure SN must the same as Machine ID Name and Description can be any word you want to fill in Group item needs to be selected then select OK ...

Page 42: ...files will be imported into the internal storage and will playback the media files after they are uploaded 6 2 Update content via ePoster Manager Express Plus After making a playlist and saving it to the USB successfully by ePoster Manager Express Plus plug the USB into the USB port of the LCD display If the Storage Priority in Playback Control Menu is set to USB Disk then the LCD display will pla...

Page 43: ... Image Finally Save the image as a web file Menu File Save for Web with the following options Change the dropdown menu from GIF default to JPEG Set the quality to High or Very High Note the higher the quality the larger the file will be Optimized is checked Convert to sRGB is checked Change Metadata to None Save the file name without spaces and no special characters such as Rotate the image 90 deg...

Page 44: ...a Columbia www viewsonic com la T 01800 9 157235 soporte viewsonic com Latin America Mexico www viewsonic com la T 001 8882328722 soporte viewsonic com Renta y Datos 29 SUR 721 COL LA PAZ 72160 PUEBLA PUE Tel 01 222 891 55 77 CON 10 LINEAS Electroser Av Reforma No 403Gx39 y 41 97000 Mérida Yucatán Tel 01 999 925 19 16 Other places please refer to http www viewsonic com la soporte index htm Mexico ...

Page 45: ...ied with the product b Any damage of the product due to shipment c Removal or installation of the product d Causes external to the product such as electrical power fluctuations or failure e Use of supplies or parts not meeting ViewSonic s specifications f Normal wear and tear g Any other cause which does not relate to a product defect 3 Any product exhibiting a condition commonly known as image bu...

Page 46: ...er by any other party 4 Repair or attempted repair by anyone not authorized by ViewSonic Effect of state law This warranty gives you specific legal rights and you may also have other rights which vary from state to state Some states do not allow limitations on implied warranties and or do not allow the exclusion of incidental or consequential damages so the above limitations and exclusions may not...

Page 47: ......

Reviews: