ViewSonic DPG801 Quick Start Manual Download Page 10

DPG801BK

Quick Start Guide

3

Engli

s

h

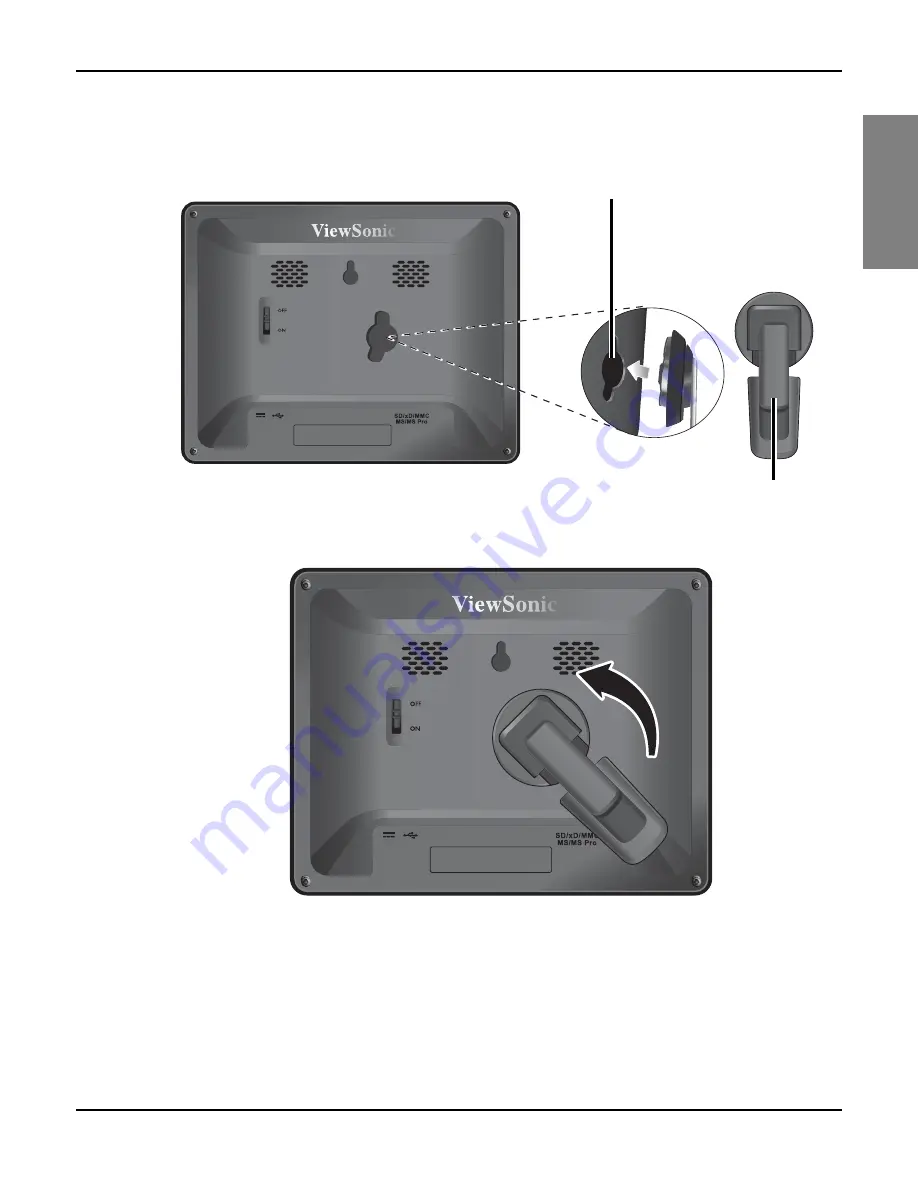
Step 2: Install the adjustable foot stand.

1. On the back of the unit, attach the foot stand to the lock slot.

2. To place the photo frame vertically, rotate the foot stand counter-

clockwise until it is secured to the photo frame.

Lock slot

Adjustable foot stand

FS083V_en.book  Page 3  Thursday, June 19, 2008  3:19 PM

Summary of Contents for DPG801

Page 1: ......

Page 2: ...to radio communications However there is no guarantee that interference will not occur in a particular installation If this equipment does cause harmful interference to radio or television reception...

Page 3: ...use the return and collection systems according to local law Important Safety Instructions 1 Read these instructions 2 Keep these instructions 3 Heed all warnings 4 Follow all instructions 5 Do not u...

Page 4: ...nly use attachments accessories specified by the manufacturer 12 Use only with the cart stand tripod bracket or table specified by the manufacturer or sold with the unit When a cart is used use cautio...

Page 5: ...s are 1 Mercury in compact fluorescent lamps not exceeding 5 mg per lamp and in other lamps not specifically mentioned in the Annex of RoHS Directive 2 Lead in glass of cathode ray tubes electronic co...

Page 6: ...ponents 1 System Requirements 1 Controls on the front 2 Controls on the back 2 Step 2 Install the adjustable foot stand 3 Step 3 Connect the AC power 4 Step 4 Optional Insert a memory card 5 Step 5 Tu...

Page 7: ...DPG801BK vi Quick Start Guide English Memo...

Page 8: ...erate the unit Step 1 Check the components Carefully open the packing box and ensure that you have the following items 1 Digital photo frame DPG801BK 2 Adjustable foot stand 3 USB cable 4 Quick Start...

Page 9: ...ish Controls on the front Controls on the back Control panel Hanging slot Speaker Lock slot Power switch USB jack for connecting to a computer so the computer can edit files in the unit Power jack 5 i...

Page 10: ...stall the adjustable foot stand 1 On the back of the unit attach the foot stand to the lock slot 2 To place the photo frame vertically rotate the foot stand counter clockwise until it is secured to th...

Page 11: ...e photo frame horizontally rotate the foot stand clockwise until it is secured to the photo frame Step 3 Connect the AC power 1 Plug one end of the AC power adapter into the power jack on the back of...

Page 12: ...ard On the back of the unit you can insert a memory card containing the content you want to show on the unit Note Secure Digital Card SD xD Picture Card xD MultiMedia Card MMC Memory Stick MS and Memo...

Page 13: ...power switch to the ON position to power on the unit Step 6 Operate the unit After the unit is turned on available functions represented by name or icon show on the screen Their corresponding buttons...

Page 14: ...the unit is placed vertically the name or icon indicating the function you want to use To toggle among Photo Calendar Music and Video modes press under Mode If the control panel is unused for a certai...

Page 15: ...mode Note Standard JPEG and BMP image file formats are supported LCD screen Current mode Current file number Total number of files Mode selection Thumbnail view Menu Zoom out Zoom in Slideshow Next f...

Page 16: ...g the Music mode Note MP3 and WMA audio file formats are supported Play or Pause Next track Previous track Volume down Volume up Mode selection Track name elapsed time and volume level Current mode Li...

Page 17: ...fer to the table below for limitations AVI MOV MPEG MPG WMV Motion JPEG DSC O O X X X MPEG1 VCD X X X X X MPEG2 DVD X X X X X MPEG4 DV High Compress X X X X X H 264 DV X X X X X H 263 MOBILE X X X X X...

Page 18: ......

Reviews: