background image

39

10.  RS232 Protocol

10.1.  Introduction

This document describes the hardware interface spec and software protocols of RS232 interface 

communication between ViewSonic Commercial TV / Digital Signage and PC or other control unit with 

RS232 protocol.

The protocol contains three sections command:

• 

Set-Function 

• 

Get-Function

• 

Remote control pass-through mode

* In the document below, “PC” represents all the control units that can send or receive the RS232 protocol 

command.

10.2.  Description

10.2.1. Hardware specification

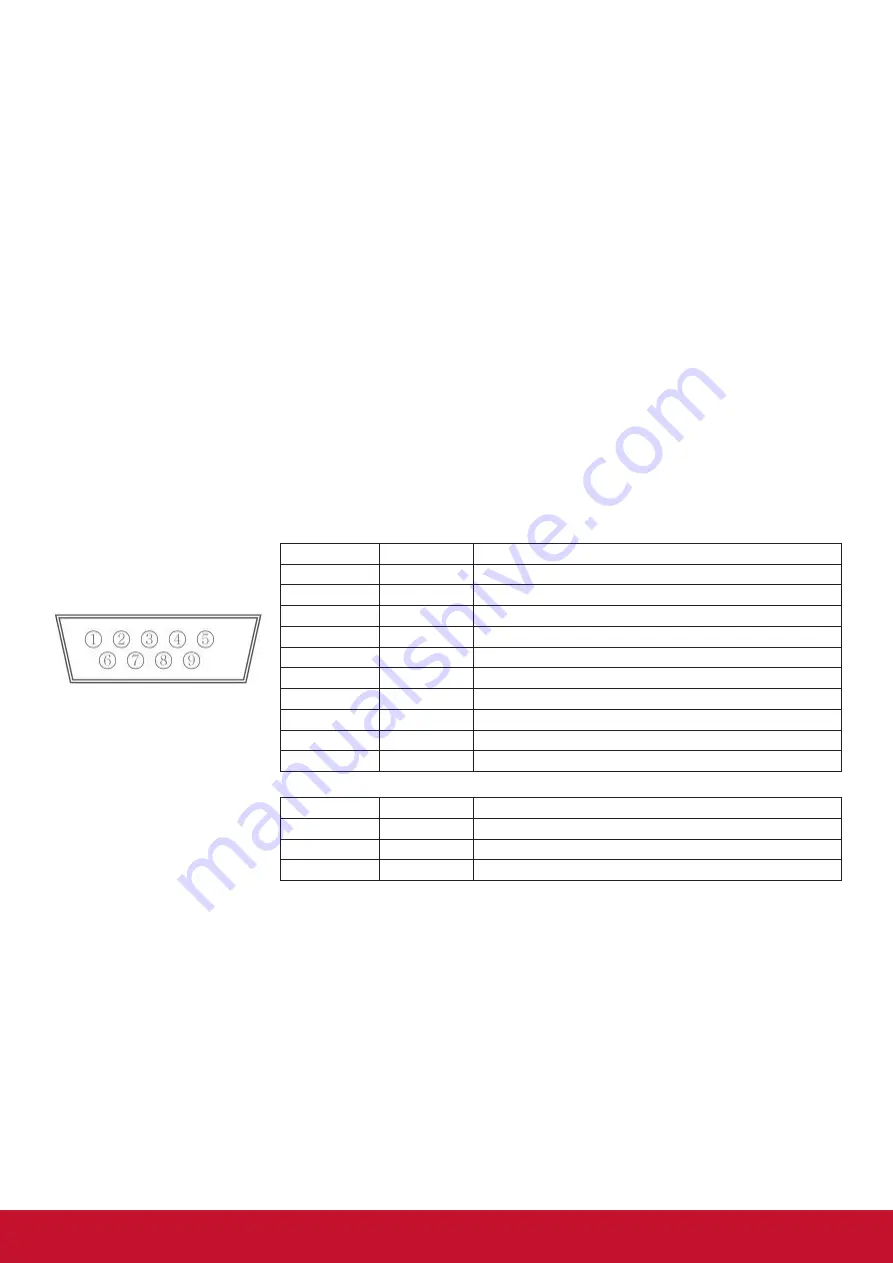
Viewsonic TV communication port on the rear side:
(1) Connector type: DSUB 9-Pin Male 
(2) Pin Assignment

Male DSUB 9-Pin
(outside view)

Pin  # 

Signal

Remark

1

NC 

2

RXD

Input to Commercial TV or DS

3

TXD

Output from Commercial TV or DS

4

NC

5

GND

6

NC 

7

NC

8

NC

9

NC

frame

GND

* Use of crossover (null modem) cable required for use with PC

[Special case]3.5mm barrel 

connector 

Pin  # 

Signal

Remark

Tip

TXD

Output from Commercial TV or DS

Ring

RXD

Input to Commercial TV or DS

Sleeve

GND

10.2.2. Communication Setting

- Baud Rate Select:   9600bps (fixed)
- Data bits:  

8 bits (fixed)

- Parity:  

None (fixed) 

- Stop Bits:  

1 (fixed)

10.2.3. Command Message Reference

PC sends to Monitor command packet followed by “CR”. Every time PC sends control command to the 

Monitor, the Monitor shall respond as follows:
1.  If the message is received correctly it will send “+” (02Bh) followed by “CR” (00Dh)
2.  If the message is received incorrectly it will send “-” (02Dh) followed by “CR” (00Dh)

Summary of Contents for CDM5500T

Page 1: ...ing your product for future service Warranty information contained in this User Guide will describe your limited coverage from ViewSonic Corporation which is also found on our web site at http www vie...

Page 2: ...ding the world s expectations for technological evolution innovation and simplicity At ViewSonic we believe that our products have the potential to make a positive impact in the world and we are confi...

Page 3: ...radio or television reception which can be determined by turning the equipment off and on the user is encouraged to try to correct the interference by one of the following measures Reorient or reloca...

Page 4: ...the Annex III of the RoHS2 Directives as noted below Examples of exempted components are 1 Mercury in cold cathode fluorescent lamps and external electrode fluorescent lamps CCFL and EEFL for special...

Page 5: ...laws or rules of your municipality to dispose of the tube properly Do not bend power cord Do not use monitor in high temperature humid dusty or oily areas If monitor or glass is broken do not come in...

Page 6: ...nk often Position the monitor at a 90 angle to windows and other light sources to minimize glare and reflections Clean the LCD monitor surface with a lint free nonabrasive cloth Avoid using any cleani...

Page 7: ...ion Notes 1 1 4 Installing and Removing Table Stands optional 2 1 5 Mounting on a Wall 3 1 6 Mounting in Portrait Position 4 2 Parts and Functions 5 2 1 Control Panel 5 2 2 Input Output Terminals 6 2...

Page 8: ...ice No part of this document may be copied reproduced or transmitted by any means for any purpose without prior written permission from ViewSonic Corporation Product Registration To meet your future n...

Page 9: ...daisy chain cable CD ROM DVI to VGA cable USB cable Type A B Quick Start Guide NOTES For all other regions apply a power cord that conforms to the AC voltage of the power socket and has been approved...

Page 10: ...he tube to the display by using M6xL41 screws Please refer to the following drawing to know the position of screws Step 3 Set up the stand by using thumb M6xL41 screws Thumbscrews Table stand Longer p...

Page 11: ...r Product warranty does not cover damage caused by improper installation 4 For the wall mounting kit use mounting screws and tighten them securely Model VESA Size mm Mounting Screws X Thickness of wal...

Page 12: ...4 1 6 Mounting in Portrait Position This display can be installed in portrait position 1 Remove the table stand if attached 2 Rotate 90 degrees clockwise 90 90...

Page 13: ...audio output level while OSD menu is off 6 button Press to move the highlight bar up while OSd menu is on 7 button Press to move the highlight bar down while OSD menu is on 8 MENU button Press to acce...

Page 14: ...page 13 for IR Pass Through connection 7 RJ 45 LAN control function for the use of remote control signal from control center 8 RS232C IN 9 RS232C OUT 2 5 mm RS232C network output input for the loop t...

Page 15: ...digit number 0 9 to select the display you want to control For example press 0 and 1 for display No 1 press 1 and 1 for display No 11 The numbers available are from 01 255 2 Not pressing any button w...

Page 16: ...sed battery acid as it can damage your skin NOTE If you do not intend to use the remote control for a long period remove the batteries 2 3 3 Handling the remote control Do not subject to strong shock...

Page 17: ...ternal Equipment 3 1 Connecting External Equipment DVD VCR VCD 3 1 1 Using HDMI video input DVD VCR VCD HDMI OUT HDMI IN 3 2 Connecting a PC 3 2 1 Using VGA input PC VGA OUT D Sub 15 pin DVI IN VGA AU...

Page 18: ...10 3 2 2 Using DVI input PC DVI OUT DVI IN VGA AUDIO IN AUDIO OUT 3 2 3 Using HDMI input HDMI OUT HDMI IN PC...

Page 19: ...11 3 2 4 Using DisplayPort input DisplayPort OUT DisplayPort IN PC 3 3 Connecting Audio Equipment 3 3 1 Connecting an external audio device AUDIO IN AUDIO OUT STEREO AMPLIFIER...

Page 20: ...he RS232C OUT connector of DISPLAY 1 to the RS232C IN connector of DISPLAY 2 PC RS 232C DISPLAY 1 RS 232C IN RS 232C OUT RS 232C IN DISPLAY 2 3 4 2 Digital video connection Connect the DVI OUT connect...

Page 21: ...R IN External IR Receiver IR OUT IR IN IR OUT DISPLAY 2 NOTE This display s remote control sensor will stop working if the IR IN is connected 3 6 IR Pass through Connection DVD VCR VCD DVD VCR VCD DIS...

Page 22: ...mat FULL Enlarge the picture to fill the screen NORMAL 4 3 format DYNAMIC 16 9 format REAL This mode displays the image pixel by pixel on screen without scaling the original image size 21 9 21 9 forma...

Page 23: ...ates and press to next step 4 Press Edit schedule button to add schedule 5 Press Add schedule button to set playlist schedule 6 And then you can export to player or USB Export to Player Display Select...

Page 24: ...will show a dialog Enter URL and press OK then data will save on List 2 Press Option then left side will pop up a list Import Import url list file Export Export url list file Delete all Delete all url...

Page 25: ...will show web page of item s url 4 5 PDF Reader You can play PDF file on your display from internal USB or SD card This page has three items Play Compose and Settings Play select playlist to play Com...

Page 26: ...edia file Info key show media info Ok key select unselect file In the slidebar it helps you to do the following select all select all storage files delete all delete all playlist files add remove upda...

Page 27: ...sable to control Wi Fi On Off After Enable the screen will list all available WiFi AP Note Ethernet will be disable automatically if WiFi turn on and connect to network 4 7 2 Ethernet Enable To turn E...

Page 28: ...l FTP On Off After setup PD can share FTP files 3 Source Settings Browser Open Browser setting page PDF Reader Open Play List and effect setting page in PDF Player Custom app Let user select custom ap...

Page 29: ...s shown below You can use it as a reference for further adjusting your display Navigating the OSD menu using the remote control 1 Press the MENU button to display the OSD menu 2 Press or button to sel...

Page 30: ...e gain Picture Mode PC mode Standard Highbright sRGB Video mode Standard Highbright Cinema Overscan Change the display area of the image ON Set to display area about 95 OFF Set to display area about 1...

Page 31: ...osition of the image left or right The adjustable step by Zoom and H zoom setting V position Moves the vertical position of the image up or down The adjustable step by Zoom and V zoom setting Auto Adj...

Page 32: ...X O O X O X X PDF Player X X X O O X X O X Custom X X X O O X X X O O PIP function available X PIP function unavailable 5 1 5 Config1 menu Switch on state Panel saving RS232 routing Boot on source WO...

Page 33: ...ctory preset values Android settings will also reset when factory reset 5 1 6 Config2 menu OSD turn off OSD H position OSD V position OSD transparency Information OSD Logo Monitor ID Heat status Monit...

Page 34: ...are Main PIP Rotation Set the rotation of Main Sub OSD Language Select the language used in the OSD menu The options are English Deutsch Fran ais Italiano Espa ol Pycc Polski T rk e QR Code Display QR...

Page 35: ...l Lock all but Volume Lock all but Power Lock all except PWR VOL Lock the remote control function of this display NOTE To unlock IR control press and hold the Info button on the remote control for mor...

Page 36: ...ion H monitors Select the number of displays on the horizontal side V monitors Select the number of displays on the vertical side Position Select the position of this display in the screen matrix Fram...

Page 37: ...on and Frame comp Switch on delay Set the power on delaying time in seconds The default option Auto allows a sequential powering on for each display by their ID number when multiple displays are conne...

Page 38: ...ing time submenu 5 Press or button to select item press or button to adjust NOTE Cannot set time to date after year 2037 Schedule This function allows you to program up to 7 seven different scheduled...

Page 39: ...o select which day in a week this schedule item will be take effect and then press the OK button 5 Playlist selection Press or to select the playlist to be played when display power on Playlist option...

Page 40: ...D Orange Can be wake up Mode 4 DC off Back light off LED Red Power Save Will not enter power save mode show no signal only NOTE When Auto FW update is not OFF display will work under Mode3 for FW upda...

Page 41: ...d Image Size SQCIF 128x96 QCIF 176x144 CIF 352x288 4CIF 704x576 Maximum Frame Rate 30fps Maximum Bit Rate 38 4Mbps Audio Codec MP3 1 Not support H 263 AVI MKV MP4 MOV 3GP TS FLV H 264 Supported Image...

Page 42: ...Ratio Stand for Mode H Pixels V Lines 720p 1280 720 50 Hz 74 25 MHz 16 9 Normally DVB Mode 60 Hz 1080i 1920 1080 25 Hz 74 25 MHz 16 9 Normally ATSC Mode 30 Hz 1080p 1920 1080 50 Hz 148 5 MHz 16 9 Norm...

Page 43: ...cloth If the surface becomes dirty soak a soft lint free cloth in a mild detergent solution Wring the cloth to remove excess liquid Wipe the surface of the display to remove dirt Then use a dry cloth...

Page 44: ...is not correctly set Use the Zoom mode or Custom zoom function in the Screen menu to fine tune display geometry and time frequency parameter Can hear sound but no picture Improperly connected source s...

Page 45: ...8 pin 10 100 LAN Port HDMI Input HDMI Jack 2 Type A 19 pin Digital RGB TMDS Video Audio MAX Video 720p 1080p 1920 1080 60 Hz WUXGA Audio 48 KHz 2 Channel L R Supports LPCM only DVI I DVI VGA in out D...

Page 46: ...000 m Storage 0 5 000 m Touch specification Touch Panel Item Specifications Touch Method and Object size Finger or Stylus 6pts or 10pts Number of Touch 10 Touch Accuracy 5mm with 8mm stylus Min Commun...

Page 47: ...DSUB 9 Pin outside view Pin Signal Remark 1 NC 2 RXD Input to Commercial TV or DS 3 TXD Output from Commercial TV or DS 4 NC 5 GND 6 NC 7 NC 8 NC 9 NC frame GND Use of crossover null modem cable requi...

Page 48: ...e 1 3 Three bytes ASCII that defines the value CR 0x0D Set Function format Send Command Type s Name Length ID Command Type Command Value1 Value2 Value3 CR Byte Count 1 Byte 2 Byte 1 Byte 1 Byte 1 Byte...

Page 49: ...PbPr 004 HDMI 014 HDMI2 024 HDMI3 005 DVI 006 VGA1 PC 016 VGA2 007 OPS 008 Internal Mem 009 DP 1 No need for USB 2 For the case of two more same sources the 2nd digital is used to indicate the extensi...

Page 50: ...itor and all RCU command codes are transmitted to PC via the RS232 port Date 8 s V 56 0xx Year 1xx Month Day See example in Note For specific models only Tiling Mode 8 s P 50 000 OFF 001 ON for DS Til...

Page 51: ...Value3 CR Byte Count 1 Byte 2 Byte 1 Byte 1 Byte 1 Byte 1 Byte 1 Byte 1 Byte Bytes order 1 2 3 4 5 6 7 8 9 NOTE Power STBY status is the exception for VT2405LED 1 and VT3205LED Reply Command Type r or...

Page 52: ...x37 0x0D Example2 Get Brightness from TV 05 but the Brightness command ID is error and it is NOT in the command table Send Hex Format Name Length ID Command Type Command Value1 Value2 Value3 CR Hex 0x...

Page 53: ...Lock 8 g o 6F 000 Unlock 001 Lock Get Button Lock 8 g p 70 000 Unlock 001 Lock Get Menu Lock 8 g q 71 000 Unlock 001 Lock Get Tiling Mode 8 g v 76 000 OFF 001 ON for DS Get Tiling Compensation 8 g w...

Page 54: ...r example Volume will not change the volume in the LCD but only sends Volume code to PC over the RS232 port IR Pass Through Function format Reply Command Type p Name Length ID Command Type RCU Code1 M...

Page 55: ...ASPECT ZOOM SIZE 0F VOLUME UP 10 VOLUME DOWN 11 MUTE 12 CHANNEL PAGE UP BRIGHTNESS 13 CHANNEL PAGE DOWN BRIGHTNESS 14 POWER 15 SOURCES INPUTS 16 17 18 SLEEP 19 MENU 1A UP 1B DOWN 1C LEFT 1D RIGHT 1E...

Page 56: ...code TV DS will turn itself on then forward the POWER code to the host via RS232 2 2 When TV DS is ON and receives the IR POWER code TV DS will forward the POWER code to the host via RS232 then turn o...

Page 57: ...com Latin America Columbia www viewsonic com la C http www viewsonic com la soporte servicio tecnico soporte viewsonic com Latin America Mexico www viewsonic com la C http www viewsonic com la soporte...

Page 58: ...uct d Causes external to the product such as electrical power fluctuations or failure e Use of supplies or parts not meeting ViewSonic s specifications f Normal wear and tear g Any other cause which d...

Page 59: ...er by any other party 4 Repair or attempted repair by anyone not authorized by ViewSonic Effect of state law This warranty gives you specific legal rights and you may also have other rights which vary...

Page 60: ...s serial number so please record the product information in the space provided below on your purchase for your future use Please retain your receipt of proof of purchase to support your warranty claim...

Page 61: ...globales com Cuernavaca Compusupport de Cuernavaca SA de CV Francisco Leyva 178 Col Miguel Hidalgo C P 62040 Cuernavaca Morelos Tel 01 777 3180579 01 777 3124014 E Mail aquevedo compusupportcva com Di...

Page 62: ......

Reviews: