

1
2
3
4
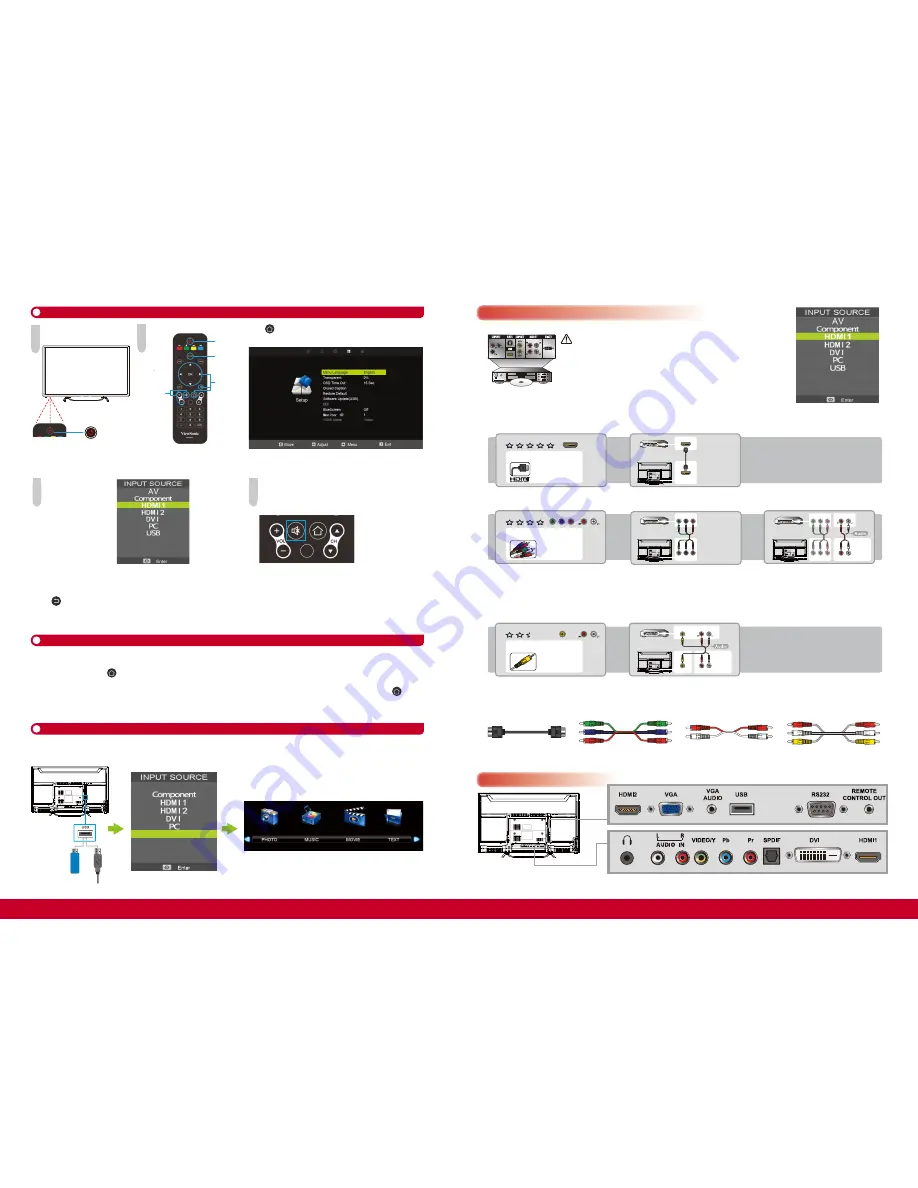
Back Panel Connections
Video Quality
AV
AUDIO OUT
COMPOSITE
• Please contact ViewSonic Service team directly if you have any questions on the SD connection.
Step 2:
Connect video/audio signal with appropriate connector cable.
Step 1: Identify the connector on your player.
Video Quality
Y Pb Pr
Component Video Input
Y
Pb Pr
AUDIO OUT
• If your connecting equipment has only DVI output instead of the HDMI output, you must use DVI-to-HDMI cable for the video and also connect the audio cable
for sound.
Required Cable types for Connection
Basic Connection for your SD Devices, such as VCD/ DVD player
Basic Connection for your SD Devices, such as VCD/ DVD player
HD Connection for your HD Devices, such as HD/Blu-ray DVD player
HD Connection for your HD Devices, such as HD/Blu-ray DVD player
Connect to your Home Entertainment Devices
HDMI
Component
Audio (L/R)
Composite
COMPOSITE
AUDIO OUT
VIDEO
HDMI
HDMI
Step 2:
Connect video/audio signal with appropriate connector cable.
Step 1:
Identify the connector on your player.
Step 2:
Connect video/audio signal with appropriate connector cable.
Step 1:
Identify the connector on your player.
Caution:
• To protect equipment, always turn off the display before connecting any external
equipment.
• Please read the relevant operation manual (Blu-ray disc player, etc.)
carefully before making connections.
Video Quality
HDMI
HD Multimedia Interface
HDMI
AUDIO OUT
AUDIO IN
R
L
Y
Pb Pr
Y
Pb Pr
Y
Pb Pr
Y
Pb Pr
AUDIO IN
R
L
Initial Setup
Insert the batteries into the
remote control.
Step 1:
Power on the display
• Plug the power cord
• Press
POWER
to turn on the display
Step 2:
Language setting
Watching Your LCD display
• Press
to exit the OSD menu after you have completed the setting.
• For other detail setting, please refer the User Manual.
• If you watch LCD display with STB or Satellite box, please switch to appropriate input source, and refer the user manual from your service provider for the correct
display setting.
• If you have questions on the setting for your ViewSonic LCD display, please contact ViewSonic Service Team.
5
4
1. Plug the USB device into the USB jack.
2. Press
INPUT
to select
USB
.
3. Select
Music
,
Photo
,
Movie
or
Text
.
4. Choose the file to playback.
• For more details on USB operations, please refer to the User Manual.
Using USB Flash Drive
• Press to enter OSD
• Press ◄/►, then OK to select
Setup
menu
• Enter
Language
and choose the desired one
Adjust Display Mode
Your ViewSonic LCD display supports several aspect ratios.
For best viewing, select the appropriate
Zoom Mode
to suit the viewing display. The
16:9
aspect ratio looks perfect on your ViewSonic LCD display.
For different aspect ratio, press
on your remote control and select
Picture
>
Zoom Mode
to change.
Customize Picture Mode
ViewSonic LCD display includes several preset view options optimized for different viewing conditions. Press
P.MODE
on your remote control, or press
on your
remote control and select
PICTURE > Picture Mode
. Choose the appropriate mode to suit your content.
Programming your Cable or Satellite Box remote
Refer to the user manual from your service provider to determine the setting.
3
4
Step 3:
Select video source
•
Press
INPUT
to display the
Source Select menu.
Press ▲/▼ to select the correct
input source and press
OK
to
confirm the selection.
Step 4:
Adjust the volume.
1. Change the volume
Using
+ VOL -
on the remote control or display.
2. Mute the current sound output
• Press
MUTE
to turn off the sound. To restore the sound, press this
button again, or press the
VOL +/-
button.
AV
USB
POWER
or
3
Power
on/off
Input
selection
OSD
adjustment
Volume
control


