ViewEra V151 Series User Manual Download Page 12

12 


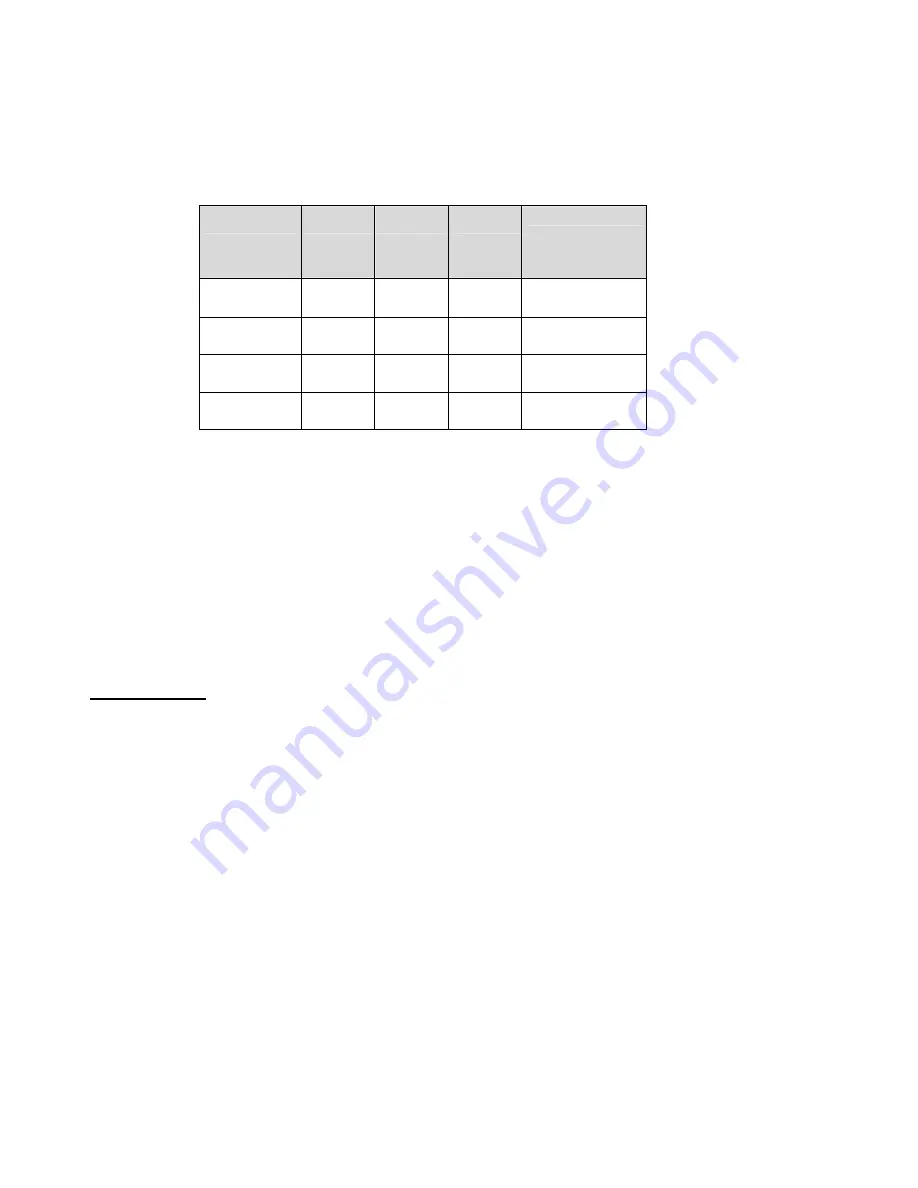
6. Power Saving Features 

When the power saving is active, the power indicator LED will be from Green 

Light  to  Amber.  The  power  saving  feature  complies  with  these  VESA  power 

saving modes: 

Mode 

H. Sync.  V. Sync. 

LED 

Power 

Consumption 

Normal 

On 

On 

Green 

25

Stand-by 

Off 

On 

Amber 

< 3W 

Suspend 

On 

Off 

Amber 

< 3W 

Off 

Off 

Off 

Amber 

< 3W 


The  monitor  uses  the  H.  Sync  and  V.  Sync  signals  to  determine  the  operation 

mode to enter. 

The monitor power-saving feature automatically turns off H. Sync and V. Sync if 

there is no input from the system for a certain period of time. To use this feature, 

you need a green PC that is compliant with the VESA power saving feature or a 

software utility to detect system input such as keyboard or mouse


Time Settings 

Time  settings  are  adjusted  from  the  system  unit  by  software.  To  fulfill  the 

requirements  in  the  NUTEK  specification  803299/94  the  total  time  from 

indicated  inactivity  to  Power  Saving  position  A2  (VESA  OFF)  must  not  be 

set  more than 70 minutes.  We recommend  you  switch  off  the monitor  when 

you do not intend to use it for a while. 

Summary of Contents for V151 Series

Page 1: ...1 15 TFT LCD MONITOR V151 Series USER S MANUAL www viewera com Rev 1 0 ...

Page 2: ...Page 4 2 Control Functions Page 6 Function Selection Page 7 Function Adjustments Page 8 3 Installation Page 9 4 Display Modes Page 10 5 Signal Connector Pin Outs Page 11 6 Power Saving Features Page 12 7 Product Specifications Page 13 8 Dead Pixel Policy Page 14 9 Warranty and Customer Service Page 14 10 Windows Setup Page 15 11 Trouble Shooting Page 16 ...

Page 3: ...e Its maximum resolution of XGA 1024 x 768 is ideal for displaying complex graphics and high definition images Its other outstanding capabilities include audio system and OSD On Screen Display controls Package Contents Included with your LCD monitor as following items 15 TFT LCD monitor 15 pin D sub VGA signal cable Audio cable AC power cord AC DC Adaptor User s manual DVI signal cable optional Pr...

Page 4: ... into the LCD monitor through cabinet slots They may cause accident fire electric shock or failure Disconnect the power plug from the AC outlet if you will not use it for an extended period of time Do not attempt to service this product yourself as opening or removing covers may expose you to dangerous voltage points or other risks Do not touch the screen directly with your fingers You may damage ...

Page 5: ...ets the respective European country s safety regulations such as VDE for Germany Do not over load wall outlets or power cords Ensure that the total of all units plugged into the wall outlet does not exceed 10 amperes Ensure that the total ampere ratings on all units plugged into the extension cord is not above the cord s rating If the power supply cord which came with your monitor is to be connect...

Page 6: ... monitor When you press the knob the speakers are mute Press the knob one more time the speakers are active When you press the knob the speaker volume OSD is shown You can increase or decrease the volume by pressing the and knobs 3 You can hold the 2 knob for more than 3 second to adjust the image quality automatically The OSD menu will close automatically after 3 10 seconds without operation and ...

Page 7: ...of the image Black Level Adjust the black Level of the image Exit Close the Video OSD menu 3 Audio Volume Adjust the speaker volume Balance Adjust the speaker volume to right side or left side Exit Exit the Audio OSD menu 4 Color Color Temperature User Adjust the R G B gain level 6500K Select color temperature of 6500 K 9300K Select color temperature of 9300 K Exit Close the Color Temperature OSD ...

Page 8: ...he Image OSD menu Note Image function is only available for VGA image signal 6 Language Set the language of the OSD windows 7 Tools OSD Control OSD Timer Setting the OSD menu display time OSD H Position Adjust the horizontal position of the OSD menu OSD V Position Adjust the vertical position of the OSD menu Exit Close the OSD Control OSD menu Recall Recall the factory default setting Sharpness Ad...

Page 9: ...Turn the monitor down 2 Assembly the base to the arm with screw 3 Tighten the screw with a coin Installing the Monitor This monitor is equipped with an auto sensing DC power adapter for voltage ranges of 100 240VAC 60 50Hz Follow these steps to install the monitor 1 Before you connect the cables made sure that the monitor and the system unit power switches are off 2 Plug one end of the 15 pin sign...

Page 10: ...This memory capacity is divided into two parts the user setting area and the factory presetting area User Setting Area The user settings by the user on the last display mode maintain in the memory of the micro controller You can change the settings or add a nonstandard mode The micro controller always detects and displays the last mode stored in the user setting area when the monitor is turned on ...

Page 11: ... 7 VESA 60 1024 768 48 4 60 Non interlaced 8 VESA 70 1024 768 56 5 70 Non interlaced 9 VESA 75 1024 768 60 0 75 Non interlaced 5 Signal Connector Pin outs To connect VGA 8514A or IBM compatible graphics adapters use a 15 pin mini D type male connector 15 pin Mini D type Male Connector Pin Assignment 1 Red Video 6 Red Ground 11 Ground 2 Green Video 7 Green Ground 12 Serial Data I O 3 Blue Video 8 B...

Page 12: ... saving feature automatically turns off H Sync and V Sync if there is no input from the system for a certain period of time To use this feature you need a green PC that is compliant with the VESA power saving feature or a software utility to detect system input such as keyboard or mouse Time Settings Time settings are adjusted from the system unit by software To fulfill the requirements in the NUT...

Page 13: ...Digital DVI connector optional Display Area 12 W x 9 H inch 304 8 W x 228 6 H mm Power Supply Input voltage Output rating 100 240V 60 50Hz 12V DC 3 0A Power Consumption 25 watts max 3 watts standby Audio 3 watts x 2 built in speakers Frequency Horizontal 30 60 KHz Vertical 50 75 Hz Dimensions set size 13 8 H x 13 5 W x 5 5 D inch 350 H x 345 W x 140 D mm Safety EMI UL CUL FCC B CB CE TUV GS Weight...

Page 14: ...arranted for three years for parts and one year for LCD panel from the date of purchase ViewEra warrants its products to be free from defects in material and workmanship during the warranty period For detail warranty information please refer to our website http www viewera com warranty htm Customer Service Contact your ViewEra retailer or ViewEra for after sale service You may contact ViewEra Cust...

Page 15: ...5 10 Windows setup For the best view please set the monitor type in Windows Please select as following Control Panel Display Settings Advanced List All Modes For 1024 768 please set to XGA 1024 768 75 Hz ...

Page 16: ...on 3 The text and icon look blurry LCD monitor has a native resolution which pixels are produced by cells in fixed positions When a resolution different from the native resolution is chosen the LCD monitor uses various interpolation methods to achieve the pseudo resolution To achieve the optimum viewing quality choose the native resolution of the panel is recommended Use Auto Tuning function to ad...

Page 17: ...e it may be imprinted in the screen and leave a residue image It is characteristic of liquid crystal and is not malfunction or deterioration of the liquid crystal The residue image will disappear after a period of time It is recommended to set up the screen saver for your LCD monitor ...

Reviews: