Niagara
®
GoStream
®
SURF
Quick Start Guide
Congratulations on the purchase of your new Niagara GoStream SURF.
The following steps in this
Quick Start Guide
will help you set up and
configure your Niagara GoStream SURF so you can begin streaming or
capturing video as quickly as possible. You can perform most of the
basic operations from the touch panel on the Niagara GoStream SURF.
The Niagara GoStream SURF web interface allows quick and easy ac
-
cess to its operational features. You must modify any advanced setup
options of the Niagara GoStream SURF encoders through this interface
before running an encoder session. Please refer to the
User Guide
on
the included CD for more detailed instructions.
Complete the following steps to begin operating the Niagara GoStream
SURF:
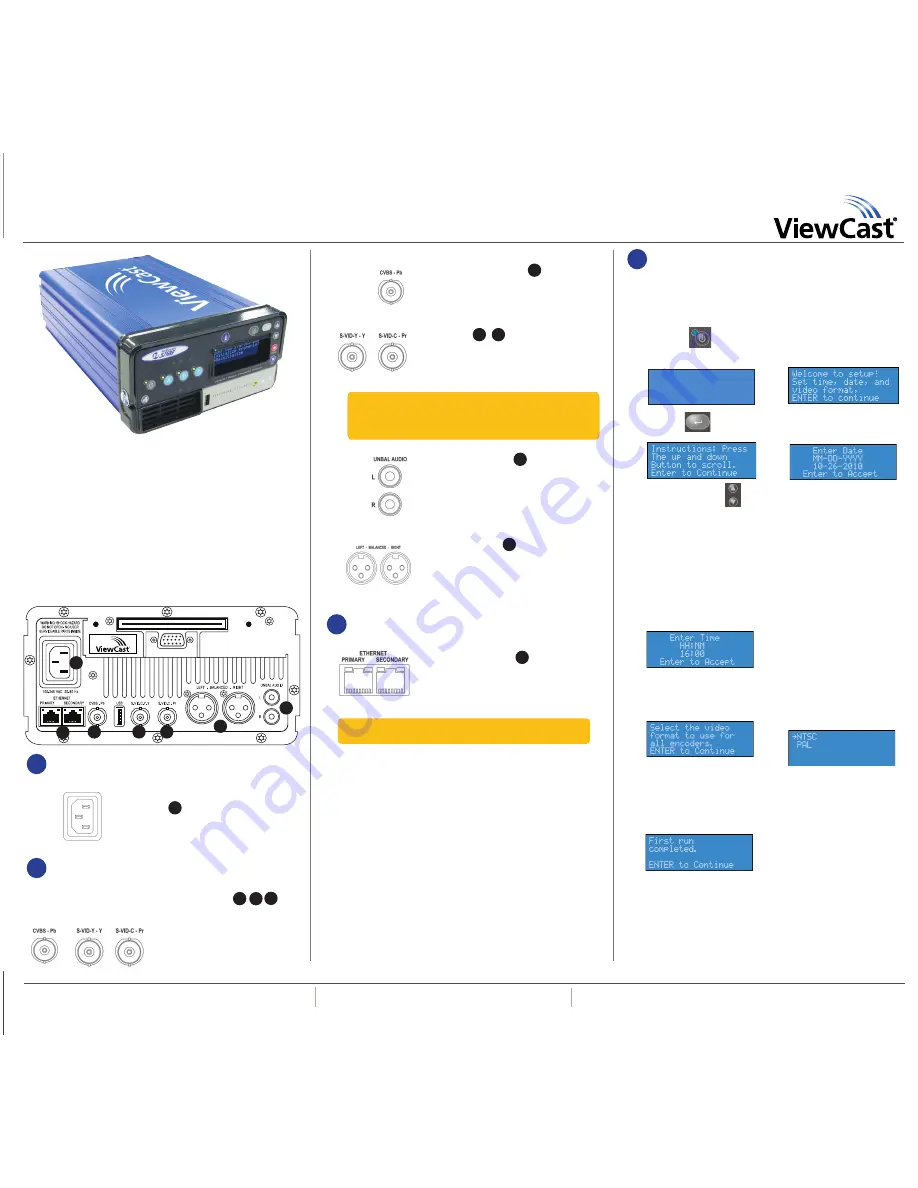
AC power connector for 100-240 volts,
AC, 50-60 Hz
A
Plug the power cable that was included with
your Niagara GoStream SURF into this connec-
tor and plug the opposite end into an AC
power source.
Component Video BNC Input
C
A YPbPr standard-definition component video
input is available on the BNC connectors.
Composite Video BNC Input
C
The Niagara GoStream SURF includes a
BNC-to-RCA adapter so you can connect a
composite RCA video cable to the BNC
connector labeled CVBS-Pb.
S-Video Input
D
,
E
This standard consumer video connector is on
most video players and video cameras. This
connection may require an additional
S-Video adapter (included).
Unbalanced Audio Input
G
These RCA connectors provide left and right
stereo inputs. You will find RCA connectors
(standard consumer stereo audio connection)
on most video players and video cameras.
Balanced Audio Input
F
These XLR connectors provide left- and right-
balanced stereo inputs. High-end audio and
video equipment may have these professional
connectors.
RJ-45 Ethernet connector
B
The Niagara GoStream SURF provides two
network connectors. Use either the primary
or secondary jack to connect to your IP
network.
The Niagara GoStream SURF network settings default to dynamically
obtain an IP address from a DHCP server on the network. For most
network environments, you do not need to modify these default
settings. If the Niagara GoStream SURF cannot find a DHCP server or
it remains unavailable on the network, the Niagara GoStream SURF
assigns its own IP address.
Once connected to a network, you should be able to access the built-
in web server by browsing to the unique machine name (the serial
number located on the buttom or side of the appliance). You may
also set the IP address through the web interface.
If you do not have a DHCP network or you cannot connect to the
Niagara GoStream SURF through its DNS name, you can see the IP
address on the front panel by using the menu or you can connect
a monitor, mouse, and keyboard directly to USB ports. The Niagara
GoStream SURF will have a Microsoft® Windows 7 desktop.
The first time you power up the Niagara GoStream SURF, the system
takes a few moments to boot up. The LCD display will present a series
of menus that will assist you in setting up the system clock, date, and
video input format (NTSC (North America/Japan) or PAL).
1)
Press
Power
on the front
panel. The following screen appears:
3)
Press
Enter
.
The following screen appears:
5)
Use the
Up
and
Down
arrows to change
the numerical value of the month.
7)
Use the same process to set
the
Day
and
Year
until you are
satisfied with your settings.
9)
The Niagara GoStream SURF
uses a 24-hour clock format, for
its system clock entries.
11)
Press
Enter.
The following
screen appears to set the
video input format.
15)
From a separate computer on the same network as the Niagara
GoStream SURF, launch a web browser such as Internet Explorer
and enter the serial number or IP address of your Niagara
GoStream SURF in the address bar. The serial number can be
located on the bottom or side of the appliance in the format
VSxxxxxxxx
. Proceed through to the next section.
2.
Connect video and audio sources
Audio
3.
Connect to an IP network
4.
First start setup
1.
Connect to an electrical power source
Continued on back
Contact ViewCast Technical Support at
40-03253-04-A
© 2011 ViewCast Corporation. ViewCast
®
, Niagara
®
(and design)
TM
are registered trademarks of ViewCast Corporation
or its subsidiaries. All other trademarks are the property of their respective owners. Product specifications and availability
may change without notice.
US /
800 540 4119 | Europe / Middle East / 44 1256 345610 |
Asia / P852 2251 8778
NOTE:
Three BNC-to-RCA adapters are included with your
Niagara GoStream SURF. This adapter will convert the Compo-
nent and Composite BNC connectors to a common RCA connec-
tor found on most consumer video cameras and video players.
NOTE:
Contact your network administrator for assistance if you
are unfamiliar with network protocols.
A
B
C
D
E
F
G
ViewCast Corporation
Niagara 6.3.261.0
Serial: VS11410001
Booting ...
2)
After the appliance pow-
ers up the first time, the
following screen appears:
4)
Press
Enter
. The system
prompts you to set the date.
6)
Press
Stop
to move to the
field to the left. Press
Stream
to move to the field
to the right.
8)
Press
Enter
to accept the
settings and move to the
next screen to set the
system clock.
10)
Use the
Up
,
Down
, and
Stream
buttons to set the
hour and minute of the
system clock.
12)
Press
Enter
to continue.
Use the
Up
and
Down
arrows to select your video
source format from either
NTSC or PAL.
13)
Press
Enter
to set the format.
The following screen appears
confirming you have
successfully set up your
Niagara GoStream SURF.
14)
Press
Enter
to exit the
setup menu and reboot the
appliance.
Video
D E


