background image

CDE VERSION

E - 2

1. NOTE OF DISCS

MOISTURE CONDENSATION

NOTES ON CDs

P. 2

P. 3

P. 4

P. 1

P. 5

P. 6

P. 7

1.

2.

3.

4.

5.

NOTES ON DISCS

There are paste residue.
Ink is sticky (P.5).

Stickers that are beginning 
to peel away, leaving a 
sticky residue (P.6).

Labels are attached (P.7).

On a rainy day or in a very damp area, moisture may condense on the lenses inside the unit. 
Should this occur, the unit will not operate properly. In such a case, remove the disc and wait for 
about an hour until the moisture has evaporated.

A  dirty  or  defective  disc  may  cause  sound 
dropouts  while  playing.  To  enjoy  optimum 
sound, handle the disc as follows.
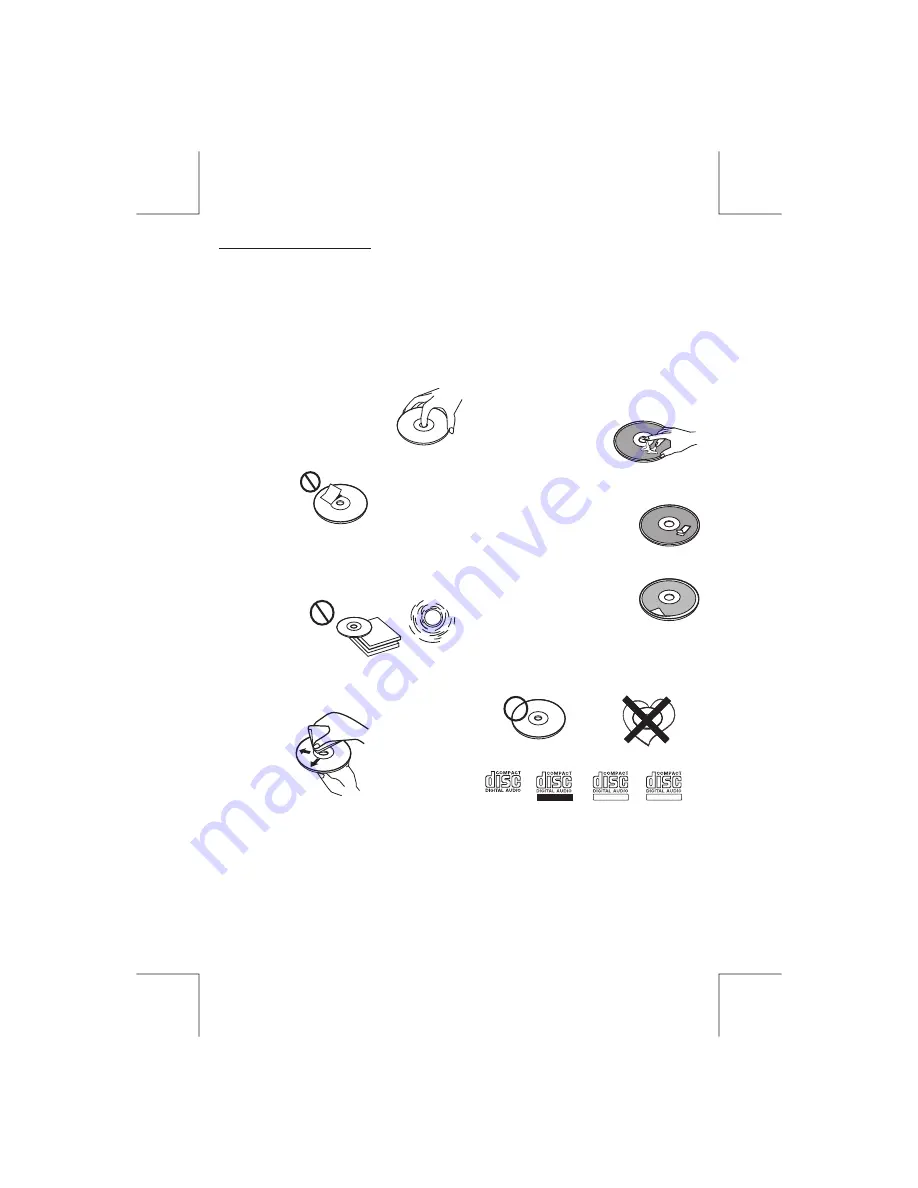
Handle the disc by its edge. To keep the disc 
clean, do not touch the surface (P.1).

If  you  use  the  discs  explained  below,  the 

sticky  residue  can  cause  the  CD  to  stop 

spinning and may cause malfunction or ruin 

your discs.
Do not use second-hand or rental CDs that 

have  a  sticky  residue  on  the  surface  (for 

example,  from  peeled-off  stickers  or  from 

ink, or glue leaking from under the stickers).

Do not stick paper or tape on the disc (P.2).

Before playing, clean the discs with an 
optional cleaning cloth. Wipe each disc from 
the centre out (P.4).

Do  not  use  solvents  such  as  benzine, 
thinner,commercially  available  cleaners,  or 
antistatic spray intended for analog discs.

Do not expose the discs to direct sunlight or 
heat sources such as hot air-ducts, or leave 
them in a car parked in direct sunlight where 
there  can  be  a  considerable  rise  in 
temperature inside the car (P.3).

Do not use rental CDs with old labels that 
are beginning to peel off.

Do not use your CDs with labels or stickers 
attached.

**************

*******

*******

*******

*******

*******

*******

*******

*******

****

*******

******* *******

*******

Do Not Use Special Shape CDs

Be sure to use round shape CDs only for this 
unit and do not use any special shape CDs. 
Use of special shape CDs may cause the unit 
to malfunction.(P.8).

Be sure to use CDs with disc mark  

Only for this unit.

RECORDABLE

REWRITABLE

P. 8

CD-Rs  and  CD-RWs  which  have  not 
undergone finalization processing cannot be 
played. (For more information on finalization 
processing, refer to the manual for your CD-
R/CD-RW  writing  software  or  CD-R/CD-RW 
recorder.)  Additionally,  depending  on  the 
recording status, it may prove impossible to 
play certain CDs record on CD-R or CD-RW.

TEXT

Summary of Contents for VTC2500BT

Page 1: ......

Page 2: ...e that feature You will not need to PRESS hard on the panel to make this radio change features Some of the buttons that have dual functions will need to be TOUCHED from 2 to 3 seconds to activate the second level function The best area to TOUCH on the panel to make it activate is the illuminated or lighted area For example just touch the illuminated to play the next track or return to the previous...

Page 3: ...kers Do not stick paper or tape on the disc P 2 Before playing clean the discs with an optional cleaning cloth Wipe each disc from the centre out P 4 Do not use solvents such as benzine thinner commercially available cleaners or antistatic spray intended for analog discs Do not expose the discs to direct sunlight or heat sources such as hot air ducts or leave them in a car parked in direct sunligh...

Page 4: ...ght or from hot air from heater or where it would be subject to dust dirt or excessive vibration Be sure to remove the front panel before installing the unit DIN FRONT REAR MOUNT This unit can be property installed either from Front conventional DIN Front mount or Rear DIN Rear mount installation utilizing threaded screw holes at the sides of the unit chassis For details refer to the following ill...

Page 5: ... and half sleeve are not used for method B installation 5 2 4 3 2 5 a Frame b Insert fingers into the groove in the front of frame and pull out to remove the frame When re attaching the frame point the side with a groove down wards and attach it c Insert the levers supplied with the unit into the grooves at both sides of the unit as shown in figure until they click Pulling the levers makes it poss...

Page 6: ...e and be careful not to drop it or subject it to strong shocks When the release button is pressed and the D C P is unlocked the car s vibrations may cause it to fall To prevent damage to the D C P always store it in a protective case after detaching it The rear connector that connects the main unit and the D C P is an extremely important part Be careful not to damage it by pressing on it with fing...

Page 7: ...B8 GREEN B7 B6 A5 A4 PIN BLACK A8 RED A7 BLUE LEFT FRONT SPEAKER LEFT REAR SPEAKER LEFT REAR SPEAKER RIGHT REAR SPEAKER RIGHT FRONT SPEAKER LEFT FRONT SPEAKER RIGHT FRONT SPEAKER RIGHT REAR SPEAKER FUNCTION LABEL POWER ANTENNA BATTERY IGNITION ACC GROUND REAR LINE OUT R CH REAR LINE OUT L CH SUB W OUT Not Supplied RCA TO RCA CABLE REAR SUB W OUT L R Not Supplied FUSE AMP SUB WOOFER ANTENNA JACK AN...

Page 8: ...er Volume Band TA ix B ass M1 M2 M3 M4 M5 M6 Memor y 1 Mem ory 2 Memo ry 3 Memory 4 Memory 5 Memory 6 Pause Play Intro Folder Intro Repeat Folder Repeat Random Folder Random Folder Down Folder Up ID3 Info Seek Up Track File Up Fas t Forwa rd Tune Up Seek Down Tune Down Track File Down Fast Backward USB Cover Socket Bluetooth Transfer Sub W Eject 22 21 6 3 7 4 1 17 19 Mute Sys tem Menu Phone ESC Re...

Page 9: ...e volume rotate the Encoder Volume Knob counter clockwise When volume is adjusted the volume level will be shown on the display panel as a number ranging from 0 lowest to 46 highest Press this button to eject the CD from the unit The receiver will switches to radio mode automatically Press this button to quick return previous menu or mode 4 POWER ON OFF BUTTON POWER MUTE Hold press POWER MUTE butt...

Page 10: ... the AF Alternate Frequencies function When AF in On mode the unit will be searches for another station with stronger signal but with the same program identification as the current station automatically REG ON OFF Regional Radio User can rotate the Encoder Volume Knob to turn On Off the Regional function REG ON Only stations in the current region can be tuned to automatically REG OFF All stations ...

Page 11: ...INFO SYS System Information Once into the System Information mode press the Audio button to view the details system software informations of this unit E 10 need to translation ...

Page 12: ...User has 5 seconds to use the Encoder Volume Knob to adjust the desired Treble level range from 10 to 10 BAL Balance User has 5 seconds to use the Encoder Volume Knob to adjust the Balance between the right and left speakers from 10R full right to 10L full left C00 represents an equal balance between the right and left speakers FAD Fader User has 5 seconds to use the Encoder Volume Knob to adjust ...

Page 13: ... 6 strong stations and store them in the current band Select a band if needed Press button for more than three seconds The new stations replace stations already stored in that band Preset Scan Scan stations stored in the current band Select a band if needed Press button for less than 3 seconds The unit will pause for ten seconds at each preset station Press button again to stop scanning when the d...

Page 14: ...traffic announcement broadcast is being received The unit will go back to the previous mode and TA goes into stand by mode again When the TP icon is not light up for 60 seconds A beep Alarm tone is heard and the LCD will show Lost TP TA TA seek will automatic activate and searches to another TA station 3 PTY Function Hold press the PTY button to turn On the PTY standby mode the PTY icon will be ap...

Page 15: ...hen the desired track is reached press INT Intro button again to end the scan and play the selected track MP3 WMA OPERATION MP3 and WMA Windows Media Audio music files are audio compression format This unit can play MP3 WMA directly from files contained on a CD R RW USB Memory Stick SD Card Notes on MP3 WMA Play This unit can play MP3 MPEG1 2 2 5 Audio Layer 3 However the MP3 recording media and a...

Page 16: ... list characters are the only file names and folder names that can be entered and displayed Using any other character will cause the file and folder names to be displayed incorrectly The unit recognizes and plays only files with the MP3 WMA extension A file name entered with characters not on the code list may not play correctly E 15 Writing Files into a Media When a media containing MP3 WMA data ...

Page 17: ...low Subfolders are shown as folders in the folder currently selected The equipment assigns folder numbers The user can not assign folder numbers It is not possible to check folders that do not include MP3 WMA files These folders will be skipped without displaying the folder number and name E 16 FILE FOLDER PLAY There are three different play methods as following Press M2 button more than 3 seconds...

Page 18: ... less than three seconds to access the sub folders or files Rotate the Encoder Volume Knob to navigate then press the select knob to confirm and begin file play During navigation search press PS or rotate the Encoder Volume Knob counterclockwise to move back to the last upper level of a folder ID3 INFORMATION DISPLAY If any MP3 WMA file recording with ID3 Tag information The ID3 information such l...

Page 19: ...e Usually the unit takes longer time to read this kind of player than normal USB Stick Especially if the Flash Player with built in power battery sometimes takes 20 30 seconds to start up the playback The unit is not compatible to playing any Portable Hard disk Music File Playback Operation All the USB playback operation function is same as the operation on CD MP3 WMA Please refer to CD MP3 WMA Op...

Page 20: ...t which are stored into SD Card Please read below before you start the operation of Memory Card After a SD card was inserted into the main unit card slot Press Mode button to select mode the unit will automatically playback files contained from the SD Card Press Mode button repeatedly is allowing changing to other modes or switch back to SD Card mode All the SD Card playback operation function is ...

Page 21: ...ng tone of the Mobile Phone But some Mobile Phones like Sony Ericsson do not support this feature The Ring tone will be using the standard Ring tone of the Head unit User Guide For Bluetooth Operation 13 When in telephone mode during talking it is highly recommended to set the volume to below 30 in order to achieve the best sound quality As if the volume is too high it may create unwanted echo ins...

Page 22: ...trix 1 2 3 Panel Function Button Bluetooth Hand Free Function Encoder Volume Knob Short Press Confirm to answer an incoming call Call Esc Short Press 1 Reject Incoming call 2 End a call Phone Transfer Long Press Transfer Phone Conversation back to Mobile Phone 1 2 3 red part need to translation ...

Page 23: ...onal during the pairing mode BT89 should appear in the pairing list on the Mobile Phone User need to select BT89 and then input the password 1234 If the pairing is successful the display will show Mobile Phone Name or Model Number The unit is with built in Auto Reconnection function In some conditions user need to reconnect manually For example like the following The unit can be re connected by th...

Page 24: ...Always press the PHONE TRANSFER button answer accept the call after the LCD display the Incoming caller telephone number The audio output of the present mode will be muted and the ringing tones will be heard if an incoming call is not being answered User can use the Encoder Volume Knob to adjust the volume level To end the conversation press the CALL RETURN button The unit will switch back to the ...

Page 25: ...l is not being answered yet It s only possible to Transfer the call to Mobile Phone after the call is being answered During the talking mode if the Ignition is being turned off the unit will keep the conversation even if the Ignition is Switched off After finished the conversation User can press button to switch off the unit CALL RETURN Depending on different type of Mobile Phone the time need for...

Page 26: ... the details operation of connecting with this unit Please refer to the CONNECTING operation for more details 3 Once in the BT AUDIO mode user can use the audio device to start playback the song via Bluetooth wireless with this unit IMPORTANT To listen Bluetooth audio streaming from the audio device user MUST change the mode to BT AUDIO first Any other mode of this unit is not able to activate the...

Page 27: ...the Mute button on this unit 6 Stop playback by mode changing mode into any other mode of this unit The AVRCP operation may differ depending on the audio device all the other operation other than those listed above should be performed on the audio device Hands free Phoning While Bluetooth Audio Streaming Disconnecting An Audio Device With This Unit User can close the Bluetooth Audio connection by ...

Page 28: ...ON FM System Usable disc Sampling frequency No of quantization bits Frequency Number of channels S N Ratio Compact disc audio system Compact disc 44 1KHz 1bit 5 20 000Hz 2 stereo 70dB Frequency Range Intermediate Frequency UsableSensitivity S NRatio 522 1620 KHz 450KHz Better than 45dB 40 dB E 27 MEDIA SECTION USB Host Memory Card Support Type of Memory Card SD Host 1 1 compatibles 2 0 BLUETOOTH P...

Page 29: ...ry to play a new one Temperature inside the car is too high Cool off or until the ambient temperature returns to normal Condensation Leave the player to off for an hour or so then try again Volume is in minimum Adjust volume to a desired level Wiring is not properly connected Check wiring connection The operation keys do not work No sound The built in microcomputer is not operating properly due to...

Page 30: ......

Reviews: