background image


21

MENU OPERATION 

 ON-SCREEN DISPLAY FUNCTION 

Press the 

OSD 

button on the remote control or click OSD icon on the screen 

during playback to display the console information of the current disc on the 
screen.  

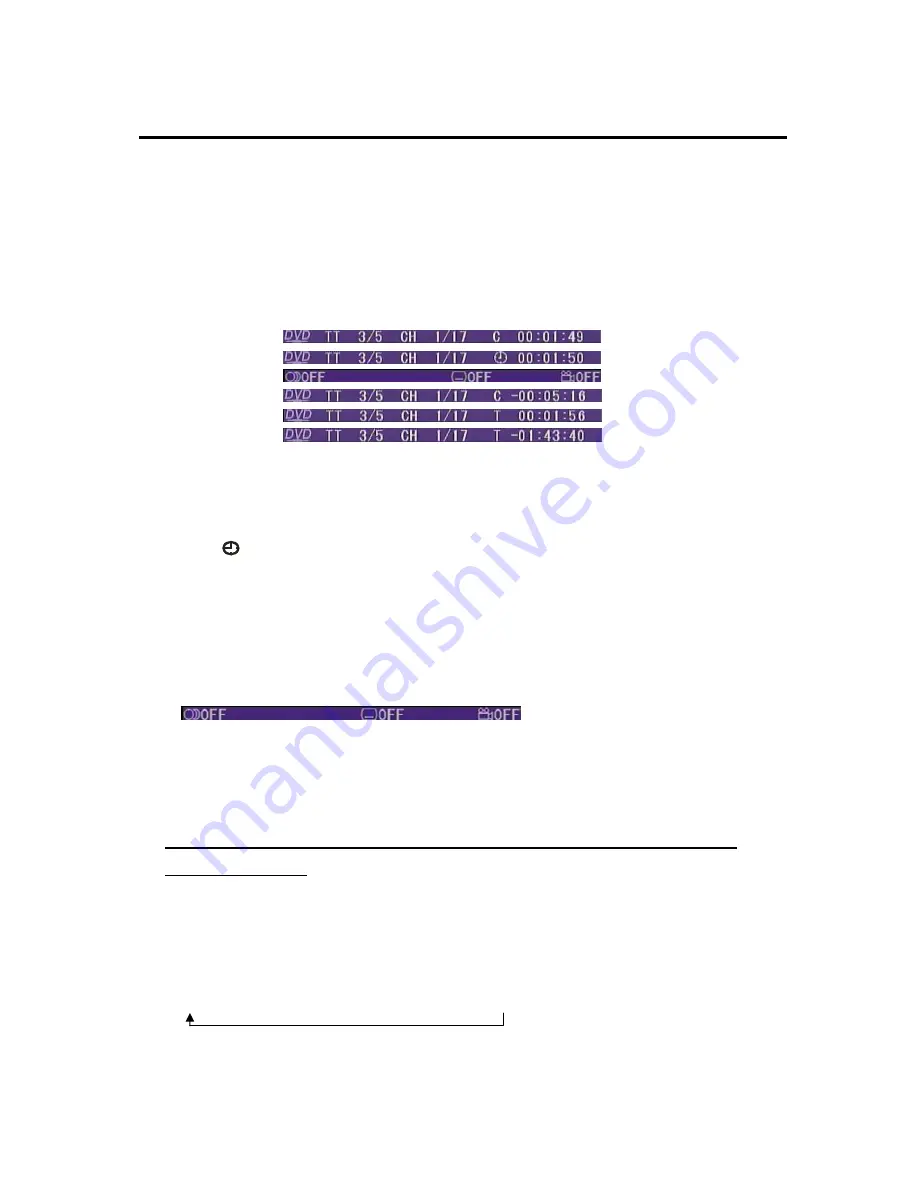
For an example (when playing a DVD disc): 

Once you press 

OSD

 button on the remote control or click OSD icon on the screen   

you will see the information as the following order. 


1) Item: TT 

Function: Display the current title number and total title number.   

2) Item: CH 

Function: Display the current chapter number and total chapter number. 

3) Item: 


(This icon only displayed for several seconds, after several seconds it 

will disappeared.) 

Function: Display the played time of the current chapter. 

4) 

C-:

 Display the remaining time of the current chapter. 

5) 

T:  

Display the played time of the current title. 

6) 

T-: 

Display the remaining time of the current title. 

7) 

C:

 Display the played time of the current chapter.


8)  

Display the current disc’s language, audio type, subtitle language and play 
angle. 

Note: The displayed information is different according to different type of discs. 

 REPEAT PLAY 

Repeat play: when you want to repeat playing the whole disc or a track or a   

chapter in the disc. 

   Press 

RPT

 button on the remote control or click 

RPT

 icon on the screen 

repeatedly to select different repeat modes. 

   For different kinds of discs, pressing 

RPT

 button has different effects. 

For example: 
DVD: 

REP:[OFF]

 REP:[CHAPTER]

 REP:[TITLE] 

 REP:[ALL]   


Summary of Contents for VNT7000BT

Page 1: ......

Page 2: ...AYER 9 LOCATIONS AND FUNCTION OF THE REMOTE CONTROL 11 BASIC OPERATION 14 MENU OPERATION 16 RADIO OPERATION 16 DISC OPERATION 19 BLUETOOTH OPERATION 26 SD USB OPERATION 28 MY MISIC OPERATON IPOD OPERA...

Page 3: ...arking in direct sunlight can produce very high temperatures inside your vehicle Give the interior a chance to cool down before starting playback Use the Proper Power Supply This product is designed t...

Page 4: ...DED ACCESSORIES THIS DEVICE IS INTENDED FOR CONTINUOUS OPERATION This product incorporates copyright protection technology that is protected by method claims of certain U S patents and other intellect...

Page 5: ...lowing places 1 Direct sunlight 2 Dirty dusty and damp areas 3 Near car heaters 4 On the seats or dashboard Disc Cleaning Use a dry soft cloth to wipe the surface If the disc is quite dirty using a so...

Page 6: ...isc with rough edges is used the proper setting will not be performed and the player will not play the disc Therefore remove the rough edges in advance by using a ballpoint pen or pencil as shown on t...

Page 7: ...t injure the passenger if there is an emergency stop If installation angel exceeds 30 from horizontal the unit might not give its optimum performance Avoid installing the unit where it would be subjec...

Page 8: ...11 CONNECTIONS Line No Line color Function terminal color 1 Grey Video output YELLOW 2 Green Rearview input YELLOW 3 Green Subwoofer output GREEN 4 Black Radio antenna connector BLACK...

Page 9: ...9 LOCATIONS AND FUNCTION OF THE PLAYER KEYS ON THE FRONT PANEL WHEN THE MONITOR TURNING DOWN 17 18 19...

Page 10: ...7 SEL Repeatedly press to select the audio mode to adjust such as VOL BAS TRE BAL FAD 8 VOL Press to increase the volume level 9 RST Reset button 10 Press to eject the disc that in the disc slot of th...

Page 11: ...11 LOCATIONS AND FUNCTION OF THE REMOTE CONTROL...

Page 12: ...ono mode or stereo mode 9 LOC RDM Press to t to play all tracks on the disc in random order In radio mode press it shortly to select between local and distant stations 10 VOL VOL Press to increase dec...

Page 13: ...OTO GOTO Disc search button used in DISC mode cooperatively used with numeric buttons Preparing the Remote Control Inserting the Batteries 1 Open the battery compartment cover 2 Insert the new batteri...

Page 14: ...EQ OFF mode press SEL button to select the modes And Bass Treble modes are invalid Shown as below VOL BAL FAD BRI CON COL REMOTE SENSOR There is a remote sensor on the front panel You can point the r...

Page 15: ...audio will be heard Note Only when parking the video picture can be seen on the screen When driving the warning information will be displayed RESET FUNCTION The reset button RST is on the front panel...

Page 16: ...u can also press BND SYS on the remote control to select desired band The reception band will change in the following order FM1 FM2 FM3 MW1 MW2 click to select channel downward or upward manually Pres...

Page 17: ...nt station will be stored to the location button Repeat steps 1 and 2 to program additional stations Quick tuning Select the desired band then press one of the six preset buttons on remote control or...

Page 18: ...on is implemented by preset M1 M6 frequency bar According to above two allotted group the preset number is used for PTY selection as follows MUSIC group M1 POP M ROCK M M2 EASY M LIGHT M M3 CLASSICS O...

Page 19: ...he disc slot press SRC button on the front panel or MODE button on the remote control or tap DISC icon on the MENU interface to change the mode to DISC mode then the unit will play the disc automatica...

Page 20: ...s again RAPID FORWARD RAPID REVERSE Hold press on the screen or hold press on the remote control during playback Each time the button is pressed the speed of rapid forward reverse changes according to...

Page 21: ...conds it will disappeared Function Display the played time of the current chapter 4 C Display the remaining time of the current chapter 5 T Display the played time of the current title 6 T Display the...

Page 22: ...Time then press ENTER to confirm ZOOM FUNCTION Allows the picture to be increased in size Press ZOOM button on the remote control to toggle among 2 scale 3 scale and 4 scale 1 2 scale 1 3 scale 1 4 sc...

Page 23: ...n only works for discs having scenes recorded at different angles AUDIO FUNCTION FOR VCD For VCD press Audio on the remote control or click L R icon on the screen during playback to change the channel...

Page 24: ...TUP In DISC mode when the disc is playing or in stop mode press Setup on the remote control to enter setup menu When the cursor is on the topside use buttons to move between the different pages such a...

Page 25: ...se English Japan French Spanish Russian Latin and German You can change the SUBTITLE LANGUAGE among Portuguese English Japan French Spanish Russian German and OFF You can change the MENU LANGUAGE amon...

Page 26: ...O L MONO R and MIX MONO to be selected LAST PLAY MEMORY 1 During disc playback if you turn off the unit and then turn on the unit again the DVD unit will resume playing from the point that just interr...

Page 27: ...Dial interface Use the number buttons 0 9 on the dial keypad on the left of the screen to input the number you need Click icon to clear the number you input Then click to make an outgoing call Click...

Page 28: ...t click to the current mode such as radio DISC 4 SD USB OPERATION SD When the front monitor panel turns down you can see the SD MMC interface on the housing When you insert the SD card it will enter i...

Page 29: ...d the terminal to the USB interface on the front panel On the main menu click MY MUSIC icon to enter into the IPOD interface The unit can play the files on the IPOD device In the IPOD interface tap an...

Page 30: ...icon to enter into the corresponding interface click to mute or resume the sound Click the icon to return to the main menu interface 7 REARVIEW OPERATION On the back of the unit there is a jack for r...

Page 31: ...firm the time setting AREA ZONE Click the icon for different country to select the country you are staying There are Europe USA South America Russia and Australia Mid Ease to be selected Note for some...

Page 32: ...ing equalization mode Rock Jazz Standards and Classical Loudness select ON or OFF Subwoofer select ON or OFF Treble click and to adjust the value of treble Bass click and to adjust the value of bass S...

Page 33: ...ven when the correct buttons on the remote control are pressed Battery capacity is low Install new batteries Some operations are disabled in specific states Enter the correct mode The disc can not pla...

Page 34: ...Pull the antenna out all the way The antenna control wire is not connected Connect the wire correctly The sound picture skips on a DVD VCD CD MP3 The disc is scratched or dirty Clean the disc A track...

Page 35: ...tion 25dB MW Frequency Coverage 522 to 1620 kHz Sensitivity S N 20dB 36 dBu Image Rejection 45 dB DVD Signal system Compositive video 1 0Vp p 75 Discs played 1 DVD VIDEO disc 5 12 cm single sided sing...

Page 36: ......

Page 37: ......

Page 38: ......

Reviews: