background image

Advanced Features

Modes and Features Setup

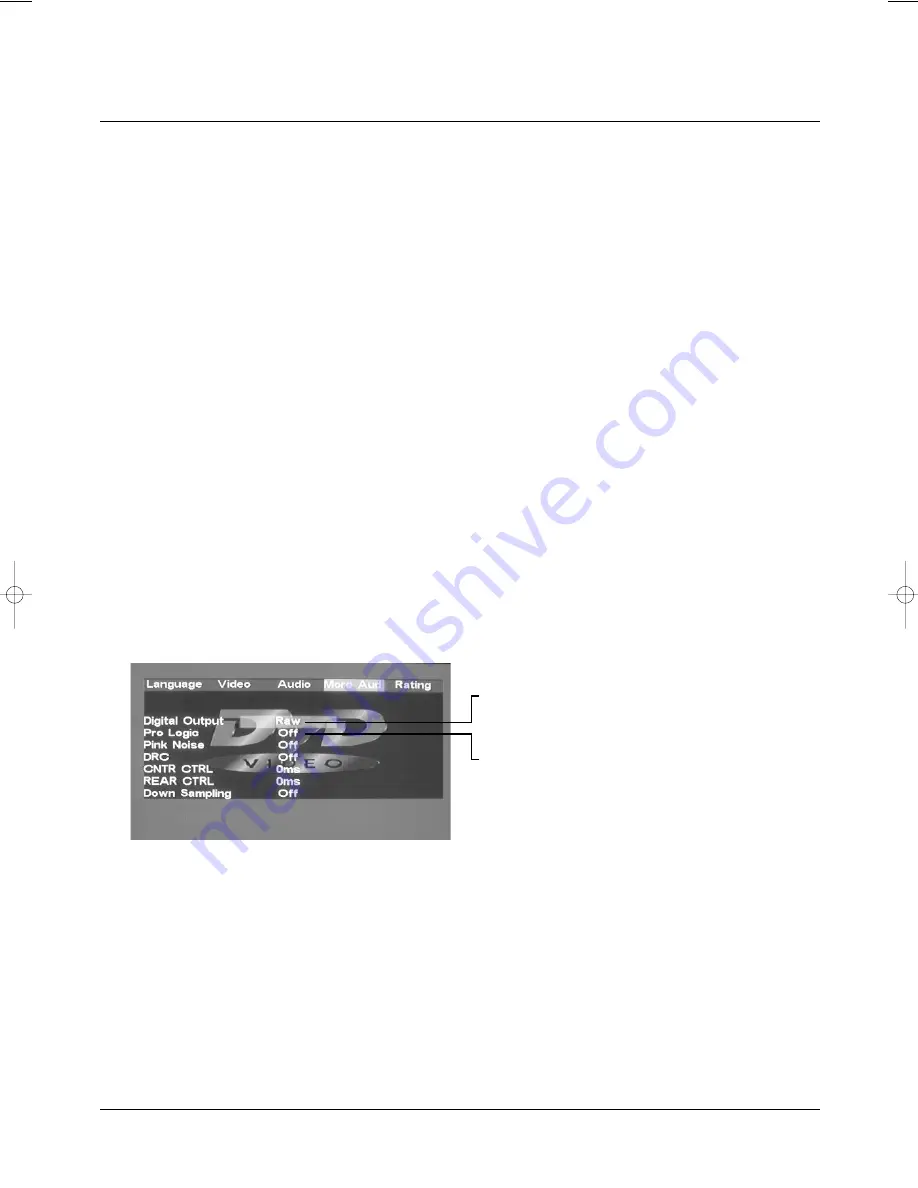
More Audio Setup

The More Audio menu includes Pro Logic and Subwoofer
settings.

Pro Logic Setting

The DVD player has a built-in Dolby Pro Logic decoder to provi-
de virtual surround sound for PCM (stereo) source material from
the 5.1 channel analog audio outputs.

A. From Stop mode, press 

SETUP

.

B. Select More Audio and press 

ENTER

.

C. Select Pro Logic and press 

ENTER

.

D. Select the desired Pro Logic setting and press 

ENTER

:

Auto Stereo audio soundtracks will be output in Dolby Pro
Logic mode.
On All audio soundtracks will be output in Dolby Pro Logic 
mode.
Off (default) Dolby Pro Logic decoding will always be inacti-
ve.

E. Press SETUP to save and exit.

19

RAW
PCM
Off

Auto
On
Off

manual dvd-40 EN.qxd  07/10/2004  12:17  PÆgina 19

Summary of Contents for DVD 40

Page 1: ...DVD 40 DVD Player HOME CINEMA User Manual ...

Page 2: ......

Page 3: ...ting to an AV Receiver with 5 1 Channel Analog Audio Input 12 Connecting to an AV Receiver with Digital Audio Input 13 Basic Playback Basic Operation 14 Advanced Features Modes and Features Setup 15 Remote Control Operation 22 MP3 Divx MPEG4 Playback 31 KODAK Picture CD Playback 32 Others Troubleshooting 33 Remote Control Preparation 34 Specifications 35 Macrovision Function Instruction 35 Content...

Page 4: ...O ENSURE THE PROPER USE OF THE UNIT READ THIS MANUAL CAREFULLY AND KEEP IT FOR FUTURE REFERENCE IF THE UNIT REQUIRES SERVICING CONTACT THE SELLER OR SEE TROUBLESHOOTING TO PREVENT DIRECT EXPOSURE TO THE LASER RADIATION DO NOT OPEN THE CABINET VISIBLE LASER MAY RADIATE WHEN THE CABINET IS OPENED OR THE INTERLOCKS ARE DEFEATED DO NOT STARE INTO THE LASER BEAMS CAUTION THE DVD VIDEO PLAYER IS A CLASS...

Page 5: ...aving one blade wider than the other This plug will fit into the power outlet only one way This is a safety feature If you are unable to insert the plug fully into the outlet try rever sing the plug If the plug should still fail to fit contact your elec trician to replace your obsolete outlet Do not defeat the safety purpose of the polarized plug 13 Power Cord Protection Power supply cords should ...

Page 6: ... exhibits a distinct change in performance this indicates a need for service 21 Replacement Parts When replacement parts are required be sure the service techni cian has used replacement parts specified by the manufacturer or have the same characteristics as the original part Unauthorized substitutions may result in fire electric shock or other hazards 22 Safety Check Upon completion of any servic...

Page 7: ... cover and rear panel to become warm after the player has been operating for an extended period of time Do not move this product during playback Doing so may cause damage to the pickup and the disc Press OPEN CLOSE on the front panel or remote to open or close the disc tray Do not push or touch the tray while it is opening or closing ...

Page 8: ...ovision Corporation and is intended for home and other limited viewing uses only unless otherwise autho rized by Macrovision Corporation Reverse engineering or disassembly is prohibited The product complies with the KODAK Picture CD format and will display KODAK Picture CDs The KODAK Picture CD Compatible logo is a trademark of Eastman Kodak Company and is used with permission Manufactured under l...

Page 9: ...NSOR 6 PLAY 7 PAUSE 8 STOP 9 PREV 10 NEXT 11 5 1 CH CEN output RCA 12 5 1 CH SUR output RCA 13 5 1 CH FRONT output RCA 14 RCA de salida de vídeo 15 Component output RCA for Progressive Scan 16 Scart output RCA 17 Video output RCA 18 S Video output RCA 19 Digital signal coaxial output RCA 20 Digital signal optical output RCA ...

Page 10: ... 1 5 6 8 7 9 10 17 38 21 28 19 13 38 15 14 11 22 23 24 34 25 36 37 32 31 29 30 27 18 12 20 33 16 26 3 2 4 1 Standby 2 Program 3 Display 4 Open Close 5 N P 6 Subtitle 7 Angle 8 Language 9 Setup 10 Left 11 Vol 12 Zoom 13 Tittle 14 Prev 15 Next 16 Stop 17 Pause 18 Mute 19 Step 20 Return 21 Mode 22 0 9 Number key 23 10 key 24 Time 25 Repeat 26 Right 27 Resume 28 L R 29 Menu 30 A B 31 Rev 32 Fwd 33 Pla...

Page 11: ...right audio cable set the Video Type to S Video 2 Composite video cable and left right audio cable 3 Component video cable and left right audio cable set the Video Type to Y Pb Pr 11 WHITE R L PR PB Y VIETA TFT 270 YELLOW VIDEO IN VIDEO IN VIDEO S VIDEO SCART SCART IN AUDIO IN RED BLACK Component video for progressive scan Composite video ...

Page 12: ...log Audio Input Notes 1 Set the TV to the AV input connected to the DVD player 2 Set the Amplifier to the AV input connected to the DVD player VIDEO IN AUDIO IN WHITE WHITE WHITE YELLOW Vídeo FRONT R SUR R SW FRONT L SUR L CENTER RED RED RED VIETA VR 6100 AMPLIFIER ...

Page 13: ... Audio Input Connections 13 Notes 1 Select the Coaxial digital audio output 2 Set the player s audio out to Raw or PCM mode 3 Set the Amplifier to the AV input connected to the DVD player AMPLIFIER OPTICAL COAXIAL Optical cable Coaxial cable VIETA VR 6100 ...

Page 14: ...mplifier to the AV input connected to the DVD player STEP 1 Press POWER to start the player The DVD logo appears on the TV screen STEP 2 Press OPEN CLOSE either on the front panel or remote control When the tray is opened place the disc on the tray with the label side up Press OPEN CLOSE again to close the disc tray STEP 3 Press the PLAY button on the front panel or remote control The player will ...

Page 15: ...s A Press ENTER to display each submenu B Press SETUP to exit the Setup Menu Setup Menu Language Setup Select Language in the Setup Menu and press ENTER to display Language submenu Press to select the menu item A Press ENTER to confirm B Press to go back one menu C Press or repeatedly to return to the Setup Menu Press to change your selection A Press ENTER to confirm B Press SETUP to exit the Setu...

Page 16: ...on Note Audio languages vary by disc A Press ENTER to confirm B Press SETUP to exit the Setup Menu Select Audio and press ENTER or to display the Audio submenu Press to change your selection Note Subtitle languages vary by disc Press to change your selection Note Menu languages vary by disc A Press ENTER to confirm B Press SETUP to exit the Setup Menu Select DVD Menu and press ENTER or to display ...

Page 17: ...e picture fills the screen of a wide screen 16 9 televi sion Note Not all DVDs offer movies in Full Screen format If not the disc will override your TV Display setting and the movie will be displa yed in Letterbox format Select TV shape and press ENTER or to display the TV shape submenu Press to select the menu item Press to change your selection A Press ENTER to confirm B Press SETUP to exit the ...

Page 18: ...to display the Video Out submenu Audio Setup The Audio menu allows you to set the analog audio out puts to correspond with the external components you have connected to the player For example if you connected the player to a TV using the Stereo Audio jacks you should set front speaker to PRESENT and other speaker to NONE to enjoy down mixed stereo audio A Press ENTER to confirm B Press SETUP to ex...

Page 19: ...erial from the 5 1 channel analog audio outputs A From Stop mode press SETUP B Select More Audio and press ENTER C Select Pro Logic and press ENTER D Select the desired Pro Logic setting and press ENTER Auto Stereo audio soundtracks will be output in Dolby Pro Logic mode On All audio soundtracks will be output in Dolby Pro Logic mode Off default Dolby Pro Logic decoding will always be inacti ve E ...

Page 20: ...d press ENTER repeatedly to set the rating from 1 most restrictive to 8 least restrictive If a password has already been set the lock icon will be closed You will not be able to select Rating until you SELECT the correct password using the 0 9 keys D Select Password E Use the 0 9 keys to SELECT a 4 digit password and press ENTER The lock icon will close to indicate that the rating and password are...

Page 21: ... DVDs are rated DVDs that are rated higher than the level you select will not play without SELECTING the correct password If you forget your Rating password select 8888 to clear the memory Keep this password out of reach of children as if will always unlock the Parental Control setting ...

Page 22: ...pter and track numbers When a numeric item is displayed on the screen press the 0 10 keys to select the desired entry and press ENTER to confirm During playback press A B to select point A Press it again to select point B The player will repeat the section from A to B automatically Press A B third time to cancel A B repeat and clear points A and B Notes 1 During CD playback points A and B must be ...

Page 23: ...ter position Elapsed time of the current track chapter Press DISPLAY again to display additional information about the playing disc Elapsed time of the current track Total tracks Current track Disc type Elapsed time of the current title Current chapter Angle Disc type Current title Audio type Subtitle DISPLAY ...

Page 24: ...lows Use the number keys to input the desired Time Title or Chapter then press ENTER to confirm Notes 1 Time searches for an exact time in the movie 2 In Title Chapter mode you cannot SELECT a value outside the range of the total number of titles or chapters 3 For some DVD discs the Search function is unavailable TIME ...

Page 25: ...scan in reverse The player will review the disc at 2 4 8 and 16 times normal speed as follows X2 X4 X8 X16 Press PLAY to resume normal playback Press PREV to skip to previous chapter or track Press NEXT to skip to the next chapter or track Press STOP to stop playback completely Press RESUME to resume playback from the point you pressed STOP Note The screen saver will automatically turn on i f play...

Page 26: ...s PAUSE during playback to pause playback Press PLAY to resume normal playback During DVD playback press MENU to return to the program menu In the Setup Menu press MENU to return to the main menu or stop mode Any time press MENU to cancel the current OSD or some menus Note This function is subject to the disc During DVD playback press TITLE to display the DVD title menu or play the first title Not...

Page 27: ...nput Input the title number and the chapter number in the desired order Then select Play Program and press ENTER to play the chapters in the order you have set Select Clear All and press ENTER to clear all the numbers you have input During playback is stopped Press MODE button twice to switch to progressive scan mode Press MODE once to switch back to Interlace scan mode Note If you connect the DVD...

Page 28: ...eeds Press STEP during playback to pause playback Press STEP repeatedly to play frame Press PLAY to resume normal playback Select to press REPEAT to select Repeat Title Repeat chapter Repeat off During DVD playback Press REPEAT to select Repeat Single Repeat All and Repeat off CD or Others SLOW STEP REPEAT ...

Page 29: ...ton to increase Volume Press VOL button to reduce volume till to no volu me output Press MUTE to mute the Audio output Press MUTE again to resume normal audio output During DVD playback press ZOOM to magnify the image as follows VOL VOL MUTE ZOOM Q1 Q2 Q3 Q Off ...

Page 30: ...one camera angle to another Note This function is disc specific During DVD playback Press LANGUAGE repeatedly to select from up to 8 audio languages formats Note This function is disc specific During DVD playback Press SUBTITLE repeatedly to select from up to 32 subtitle languages Note This function is disc specific languages will vary ANGLE LANGUAGE SUBTITLE ...

Page 31: ... MP3 discs under the following conditions recording format is not supported badly scratched or deformed disc MP3 recorded in CD R or CD RW which is not finalized or a dirty pickup When a MP3 disc Divx MPEG4 disc is loaded the screen will display as follows Total tracks Elapsed time of the current track Current track File name File window Directory Press to select the file when the cursor appears i...

Page 32: ...in diffe rent modes Now you can playback Kodak Picture CDs on this player and view your wonderful pictures on your TV in the comfort of your living room When a Kodak Picture CD is inserted on a player an auto matic slide show is launched Each picture in the Kodak Pic ture CD will be displayed consecutively in a slide show fas hion and will be scaled to fit in the whole TV screen General function Y...

Page 33: ...ave set the player s VIDEO settings correctly POOR PICTURE OR SOUND Ensure you have set the player s AUDIO settings correctly Ensure the disc is not scratched or stained Ensure the AV connector or the output terminal is not damaged BAD DISC DISPLAYED Ensure the disc is not warped damaged or deformed Ensure the disc is not badly stained or damaged Ensure the disc format is compatible with the playe...

Page 34: ...oid possible damage from battery corrosion If the remote control does not function correctly or the operating range becomes reduced replace all batteries with new ones If battery leakage occurs clean the battery compart ment then insert new ones Point the remote control at the remote sensor The pictures below are for reference only USING THE REMOTE CONTROL Remarks Do not expose the remote sensor o...

Page 35: ...Frequency response 20 Hz to 20 Khz S N ratio 90 dB Total harmonic distortion 0 05 Accessories Video Audio cable x3 Remote Control x1 Users Manual x1 Specifications are subject to change without notice Weight and dimensions are approximate This product incorporates copyright protection technology that is protected by method claims of certain U S patents and other intellectual property rights owned ...

Page 36: ......

Page 37: ......

Reviews: