background image

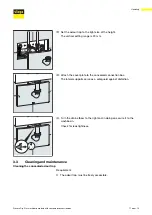
Set the odour trap to the right size at the height.
The vertical setting range is 20 mm.

Attach the cover plate to the concealed connection box.
The lateral supports serve as a safeguard against distortion.

Turn the drain elbow to the right and in doing so secure it to the

washbasin.
Check for leak tightness.

3.3

Cleaning and maintenance

Requirement:

n

The odour trap must be freely accessible.

Cleaning the concealed odour trap

Handling

Prevista Dry Plus washbasin module with concealed connection box

17 from  19

Summary of Contents for Prevista Dry Plus 8545.32

Page 1: ...for WB with single hole fitting Model Year built 8545 32 from 03 2019 en_INT Prevista Dry Plus washbasin module with concealed connection box Instructions for Use ...

Page 2: ...Prevista Dry Plus washbasin module with concealed connection box 2 from 19 ...

Page 3: ...ion 6 2 2 1 Overview 6 2 2 2 Compatible components 7 2 2 3 Technical data 7 2 3 Accessories and spare parts 8 3 Handling 9 3 1 Assembly information 9 3 1 1 Mounting conditions 9 3 1 2 Installation dimensions 9 3 2 Assembly 9 3 2 1 Mounting module 9 3 2 2 Set and clad the module 13 3 3 Cleaning and maintenance 17 3 4 Disposal 19 Table of contents Prevista Dry Plus washbasin module with concealed co...

Page 4: ...ossible operating instructions The installation of Viega products must take place in accordance with the general rules of engineering and the Viega instructions for use 1 2 Labelling of notes Warning and advisory texts are set aside from the remainder of the text and are labelled with the relevant pictographs DANGER This symbol warns of possible life threatening injury WARNING This symbol warns of...

Page 5: ... DVGW Some passages in the text may refer to technical codes in Europe Germany These should serve as recommendations in the absence of corresponding national regulations The relevant national laws stand ards regulations directives and other technical provisions take priority over the German European directives specified in this manual The information herein is not binding for other countries and r...

Page 6: ... of delivery 1 Washbasin module 2 mounting bracket for concealed connection box 3 Screws for fixing in support profile 4 slot nuts 5 Screw fitting for corner valves 6 corner valves 7 site protection for concealed connection box 8 drain elbow 9 pipe elbows 10 compression fittings 11 Cover plate 12 threaded rods for fixing sanitary objects Product information Prevista Dry Plus washbasin module with ...

Page 7: ...ier free 2 2 3 Technical data Drain elbow outlet side DN 40 50 Rubber nipple DN 50 30 ı İ Fig 2 Installation height A 850 mm above UEFFL B Observe the ceramic manufacturer s instructions C Observe the ceramic manufacturer s instructions Product information Prevista Dry Plus washbasin module with concealed connection box 7 from 19 ...

Page 8: ... drainpipe with flanged rim 75 mm Drainpipe model 9945 143 n with flanged pipe n suitable for the ready to install set model 8314 5 n available in the following versions 75 mm art no 121587 120 mm art no 670856 150 mm art no 670863 Spare parts Fig 3 drain elbow Fig 4 Ready to install set Fig 5 drainpipe Product information Prevista Dry Plus washbasin module with concealed connection box 8 from 19 ...

Page 9: ...l surfaces With the construction height the marked height of the upper edge of the finished floor must be observed 3 1 2 Installation dimensions NBY Fig 6 Dimensions 3 2 Assembly 3 2 1 Mounting module Suitable walls Construction height Preparing the concealed connection box Handling Prevista Dry Plus washbasin module with concealed connection box 9 from 19 ...

Page 10: ...ng Seal and screw in a suitable pipeline adapter INFO Observe the additional markings when aligning the corner valves Screw in until the connection to the washbasin fitting is between the markings Handling Prevista Dry Plus washbasin module with concealed connection box 10 from 19 ...

Page 11: ...e must be open towards the module and have an inner distance of 420 mm Secure the module onto the open mounting rail with the slot nuts supplied Insert the slot nut into the opening of the module Push the slot nut in until it engages Mounting in Prevista Dry Plus Handling Prevista Dry Plus washbasin module with concealed connection box 11 from 19 ...

Page 12: ...the rail Fasten the slot nut Bend the sides of the metal bars of the rails Bend the sides of the metal bars of the fitting holder 25 Nm Handling Prevista Dry Plus washbasin module with concealed connection box 12 from 19 ...

Page 13: ...aded rods by hand Tighten the nuts of the threaded rods with a fork spanner size 17 Place the protective caps on the threaded rods Make the water connections Attach the site protection from the concealed connection box 9 9 İ W J F H B ς W J F H B Handling Prevista Dry Plus washbasin module with concealed connection box 13 from 19 ...

Page 14: ...th suitable gypsum cardboard cladding panels Remove the site protection Cut the shaft of the concealed connection box flush with tiles Final assembly of the con cealed connection box Handling Prevista Dry Plus washbasin module with concealed connection box 14 from 19 ...

Page 15: ...ufacture the second connection on the other side in the same way Shorten the copper pipe The connection of the compression fitting must be within the concealed connection box Mount the compression fitting Optionally connect the washbasin fitting to the concealed connec tion box using flexible hoses Handling Prevista Dry Plus washbasin module with concealed connection box 15 from 19 ...

Page 16: ... If applicable identify sizes on the drain elbow and adjusting pipe that may have to be shortened The sizes are marked in the diagram with X and are dependent on the chosen ceramic Deburr the cut edge Grease the lip seal Insert the drain elbow through the cover plate in the lip seal of the odour trap 9 X Handling Prevista Dry Plus washbasin module with concealed connection box 16 from 19 ...

Page 17: ... supports serve as a safeguard against distortion Turn the drain elbow to the right and in doing so secure it to the washbasin Check for leak tightness 3 3 Cleaning and maintenance Requirement n The odour trap must be freely accessible Cleaning the concealed odour trap Handling Prevista Dry Plus washbasin module with concealed connection box 17 from 19 ...

Page 18: ... odour trap anti clockwise When doing so unlatch the clip to the right Lift up the odour trap Remove the odour trap for cleaning Pull out the adjusting pipe upwards to clean Clean the odour trap Handling Prevista Dry Plus washbasin module with concealed connection box 18 from 19 ...

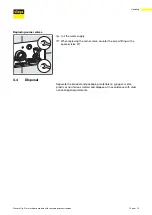
Page 19: ...ner size 27 3 4 Disposal Separate the product and packaging materials e g paper metal plastic or non ferrous metals and dispose of in accordance with valid national legal requirements Replacing corner valves Handling Prevista Dry Plus washbasin module with concealed connection box 19 from 19 ...

Reviews: