Model
Year built:
4914.11
from 01/2010
en_INT
Advantix Top bathroom drain
Instructions for Use
Page 1: ...Model Year built 4914 11 from 01 2010 en_INT Advantix Top bathroom drain Instructions for Use...
Page 2: ...Advantix Top bathroom drain 2 from 26...
Page 3: ...data 8 2 4 Information for use 8 2 4 1 Installation variations 8 2 4 2 Sealing 9 2 4 3 Fire protection 13 2 5 Required accessories 13 3 Handling 15 3 1 Assembly information 15 3 1 1 Important note 15...
Page 4: ...does not extend to possible operating instructions The installation of Viega products must take place in accordance with the general rules of engineering and the Viega instructions for use 1 2 Labell...
Page 5: ...n Germany e g DIN DVGW Some passages in the text may refer to technical codes in Europe Germany These should serve as recommendations in the absence of corresponding national regulations The relevant...
Page 6: ...with proof of practicability in keeping with building law for stress classes A and AO ETAG 022 T1 Approved bonded sealings with proof of practicability in keeping with building law for stress classes...
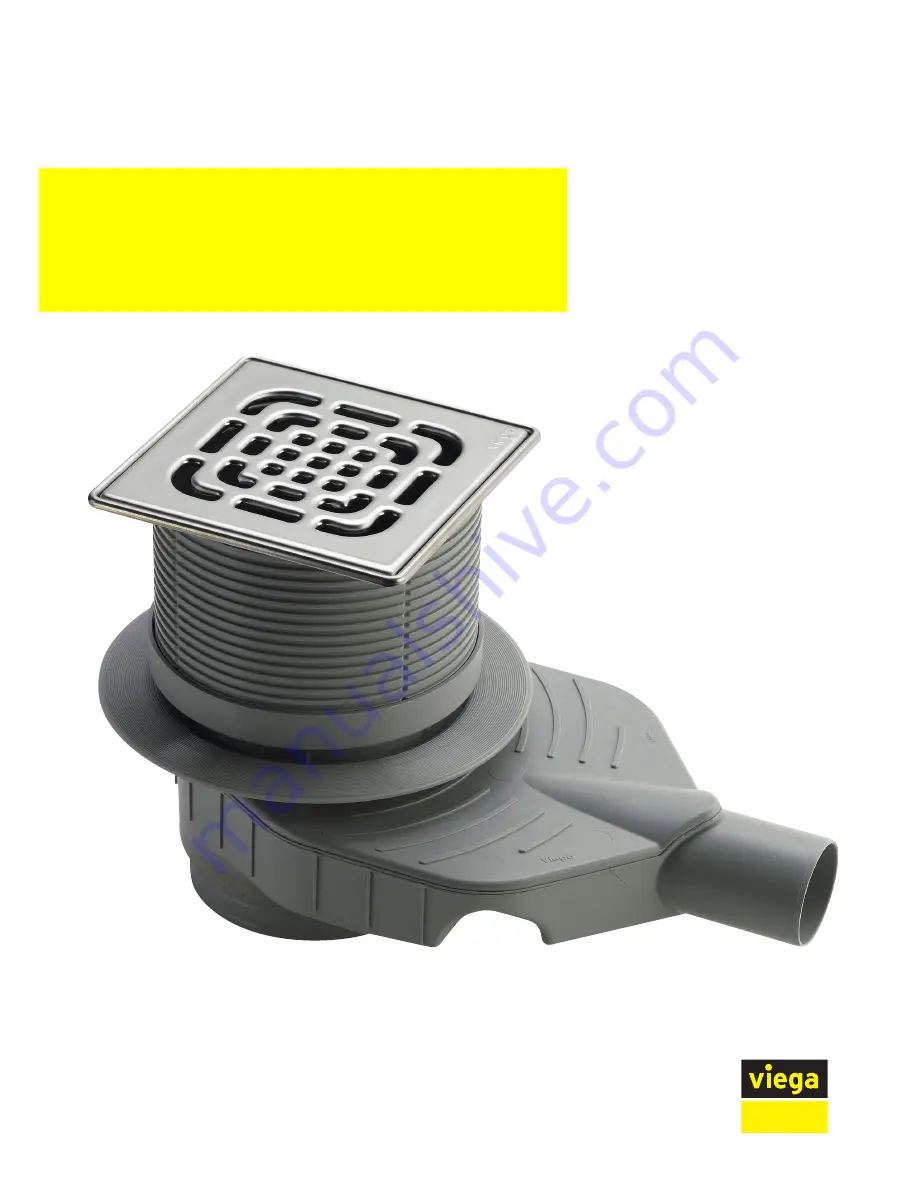
Page 7: ...aterial 2 2 3 Drainage capacity The drainage capacity is dependent on the chosen installation height The drainage capacity is 0 95 l s up to 1 l s with horizontal DN 50 drain support 2 3 Product descr...
Page 8: ...Installation dimen sions on page 15 Water head seal 35 up to 50 mm Load class K 300 kg 2 4 Information for use 2 4 1 Installation variations The mounting of the drain in a bare concrete floor is as f...
Page 9: ...people a structural engineer the on site fire protection inspector or the specialist engineer for fire protection If necessary proof of compliance with building code or an expert s report must exist...
Page 10: ...t insula tion This process has proved itself to be particularly effective for sealing balconies patios floor installation panels and cellar floors In addition sealing collars are often used as an addi...
Page 11: ...ing must be carried out in compliance with the valid standards and regulations see linktarget Normen EWT doesn t exist but y link required true Bonded sealing can be carried out with the help of a sui...
Page 12: ...e used n The screed must be laid at a minimum incline of 1 2 n The installation must be carried out properly in acc with the mounting instructions and the manufacturer s information 1 9 8 7 6 2 3 4 5...
Page 13: ...120 minutes can be achieved Fig 7 Example fire protection pipe lead in Mounting instruction of the R120 pipe lead in see model 4923 5 Art No 491 673 2 5 Required accessories Advantix tops are availab...
Page 14: ...ed You will find a corresponding set in the catalogue model 4998 3 If a bonded sealing is to be applied a suitable stacking element with sealing collar is required You will find a corresponding set in...
Page 15: ...ssary supply the required accessories Chapter 2 5 Required accessories on page 13 During assembly n Observe installation dimensions n Decide whether or not a backflow seal is required in the insertion...
Page 16: ...er edge sealing flange the floor piece remains in the delivery condi tion The water seal level is 50 mm and the immersion pipe length 48 mm Loosen clamping ring with screwdriver Remove clamping ring a...
Page 17: ...he screw of the clamping ring with max 2 5 Nm 0 2 Nm Alternatively tighten the end of the clamping ring up to or between the markings The water seal level is 40 mm and the immersion pipe length 38 mm...
Page 18: ...ing with max 2 5 Nm 0 2 Nm Alternatively tighten the end of the clamping ring up to or between the markings The water seal level is 35 mm and the immersion pipe length 33 mm 3 2 2 Mount base unit A fe...
Page 19: ...at it cannot shift when the subse quent works are applied Most importantly it must be ensured that the drain does not float when the concrete or screed is poured in NOTICE Product damage due to improp...
Page 20: ...onnection to the waste water system n The drain pipe has an internal sealing lip Position the drain on the floor and align horizontally Insert yellow protective plug Push the drain support into the dr...
Page 21: ...ied Inform the subsequent workers that the drain must be fully lined and that there must be no hollow spaces Requirements n A pipe to the planned drainage position is already in place for the connecti...
Page 22: ...hollow spaces 3 2 3 Sealing the drain NOTICE Product damage due to improper installation If hollow spaces occur during the lining of the drain leaks may occur when pressure is applied Check the proper...
Page 23: ...side facing upwards If EPDM sealing lanes are used the EPDM side must face upwards Position the sealing collar on the drain The screw holes must be visible through the recesses Position the sealing fl...
Page 24: ...s around the frame e g due to a leaky silicone joint can flow away A backflow seal is mounted in the following cases In the case of the risk of a build up of water that can soak through the screed Dur...
Page 25: ...en around the drain unit and the siphon can be removed using typical household cleaner It should be noted that the cleaning agent should be rinsed off after the prescribed soaking time There should be...
Page 26: ...Re insert grate 3 4 Disposal Separate the product and packaging materials e g paper metal plastic or non ferrous metals and dispose of in accordance with valid national legal requirements Handling Adv...