background image

66250905-EN - V1.0 - 06/02/14

3

Kristallo Series

Art. KRV98-KRV96 - Installation instructions

IP VIDEO INTERCOM MANUAL RESET

In case the  system locks (touch sensitive buttons not recognized) you can reset manually the video intercom:

1.  On the rear side of the video intercom, under the 28 way connector there is a small button see Fig. 3;

2.  Using a thickness tool, press shortly the button and wait for the video intercom reboot;

3.  Once the boot is complete the video intercom is ready to work;

This procedure reboots only the video intercom without affect any setting.

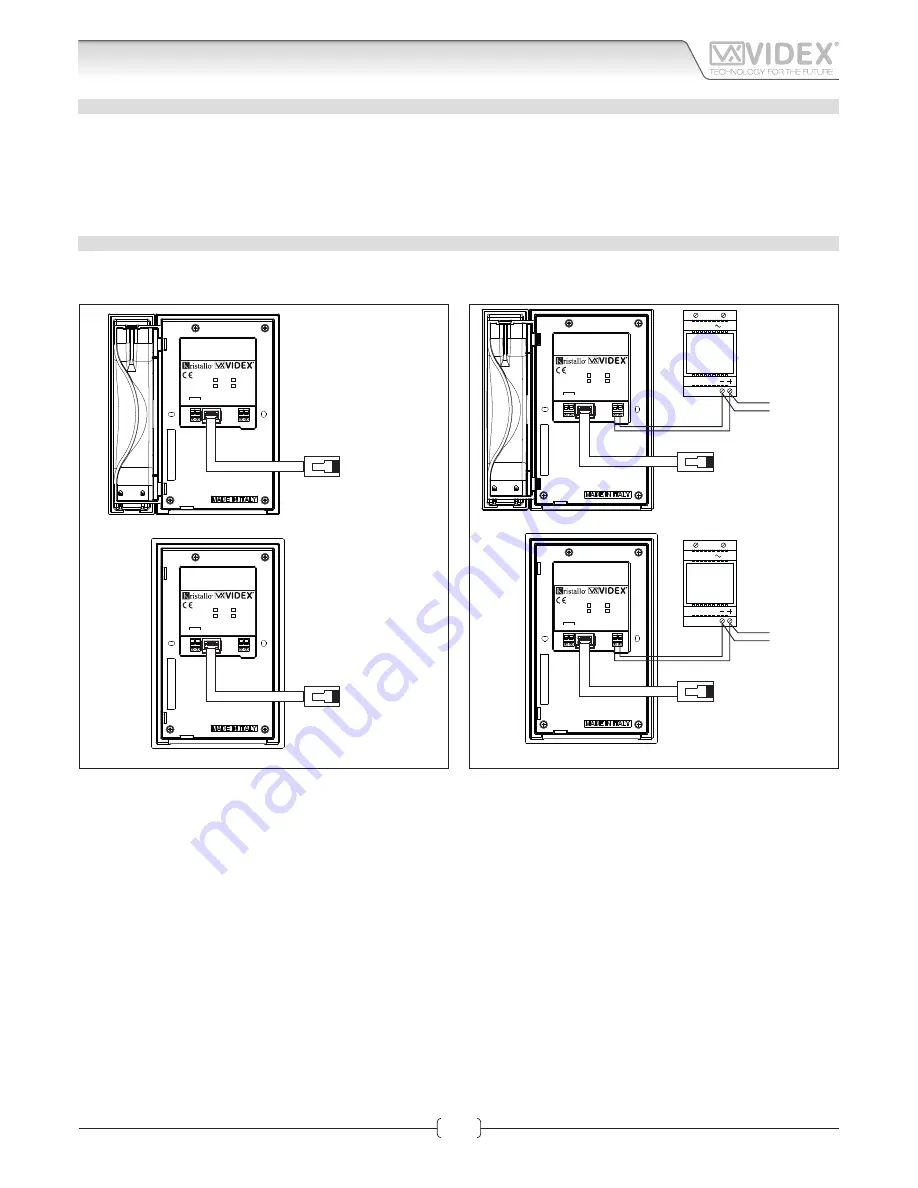
POWER SUPPLY & CONNECTION

In case of POE (Power Over Ethernet) Switch/Router, follow the connection shown in Fig. 4 otherwise, in case of standard Switch/

Router, follow the connection shown in figure Fig. 5.

LAN

+12Vdc GND

Made in Italy

KRV98
KRV96

/W (white)
/B (black)

H L

CAN BUS

LAN

+12Vdc GND

Made in Italy

KRV98
KRV96

/W (white)
/B (black)

H L

CAN BUS

Connect to a POE (Power Over 

Ethernet) Switch or Router

Connect to a POE (Power Over 

Ethernet) Switch or Router

Fig. 4  


LAN

+12Vdc GND

Made in Italy

KRV98
KRV96

/W (white)
/B (black)

H L

CAN BUS

LAN

+12Vdc GND

Made in Italy

KRV98
KRV96

/W (white)
/B (black)

H L

CAN BUS

230V

12Vdc

Art.AMR2-12

or

12Vdc 2A

PSU

230V

12Vdc

Art.AMR2-12

or

12Vdc 2A

PSU

Connect to a Switch, 

Router or directly** to the 

ethernet interface of the 

Art.4503

Connect to door panel's 

power supply unit*

Connect to a Switch, 

Router or directly** to the 

ethernet interface of the 

Art.4503

Connect to door panel's 

power supply unit*

To Art.4503

To Art.4503

Fig. 5  

*  When the devices are connected directly certain features which require the internet will not be available.
**  If the videointercom is not connected to a POE switch or router, it is necessary to connect an external PSU (terminals “+12Vdc” & “GND”). If the videointercom is provided in a video kit, you can use 

the PSU included in the video kit. For distances between the videointercom and the PSU up to 25 metres use 2 cables 1.0mm

2

 (AWG17).

Connection

Art. KRV98-KRV96 

 3.5" IP Videointercom

Summary of Contents for KRV96

Page 1: ...handsfree version or surface mount version with handset for handsfree or conventional A desk mount kit is available for the surface with handset version 10 100 Mbit Ethernet interface PoE or 12Vdc po...

Page 2: ...ATION BUTTON If the videointercom is in stand by but the monitor is switched off first press any button to switch on the display or With the videointercom in stand by and switched on it selects the pr...

Page 3: ...W white B black H L CANBUS ConnecttoaPOE PowerOver Ethernet SwitchorRouter ConnecttoaPOE PowerOver Ethernet SwitchorRouter Fig 4 LAN 12Vdc GND Made in Italy KRV98 KRV96 W white B black H L CANBUS LAN...

Page 4: ...r cable PC Laptop Art KRV96 98 IP videophone Fig 1 2 Standard or Wi Fi Router AMR2 12 12Vdc Power supply Patch Ethernet cable Patch Ethernet cable PC Laptop Art KRV96 98 IP videophone Fig 2 HARDWARE S...

Page 5: ...g Center option The window shown in Fig 5 will appear Select Change adaptor settings option on the left hand side The window shown in Fig 6 will appear Double click on the Lo cal Area Connection icon...

Page 6: ...ck on the Properties button The Local Area Connection Properties window shown in Fig 8 will appear Highlight Internet Protocol Version 4 TCP IPv4 from the list then click on the Properties button Fig...

Page 7: ...n the same range as the default IP address 192 168 1 4 in this example we are using 192 168 1 150 The range of IP addresses can be be tween 1 to 255 Only the last set of digits of the IP address needs...

Page 8: ...mpleting the details click on OK and close all windows and exit control panel 10 Your PC Laptop is now ready to change the Art KRV98 96 default IP address to one suitable for your network 11 Follow th...

Page 9: ...the IP Videointercom through the different tabs In case of problems or mistakes the videointercom can be restored to the factory preset following the procedure described in the IP videointercom restor...

Page 10: ...qualified domain After completing the SIP server connection fields remember to check the Enable registration to server Press the Configure button followed by Apply configuration A short countdown sign...

Page 11: ...iguration A short countdown signals that the device is updating the changes MODIFY PASSWORD The password that you can modify in this tab is the protection password required to access the advanced sett...

Page 12: ...l be used as melody From the video intercoms user interface it will be possible to select these files LOG FILES This tab is for technical support purposes If necessary it is pos sible to download the...

Page 13: ...o be retrievable using a PC smart phone or tablet already connected to the network This example uses Microsoft Windows 7 Other versions of Windows may differ slightly Open the Control Panel then doubl...

Page 14: ...the IP address is likely to be available If you re ceive replies then the IP address is in use and another should be used Finally use the details obtained above to complete the Subnet Mask Gateway an...

Page 15: ...but the server has still not confirmed the registration GREEN registration to SIP server enabled and the server has confirmed the registration DATE TIME If an internet connection is available the dat...

Page 16: ...Relay 2 Press the button to go back to the main menu CHRONOLOGY This submenu shows the list of call events The icon on the left of the event specifies the event type Incoming Call Outgoing Call and mi...

Page 17: ...ive selection navigate among the subpages using the or buttons Press the button to go back to the main menu AUDIO SETTINGS This subpage Fig 7 allows you to change the ringtone melody the ringtone volu...

Page 18: ...the or buttons Press the button to go back to the sub page navigation no parameters highlighted Press the button to go back to the main menu or navigate among the subpages by pressing the or buttons...

Page 19: ...hows the number of devices found While in progress you can inter rupt the search by pressing the button Once the search is complete Fig 14 the unit shows the search results and asks for confirmation T...

Page 20: ...Press the button to enable or disable the microphone mute When muting call on mute message the but ton icon changes from this to this and goes back to this when disabling conversation message Press t...

Page 21: ...02 14 21 Kristallo Series Art KRV98 KRV96 Installation instructions Kristallo Series Flush and surface videomonitor wall mounting instructions 135cm 135cm fig 1 fig 1a fig 2a fig 4 fig 4a fig 4b fig 3...

Page 22: ...the videophone by inserting the hooks in the corresponding openings and hook the plate by pushing it down as shown in figure 4 5 Test the system for correct operation SURFACE MOUNT KRISTALLO VIDEOPHO...

Page 23: ...66250905 EN V1 0 06 02 14 23 Kristallo Series Art KRV98 KRV96 Installation instructions Note...

Page 24: ...w videx security com marketing videx security com Northern UK office VIDEX SECURITY LTD Unit 4 7 Chillingham Industrial Estate Chapman Street NEWCASTLE UPON TYNE NE6 2XX Tech Line 44 0191 224 3174 Pho...

Reviews: