background image

Doc # INS-45S10SL 

Issue Date: 01/12/2012 

Revision: A 

Page 8 of 15 


9.


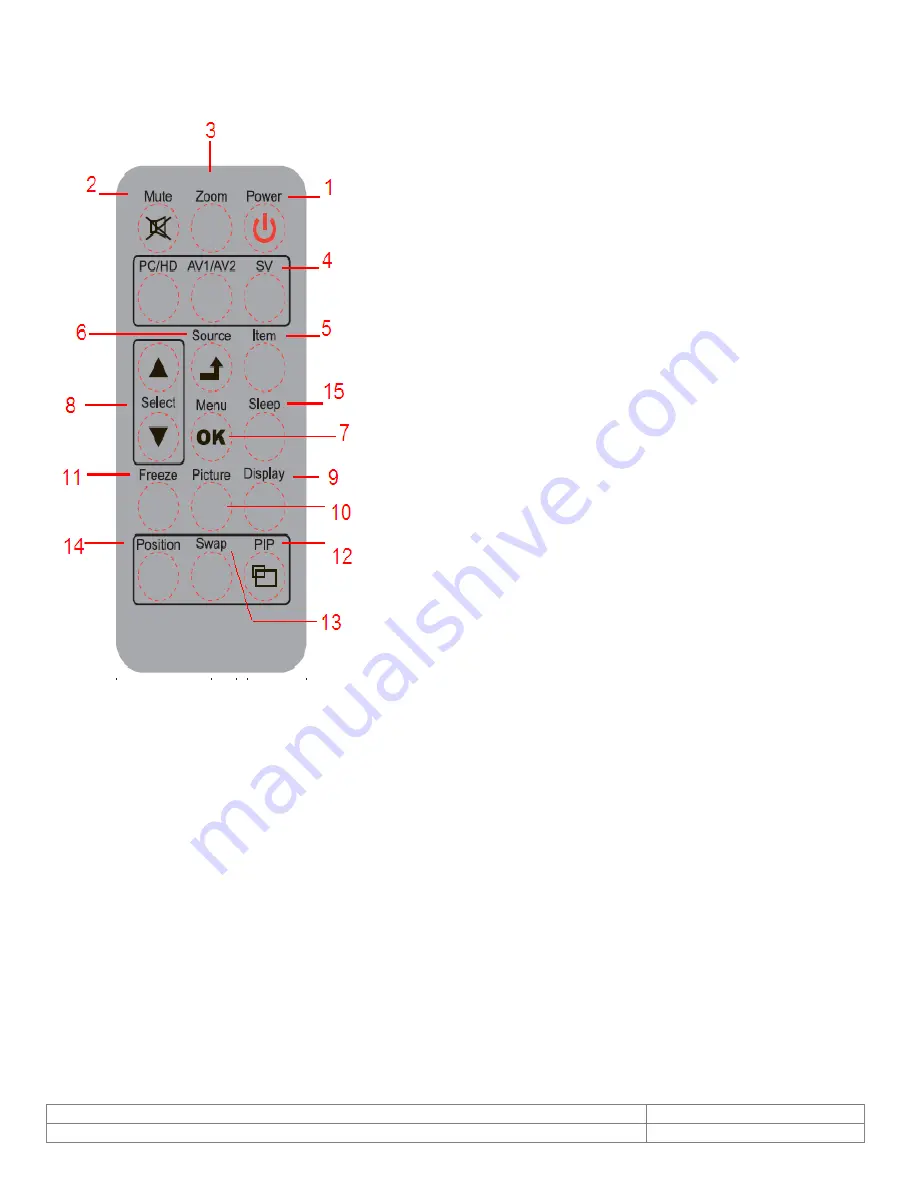
Remote control operation 


1.


Power

Push to turn on and turn off the unit. 

2.


Mute

Disable the unit's sound output, 

press the button again or the /- button to 
restore the volume. 

3.


Zoom

Toggle between the image ratios. 

(4:3/16:9/14:9/Movie/Panorama) 

4.


PC/HD, AV1/AV2, SV

Press to choose the desired 

signal source directly. 

5.


Item

As


hot key selection for Brightness/Contrast/ 

Backlight/Sharpness/Hue/Color /Volume > adjust 

6.


Source/ (Exit)

Push to select input 

signal. Used as "Return/Exit" function in OSD menu. 

7.


OK/Menu

Push to call out OSD menu. 

Used as "Confirm / OK" function in OSD menu. 

8.


Select

/

Change the function up or down.


9.


Display

Press to display the information on the screen, 

such as resolution, signal source etc

10.


Picture

Toggle between the different picture modes. 

Standard /Soft/Personal /Bright. 

11.


Freeze

: Press to freeze the picture(AV1,AV2,SVideo), 

press again to restore. 

12.


PIP

:

 Press to activate the PIP function and select the size of sub-picture Small/ Medium/ Large/ 

1+1/ Off. Off means PIP function is turned off. 


13.


Swap

In the PIP mode, press the button to switch the main picture and sub-picture. (This 

function works only when sub-picture exists.

)


14.


Position

PIP mode Press to select the position of sub-picture.

 (

4 corners and center

)


15.


Sleep: 

Select the Automatic turn off time. 


Summary of Contents for 45S10SL

Page 1: ...ve document located in the document s footer For technical assistance with this product please contact the supplier from whom the product was purchased Videology Imaging Solutions Inc Videology Imaging Solutions Europe B V 37M Lark Industrial Parkway Greenville Rhode Island 02828 USA Tel 401 949 5332 Fax 401 949 5276 North South American Sales sales videologyinc com www videologyinc com Neutronenl...

Page 2: ...vironment conditions 5 7 2 Classification of Defects 5 8 Reference Drawings 6 8 1 Drive Board w Input Connectors 6 8 2 LED Backlight Board 7 8 3 Function Key IR LED Board 7 9 Remote control operation 8 10 OSD Function 9 10 1 Source 9 10 2 Item Hot key simple operation 9 10 3 OSD Menu 9 10 4 PICTURE 9 10 5 SOUND 10 10 6 PIP 11 10 7 Display 11 10 8 Image Optimize 12 10 9 Function 13 10 10 Exit 13 11...

Page 3: ...Output BNC x 2 Input Impedance Auto Termination 1CH S Video Input 4P Mini Din X1 1CH PC Analog RGB Input D sub 15P 1CH Audio L R Input RCAX2 1CH PC Audio Phone jack 3 5ψ x1 Speaker 2WX2 option Power Input Voltage DC12 10 Power Consumption 19W max External Control OSD Function Control Operating Temperature 0 C 50 C Storage Temperature 10 C 60 C Overall Dimension 243 0 W x 185 1 H x 10 5D Panel only...

Page 4: ...Doc INS 45S10SL Issue Date 01 12 2012 Revision A Page 4 of 15 5 Block Diagram 6 Input Terminal Pin Assignment ...

Page 5: ...mperature 30 5 Inspection pattern Full white full black red green and blue screens B Acceptable Item Area Total A B Blue Black 2 3 4 Red Green White 1 3 3 Total 2 5 7 C The definitions of A and B zone Scratch on the polarizer Number 3 max Width 0 1 mm Length 6 mm Dent on the polarizer Number 3 max Average Diameter 0 3 mm Foreign material on the polarizer Number 2 max Average Diameter 0 5 mm Afteri...

Page 6: ...Doc INS 45S10SL Issue Date 01 12 2012 Revision A Page 6 of 15 8 Reference Drawings 8 1 Drive Board w Input Connectors ...

Page 7: ...nu 2 MENU Push to call out OSD menu Used as Confirm OK function in OSD menu 3 ITEM Hot key selection for Brightness Contrast Backlight Sharpness Hue Color Volume function OSD menu 4 Adjust Increase or decrease the value on OSD menu Used as UP or Increase value on the OSD Menu 5 Adjust Used as DOWN or Decrease value on the OSD Menu 6 Power Push to turn on and turn off the unit Power indicator Green...

Page 8: ...nu Push to call out OSD menu Used as Confirm OK function in OSD menu 8 Select Change the function up or down 9 Display Press to display the information on the screen such as resolution signal source etc 10 Picture Toggle between the different picture modes Standard Soft Personal Bright 11 Freeze Press to freeze the picture AV1 AV2 SVideo press again to restore 12 PIP Press to activate the PIP func...

Page 9: ...ontrast Backlight Sharpness Hue Color Volume 10 3 OSD Menu Push Menu button to display the Main menu Main menu includes Picture Sound PIP Display Function and Exit 6 categories Use Select button to select the function category to be adjusted Push the Menu OK button to enter the selected category 10 4 PICTURE Mode AV S VIDEO HD Mode PC D Sub Color Temp Use Select button to select the item to be adj...

Page 10: ...e Use Select button to select On Off all MENU FUNCTION MODE Brightness Use Select button to increase decrease the screen brightness all Contrast Use Select button to increase decrease the screen contrast all Back light Use Select button to increase decrease the screen backlight all Sharpness Use Select button to adjust the sharpness of the image AV S video Hue Use Select button to adjust the hue o...

Page 11: ...ton to adjust and then push Source button to return Mode AV S VIDEO HD Mode PC D Sub MENU FUNCTION PIP Source Use Select button to select the source of sub picture PIP Size Use Select button to select the size of sub picture Small Medium Large 1 1 Off Off means PIP function is turned off PIP Swap Push MENU button to switch the main picture and sub picture This function works only when sub picture ...

Page 12: ...djust the best image color PC MENU FUNCTION MODE H Position Use Select button to adjust the horizontal position of the image all V Position Use Select button to adjust the vertical position of the image all Image Ratio Use Select button to select the image ratio PC mode 4 3 16 9 AV S VIDEO mode 4 3 16 9 14 9 Movie Panorama all Image Optimize Push MENU button to enter the sub menu and use Select bu...

Page 13: ...OSD Language Use Select button to select the desired language all OSD Time Use Select button to increase decrease the OSD display time all OSD Blend Use Select button to increase decrease the transparent degree of the OSD display all Sleep Time Use Select button to select the automatic turn off time Off 10 20 30 60 90 120 150 180 Min all Image Auto Move Use Select button to select the image move t...

Page 14: ...Doc INS 45S10SL Issue Date 01 12 2012 Revision A Page 14 of 15 11 Outline Dimension of LCD Panel ...

Page 15: ...enville RI 02828 USA Tel 401 949 5332 Fax 401 949 5276 Videology Imaging Solutions Europe Neutronenlaan 4 NL 5405 NH Uden Netherlands Tel 31 0 413 256 261 Fax 31 0 413 251 712 Please visit our website at http www videologyinc com VIDEOLOGY IMAGING SOLUTIONS is an ISO 9001 registered video camera developer and manufacturer serving industrial machine vision biometric security and specialty OEM marke...

Reviews: