Vidao 32E66 User Manual Download Page 22

32E66-21

Menu Adjustments      

Picture Setting

The 

Picture

 menu offers options to enhance and refine the picture displayed on your TV based on ambient room light 

and personal preferences. Adjustment options include contrast, brightness, color, sharpness and color temperature.
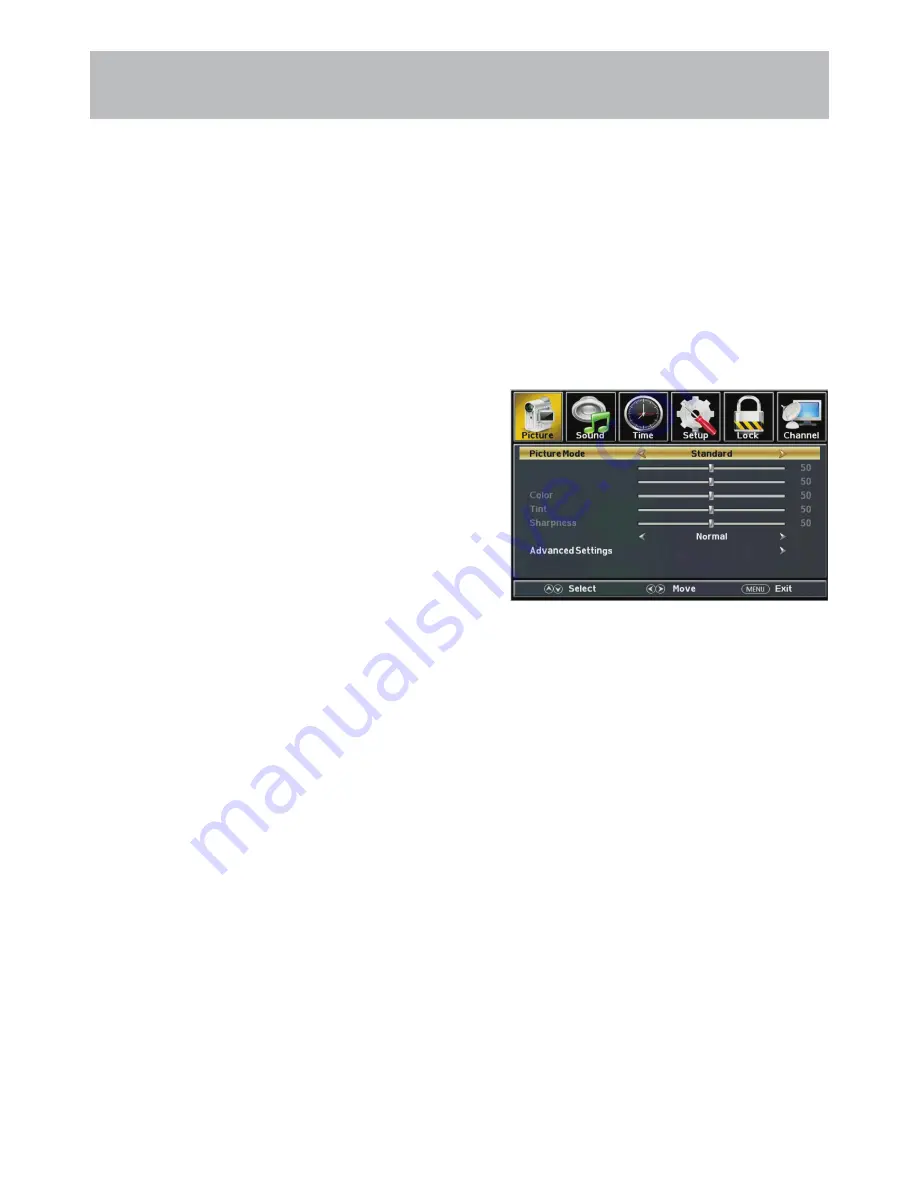
How to Navigate:

Press the 

 MENU

 button on the remote control. Navigate using 

 

 arrow buttons to select 

Picture

. Press the down 


arrow button to highlight 

Picture Mode

, then press the  

 arrow button to select your viewing preference from 5 factory 

options: Standard > Dynamic > 

soft

 >  

User

 >Power Saving*. The Standard setting is recommended for most brightly lit 

viewing environments. 

*The 

Power Saving 

feature adjusts the brightness of the TV in order to save energy and reduce power consumption.

Note: When adjustments are completed, you may select another menu by pressing the 

Menu

 button.

Brightness
Contrast

Color Temperature

•  Brightness

•  Contrast

Press down 

 arrow button to highlight 

Brightness

. Navigate 

using the 

 

 arrow buttons to increase or decrease overall 

brightness.

Press down 

 arrow button to highlight 

Contrast

. Navigate 

using the 

 

 arrow buttons to increase or decrease contrast 

intensity.

Press down 

 arrow button to highlight

 Color.

 Navigate using 

the 

 

 arrow buttons to increase or decrease color intensity.

Press down 

 arrow button to highlight 

Tint

. Navigate using 

the

 

 arrow buttons to adjust colors toward green or reddish 

tint.

Press down 

 arrow button to highlight 

Sharpness

. Navigate 

using the 

 

 arrow buttons to soften or view crisper edges in 

the picture.

Press down 

 arrow button to highlight your                         

Color Temperature.

 preference. Navigate using the 

 

 ar-

row buttons to select Cool(more bluish tone), Normal or Warm 

setting.

•  Advanced Settings

Adjust advanced video features to fine tune the picture.

Press 

button to enter.

•  Color

•  Tint

•  Sharpness

•  Color Temperature.

Summary of Contents for 32E66

Page 1: ...D TELEVISION 32E66 Ver 1 0 For technical support the VIDAO Technical Support Center is available 24 hours a day 7 days a week for technical assistance or troubleshooting To contact us by phone please...

Page 2: ...uring lightning storms or when unused for long periods of time damaged in any way such as power supply cord or plug is damaged liquid has been spilled or objects have fallen into the apparatus the app...

Page 3: ...sure of The type of power supply to your home consult your electronics retailer or local power company 6 Power Cord Polarization This TV is equipped with a three wire grounding type plug a plug with a...

Page 4: ...and Liquid Entry Never push objects of any kind into this TV through openings as they may touch dangerous voltage points or short out parts that could result in a fire or electric shock Never spill li...

Page 5: ...uld be connected to the grounding system of the building as close to the point of the cable entry as practical FCC REGULATORY INFORMATION This television has been tested and found to comply with the l...

Page 6: ...Theater System 18 TV Setup Initial Setup Wizard 19 TV Channel Setup Channel Auto Scan 20 Picture Setting Contrast 21 Brightness 21 Color 21 Tint 21 Sharpness 21 Color Temperature 21 Advanced Setting 2...

Page 7: ...Save the carton packing for future shipping Remote Control AAA Batteries 2 Quick Start Guide User Manual Child Safety Audio Video Cable Power Cable Pedestal Base Pedestal Base Screws 10 Arm of Base A...

Page 8: ...32E66 7 Align and insert screws 4 to connect pedestal base and arm Align and insert screws 6 to connect pedestal arm to the back of the TV Installing the Base...

Page 9: ...batteries if you do not plan to use the remote for an extended period of time Do not mix batteries of different age and or type Always discard used batteries safely Do not expose the remote control t...

Page 10: ...be unstable and the effective range will be reduced 2 Do not hit or violently shake the remote control 3 Never expose the remote control to high temperature or humidity 4 If the remote is not used for...

Page 11: ...EP Press to activate the Sleep function The TV will automatically turn off after 5 10 15 30 60 90 120 180 240 minutes OFF 18 MENU Press to display the Main menu 19 ASPECT Select the viewable display a...

Page 12: ...Press the CH CH buttons to select desired submenu then use the VOL VOL buttons to adjust confirm 3 Channel CH CH Press the CH CH buttons to select a channel in the TV mode 4 Volume VOL VOL Press the...

Page 13: ...coaxial cable not included to a surround sound receiver 7 CVBS L R Connect a device using a composite connection 8 Component Y Pb Cb Pr Cr Audio in Input Connect to a device with a component connecti...

Page 14: ...rmined by your location geographical terrain distance form the local broadcast transmitter and strength of antenna Connecting an antenna or basic cable service Connect the RF coaxial 75 ohm cable from...

Page 15: ...ed TV REAR PANEL Digital set top box gaming console or blu ray w HDMI interface Digital Cable Satellite Set Top Box How to connect On the back of your device connect the HDMI cable form HDMI out on de...

Page 16: ...d up incorrectly You must hook up audio cables seperately How to Use Press the INPUT button on the TV remote Then use the arrow buttons to highlight component Press ENTER Connecting a device with a Co...

Page 17: ...t top box gaming console or DVD Y Pb Cb Pr Cr Component In CVBS Audio In Line Out L R L R L R Component Audio In CVBS In Source Select PC Media HDMI1 HDMI2 HDMI3 How to Connect Match and insert the ye...

Page 18: ...ghlight PC Press ENTER NOTE If your PC uses a standard signal mode the screen will adjust automatically VGA Audio Cable not included TV REAR PANEL TV REAR PANEL Audio Amplifier Audio Cable not include...

Page 19: ...UT audio output and listen through all inputs except VGA VGA does not support digital audio How To Setup Digital Output Press the MENU button on the remote control Press the right u arrow button to se...

Page 20: ...izard will only appear the first time the TV is turned on Step 1 Select a Language Press the u arrow button to select the correct time zone Press the u arrow button to modifiy Daylight Saving Time or...

Page 21: ...al minutes to complete Cable Mode Air Mode Select Air when TV is connected to an indoor outdoor antenna Press the t u arrow button to highlight Air Press the q arrow button to select Auto Scan Press t...

Page 22: ...ssing the Menu button Brightness Contrast Color Temperature Brightness Contrast Press down q arrow button to highlight Brightness Navigate using the t u arrow buttons to increase or decrease overall b...

Page 23: ...nvironments MTS Press down q arrow button to highlight MTS Press t u button to select Mono Stereo SAP Mono Sets the sound to mono Stereo Sets the sound to stereo when stereo is not available The sound...

Page 24: ...Min 120Min 180 Min 240 Min OFF Press down q arrow button to highlight Time Zone then press the u arrow button to select between Eastern Central Mountain Pacific Alaska Hawaii Samoa Newfoundland Atlant...

Page 25: ...er menu Adjust the duration of the OSD on screen display menu Press t u button to select Menu Languages Transparency OSD Time Out Select Move Exit Menu Language Transparency Closed Captio OSD Timeout...

Page 26: ...XT1 4 Press down q arrow button to highlight Digital CC Navigate using the t u arrow buttons to select Off Service 1 6 Press down q arrow button to highlight Option Press the u arrow button to enter a...

Page 27: ...ighlight PC Settings then press uarrow button to select from the following options Highlight H Pos Navigate using thet u arrow buttons to adjust the position of images displayed from side to side High...

Page 28: ...US Rating Navigate using the t u but tons to highlight TV MPAA menu Highlight TV then press the u arrow button to enter the TV Ratings menu and select your preference Highlight MPAA then press the u a...

Page 29: ...highlight Canada English then press the u arrow button repeatedly to select your ratings preference Off Turn off C Appropriate for all children C8 Appropriate for everyone 8 years old and up G Genera...

Page 30: ...Navigate using the arrow buttons to access the list of available channels Press ENTER to change the channels status A checkmark indicates a channel has been added Highlight Channel Label to name or re...

Page 31: ...ative widescreen content and undistorted 4 3 images with black bars 2 WIDE Stretches certain 4 3 content and may reduce visible black bars 3 ZOOM Stretches the image both vertically and horizontally t...

Page 32: ...OKirree Tho Bit Rate 320K Artist Emms Christi Sampling 44K Year 1995 Size 11725kBytes Media PC Press the buttons to select Photo or Mu sic and then press the ENTER button to enter Press the buttons to...

Page 33: ...Contrast 1200 1 Vertical Viewing Angle degrees 178 Horizontal Viewing Angle degrees 178 Maximum Colors millions 16 7M Power Consumption 110 Watts Audio Power 2 X 8 W Dimension without Pedestal Install...

Page 34: ...24 Cannot use certain functions If the item chosen in a menu is shown in gray text that item cannot be selected in the current input No sound Check that connected audio cables are completely inserted...

Page 35: ...e 24 hours a day 7 days a week for technical assistance or troubleshooting at 1 800 936 1168 This warranty does not cover any product which has been subject to damage due to an act of nature misuse ne...

Reviews: