background image

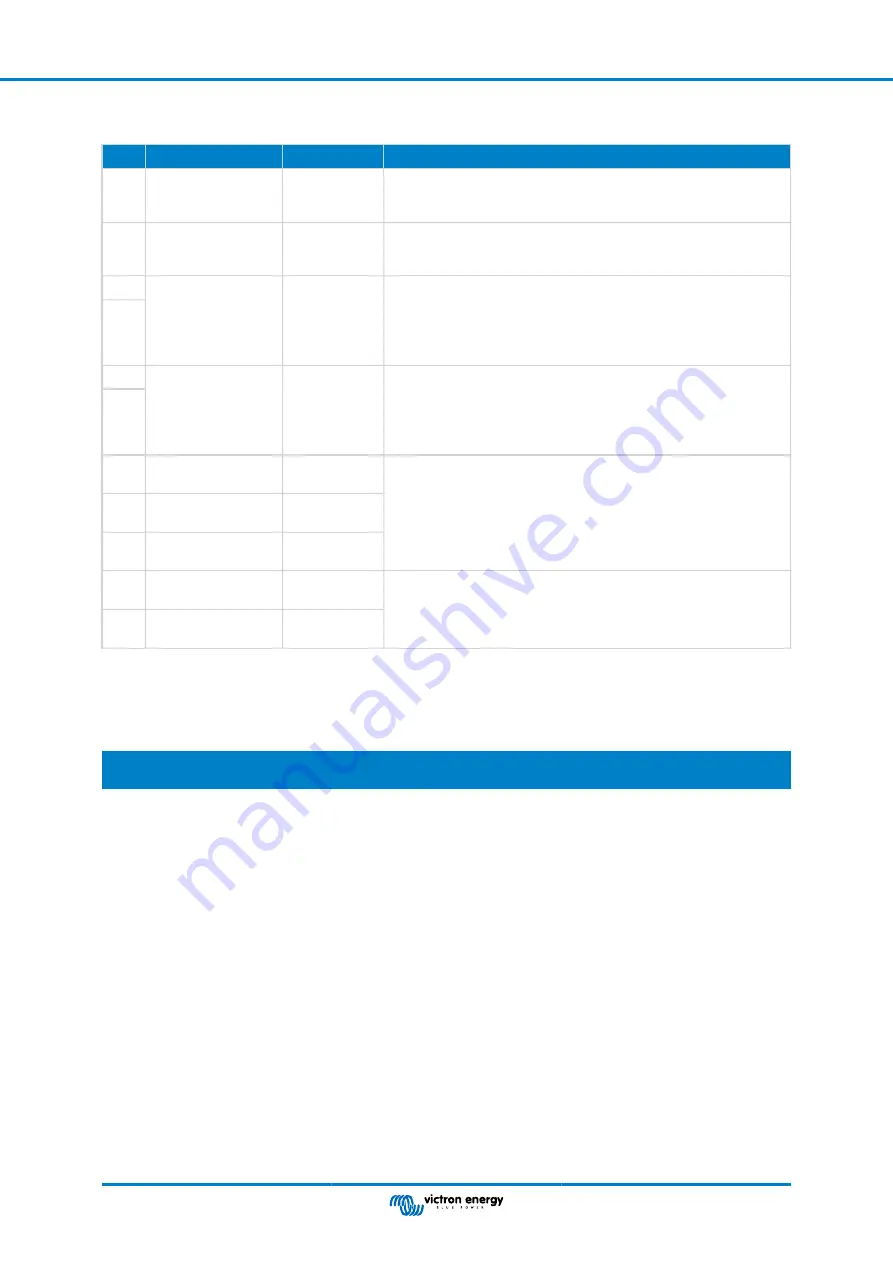
11.4. Multi connector pin-out and overview

Pin

Name

Type

Function

1

AUX voltage output
+

System
voltage
positive

The positive connection to power auxiliary devices, like a GX device.

2

AUX voltage output -

System
voltage
negative

The negative (ground) connection to power auxiliary devices, like a GX
device.

3

Allow to charge

Potential free
contact

Turns chargers on or off via a wired signal. Pin 3 can be used as the
signal input for pin 4 and wired e. g. from AUX + or AUX -. See system
examples for correct wiring.

When charging is allowed, the contacts are closed and when not
allowed, the contacts are open.

4

5

Allow to discharge

Potential free
contact

Turns loads on or off via a wired signal. Pin 5 can be used as the
signal input for pin 6 and wired e. g. from AUX + or AUX -. See system
examples for correct wiring.

When discharging is allowed, the contacts are closed and when not
allowed, the contacts are open.

6

7

Programmable relay
NC

Potential free
contact

The programmable relay is used to either control an alternator or as an
alarm relay. For details see chapter 

Programmable relay wiring [10]

.

8

Programmable relay
COM

Potential free
contact

9

Programmable relay
NO

Potential free
contact

10

Remote on/off H

Pull-up
resistor

To remotely turn the Lynx Smart BMS on or off. For full functionality see
chapter 

Wiring a Remote on/off switch [10]

.

11

Remote on/off L

Pull-down
resistor

11.5. Lynx Smart BMS related menu structure of the GX device

This is an overview of the Lynx Smart BMS related menu structure of the GX device. To see all menu items shown here, Venus
OS v2.90 or later is required.

Menu item

Default value /

unit

Description and / or possible values

Lynx Smart BMS

Shows SoC, voltage and current in the device list

Switch

On

Soft switch to manually switch the Lynx Smart BMS to Standby or
On mode

State

Running

Possible states: Initialising, Pre-charging, Running, Shutdown,
Standby

Error

#0 - No error

Error state

Battery

Voltage, current,

power

Shows current battery monitor data

State of charge

%

State of charge in percent

Consumed AmpHours

Ah

Displays the consumed AH since the battery was last fully charged

Time-to-go

Days / Hours

Displays the estimated time, based on the current load and
discharge floor setting

Alarms

High internal temperature

Ok

Low cell voltage

Ok

Low SoC

Ok

History

Deepest discharge

Ah

The deepest discharge since last history reset

Lynx Smart BMS

Page 35

Appendix

Summary of Contents for Lynx Smart BMS 500

Page 1: ...Lynx Smart BMS ENGLISH ...

Page 2: ... ATC controlled loads and chargers 9 5 3 6 Wiring a Remote on off switch 10 5 3 7 Programmable relay wiring 10 5 3 8 Connect the GX device 11 5 4 System examples in detail 11 5 4 1 Lynx Smart BMS 2x Lynx Distributor and lithium batteries 11 5 4 2 Lynx Smart BMS 1x Lynx Distributor and lithium batteries 12 5 4 3 Lynx Smart BMS only 13 6 Configuration and settings 14 6 1 Power up for the first time ...

Page 3: ...ncomplete current reading 27 8 5 2 Incorrect state of charge reading 27 8 5 3 State of charge does not increase decrease fast enough or too fast when charging discharging 27 8 5 4 Synchronisation issues 27 8 6 VictronConnect issues 28 8 7 GX device issues 28 9 Warranty 29 10 Technical specifications 30 11 Appendix 31 11 1 LED indications warnings alarm and error codes 31 11 2 Supported NMEA 2000 P...

Page 4: ...ck safety mechanism and also suitable as a remote controllable main system switch Battery monitor indicating state of charge percentage and more data Pre alarm signal provide a warning before the system shuts down due to a low cell voltage Bluetooth for use with our VictronConnect App for setup monitoring and diagnostic Local and remote monitoring using a Victron GX device for example the Cerbo GX...

Page 5: ...ttery in case the primary controls ATC and ATD contacts as well as DVCC fail to disable the loads and or chargers when required 2 It can be used as a remote controlled main system on off switch via the VictronConnect app a GX device only Standby and On as well as using the Remote on off terminals 2 3 Built in pre charge circuit The built in pre charge circuit pre charges capacitive loads such as i...

Page 6: ...ional state battery SoC and alarms and make them available to be controlled via our remote monitoring VRM portal Lynx Distributor fuse monitoring via our VictronConnect app and a connected GX device Communication with the Lynx Distributors is via it s RJ10 connectors The Lynx Smart BMS can be used to read out the Lynx Distributors generate alarms in case a fuse is blown or communication is lost Fu...

Page 7: ... the front of the units is upside down as well use the special stickers are included with each Lynx module so that the text is orientated the correct way Fused battery connections Fused DC loads and charge connections Battery monitor BMS and contactor Lynx Smart BMS with two Lynx Distributors From battery bank To DC system All DC loads and DC charge sources Example of Lynx module orientation the b...

Page 8: ...A 6kW 12kW 24kW 4 2 2 Fusing The Lynx Smart BMS is not a system fuse It only warns when the current is too high Fusing needs to be done externally for example by connecting Lynx Distributor modules to the Lynx Smart BMS or by using external fuse holders and fuses Always use fuses with the correct voltage and current rating Match the fuse rating to the maximum voltages and currents that potentially...

Page 9: ...rk on batteries should be carried out by qualified personnel only Observe the battery safety warnings as listed in the battery manual Store this product in a dry environment The storage temperature should be 40 C to 65 C No liability can be accepted for damage in transit if the equipment is not transported in its original packaging 5 2 Mechanical connections 5 2 1 Lynx Smart BMS connection feature...

Page 10: ...is the DC system side Connect all Lynx modules to each other using the M8 holes and bolts on the left and right Take care that the modules correctly slot into the rubber joiner recesses Place the washer spring washer and nut on the bolts in the correct order and tighten the bolts to a torque of 14Nm Mount the Lynx assembly in its final location using the 5mm mounting holes Lynx module M8 bolt M8 S...

Page 11: ...r with the retainer clip of the RJ10 connector facing away from you Feed the RJ10 cable through the recess at the bottom of the Lynx Distributor see above picture Plug the RJ10 cable into the RJ10 connector at the bottom of the Lynx Smart BMS Connection example Lynx Smart BMS system RJ10 cables indicated in yellow 5 3 3 Connect BMS cables Connect the BMS cables from the lithium battery to the BMS ...

Page 12: ...s A common example is by providing 12V wired from AUX equal to system voltage to pin 3 and pin 5 An active high signal is then delivered to the connected remote H ports of the chargers and loads via pin 4 respectively pin 6 In case of a low cell voltage ATD opens the contact between pin 5 and pin 6 The load is then switched off and further discharge is prevented If the temperature is too low to ch...

Page 13: ...in 11 For the Lynx Smart BMS to operate the contact between pin 10 and pin 11 must be closed 5 3 7 Programmable relay wiring The programmable relay is an SPDT relay Single Pole Double Throw with 3 contacts Common COM Normally Open NO Normally Closed NC The relay makes contact between COM and NC when the relay is not active while COM and NO makes contact when the relay is activated Depending on the...

Page 14: ...and a CCGX 5 4 System examples in detail 5 4 1 Lynx Smart BMS 2x Lynx Distributor and lithium batteries A Lynx Smart BMS with two Lynx distributors and a Cerbo GX with GX touch panel form the heart of this system They continuously monitor the batteries fuses connected loads chargers and inverter charger s A typical system can contain the following components Lynx Smart BMS with built in contactor ...

Page 15: ...as before but this time with a single Lynx Distributor on the load side of the Lynx Smart BMS and the lithium battery connected directly to the input of the Lynx Smart BMS This is useful if only a single lithium battery or a single series string of lithium batteries is used Otherwise the same components are used DC loads Solar charger Cerbo GX VE Bus VE Direct VE Can RJ10 cable BMS cables Lynx Sma...

Page 16: ...ther with a simple DC system Please also note that no GX device is used It is not absolutely necessary for the operation of the Lynx Smart BMS However without GX device it is not possible to control compatible inverter chargers and MPPTs via DVCC DC loads BMS cables ATD allowed to discharge Lynx Smart BMS Fuse System with a Lynx Smart BMS without other Lynx modules and GX device Lynx Smart BMS Pag...

Page 17: ...rmware press the UPDATE button The firmware update is even easier via the VRM Remote firmware update feature requires a GX device in the system and internet connection In case of a new installation it is also recommended to check and update the firmware of each connected lithium battery This is done via Bluetooth using the VictronConnect app in a similar manner to that outlined above Updating the ...

Page 18: ...x Smart BMS starts a new full charging cycle This can be adjusted if required A new charge cycle means that the CVL charge voltage limit is increased from 13 5V for a 12V battery to 14 2V In addition to the SoC threshold a new charging cycle is started after a firmware update when the battery voltages are below 12V 24V 48V 3V per cell or when a low cell voltage is detected Battery monitor settings...

Page 19: ...rge manually set the current state of charge Synchronise SoC to 100 manually synchronise SoC to 100 requires VictronConnect v5 70 or later and Venus OS v2 90 or later VictronConnect settings Lynx Smart BMS 6 4 Lynx Distributor settings These instructions only apply if the system contains one or more Lynx Distributors Each Lynx distributor must be addressed and set to A B C or D This is done via a ...

Page 20: ...Lynx Smart BMS Page 17 Configuration and settings ...

Page 21: ...city and the number of paralleled batteries is set correctly Check that the system voltage has been set correctly Check if the fuse names of the Lynx Distributor if applicable are correctly named If a GX device is connected check that it is powered from the Lynx Smart BMS AUX terminals Check that the Lynx Smart BMS displays correctly on the GX device Disconnect a random BMS cable and verify that t...

Page 22: ...Status LED Bluetooth LED Lynx Smart BMS LEDs Lynx Smart BMS Page 19 Commissioning and Operation of the Lynx Smart BMS ...

Page 23: ... time Standby The Lynx Smart BMS can be put into Standby mode via the soft switch in the VictronConnect app or via the GX device and is used when the boat is docked or the RV is parked to prevent accidental discharging and charging from sources on the system side All systems will be shut down except for equipment powered by the AUX power port from which we recommend for powering the GX device This...

Page 24: ...he low temperature threshold adjustable in battery has been reached the ATC contact opens and will turn off all chargers If the Lynx Smart BMS is connected to a GX device DVCC compatible chargers that are connected to the same GX device will be turned off as well 7 5 Battery monitor operation The Lynx Smart BMS has a built in battery monitor It measures battery voltage and current Based on these m...

Page 25: ...t v5 70 or later and Venus OS v2 90 or later 7 8 VictronConnect Bluetooth live data advertisement support Battery voltage current state of charge and remaining running time at a glance See what you want to know in seconds in the VictronConnect app Device list The advantage is that the data is available much faster together with data from other Bluetooth smart devices and the range exceeds that of ...

Page 26: ...ug the 11 pin multi connector from its socket and reinsert it after 5 seconds The BMS will activate and close its contactor so that the battery is again connected to the system even though the battery voltage might be too low The BMS will close the ATC and ATD contacts providing that the battery allows this However in case of an empty battery the ATD contact will stay open and only the ATC contact...

Page 27: ...rn off or remove some loads or chargers and rule out wiring problems or shorts Internal error Contact your Victron supplier if one of the following errors are occurring Internal supply error Red LED flashing 12 times every 4 seconds Initialization error Red LED flashing 9 times every 4 seconds Contactor failure Red LED flashing 10 times every 4 seconds Hardware error GX device alarm calibration lo...

Page 28: ... the cells from over voltage 8 4 2 The BMS is prematurely turning loads off This could be because of a cell imbalance If a cell voltage falls below the Allowed to Discharge cell voltage setting in the battery default 2 8V the BMS will turn the loads off Check the cell voltages of all batteries that are connected to the BMS using the VictronConnect app Also check if all batteries have the same Allo...

Page 29: ...f the BMS is functional To test if the BMS is functional disconnect one of the battery BMS cables and see if the BMS will go into alarm mode BMS Check BMS functionality by deliberately loosening a BMS cable 8 4 6 System in OFF mode This is indicated by the status LED off and the Bluetooth LED flashing every 3 seconds The Lynx Smart BMS goes into OFF mode once a low cell voltage event occurred and ...

Page 30: ...oltage Voltage Tail current of battery capacity Charge detection time minutes Practical example default battery monitor settings and a 12 8V 200Ah lithium battery for the conditions that must be met before synchronisation takes place The battery voltage has to be above 14 0V The charge current has to be less than 0 04 x battery capacity Ah For a 200Ah battery this is 0 04 x 200 8A Both above condi...

Page 31: ...and check if it is set to VE Can Lynx Ion BMS 250kbit s Also make sure that the Lynx Smart BMS is connected to the VE Can port of your GX device and not the BMS Can port e g on a Cerbo GX RJ45 terminator or cable issue VE Can devices connect in daisy chain to each other and a RJ45 terminator needs to be used with the first and last device in the chain When connecting VE Can devices always use manu...

Page 32: ...proper or unreasonable use or misuse neglect exposure to excess moisture fire improper packing lightning power surges or other acts of nature This limited warranty does not cover damage deterioration or malfunction resulting from repairs attempted by anyone unauthorized by Victron Energy to make such repairs Non compliance with the instructions in this manual will render the warranty void Victron ...

Page 33: ...harge port maximum current rating 0 5A at 60Vdc protected by resettable fuse Allow to discharge port maximum current rating 0 5A at 60Vdc protected by resettable fuse Programmable relay SPDT maximum current rating 2A at 60Vdc Connections Busbar M8 VE Can RJ45 and RJ45 terminator I O Screw terminals Battery BMS cables Male and female circular 3 pole connector with M8 screw ring Up to 26 batteries c...

Page 34: ...rnating System in bootloader mode updating firmware Red flashing 1 time every 4 seconds Warning see VictronConnect for more information Red flashing 2 times every 4 seconds Battery communication error check battery BMS cables Red flashing 3 times every 4 seconds High low cell voltage or high low temperature detected Red flashing 4 times every 4 seconds High BMS temperature detected Red flashing 5 ...

Page 35: ...ature If the fans are not running contact your Victron dealer W B04 112 Warning bad contactor Reduce the current to prevent an imminent system shutdown Do this by reducing the load or by turning loads off Contact your Victron dealer W B06 Load will disconnect The loads will be turned off in 30 seconds if fault is not resolved For example low battery voltage This warning is always in combined the r...

Page 36: ... battery settings in the VictronConnect app This error occurs when the battery voltage is outside all system voltage ranges 9V Vbat 60V E B11 11 Hardware error Contact your Victron dealer E B25 25 Pre charge error The load resistance is too low to pre charge the loads Disconnect or reduce some DC loads E B26 26 Contactor error Contact your Victron dealer E B34 34 Wrong system voltage Check battery...

Page 37: ...1 Class and function N2K device class Electrical generation N2K device function Battery For more information see the NMEA2000 MFD integration guide 11 3 List of battery monitor settings Description default value adjustable fixed automatic Battery capacity 200Ah Yes No No Charged voltage 14 0V 28 0V 56 0V Yes No No Tail current 4 Yes No No Zero current calibration No No Yes at power up Peukert expo...

Page 38: ...ogrammable relay COM Potential free contact 9 Programmable relay NO Potential free contact 10 Remote on off H Pull up resistor To remotely turn the Lynx Smart BMS on or off For full functionality see chapter Wiring a Remote on off switch 10 11 Remote on off L Pull down resistor 11 5 Lynx Smart BMS related menu structure of the GX device This is an overview of the Lynx Smart BMS related menu struct...

Page 39: ...istory reset Clear history Press to clear Clears all history data Diagsnostics Diagnostics Shows last known errors Fuses Distributor A Ok Possible states Ok Fuse blown Fuse 1 4 Ok Possible states Ok Not used Blown Distributor B Ok Possible states Ok Fuse blown Fuses 1 4 Ok Possible states Ok Not used Blown IO System switch Enabled Status of the system switch Allow to charge Yes Status of the ATC s...

Page 40: ...1 10 5 8 8 166 2 5 4 80 9 28 9 8 0 184 7 Rev02 Dimensions in mm LYN034160200 Lynx Smart BMS 500 Dimension Drawing Lynx Smart BMS D E F C 1 2 3 4 B A 3 2 1 5 C D 4 6 7 8 A B 8 7 6 5 F E Lynx Smart BMS enclosure dimensions Lynx Smart BMS Page 37 Appendix ...

Reviews: