18
|
Installation and Operation
XX-198-00
VM-717/719LCD Monitors
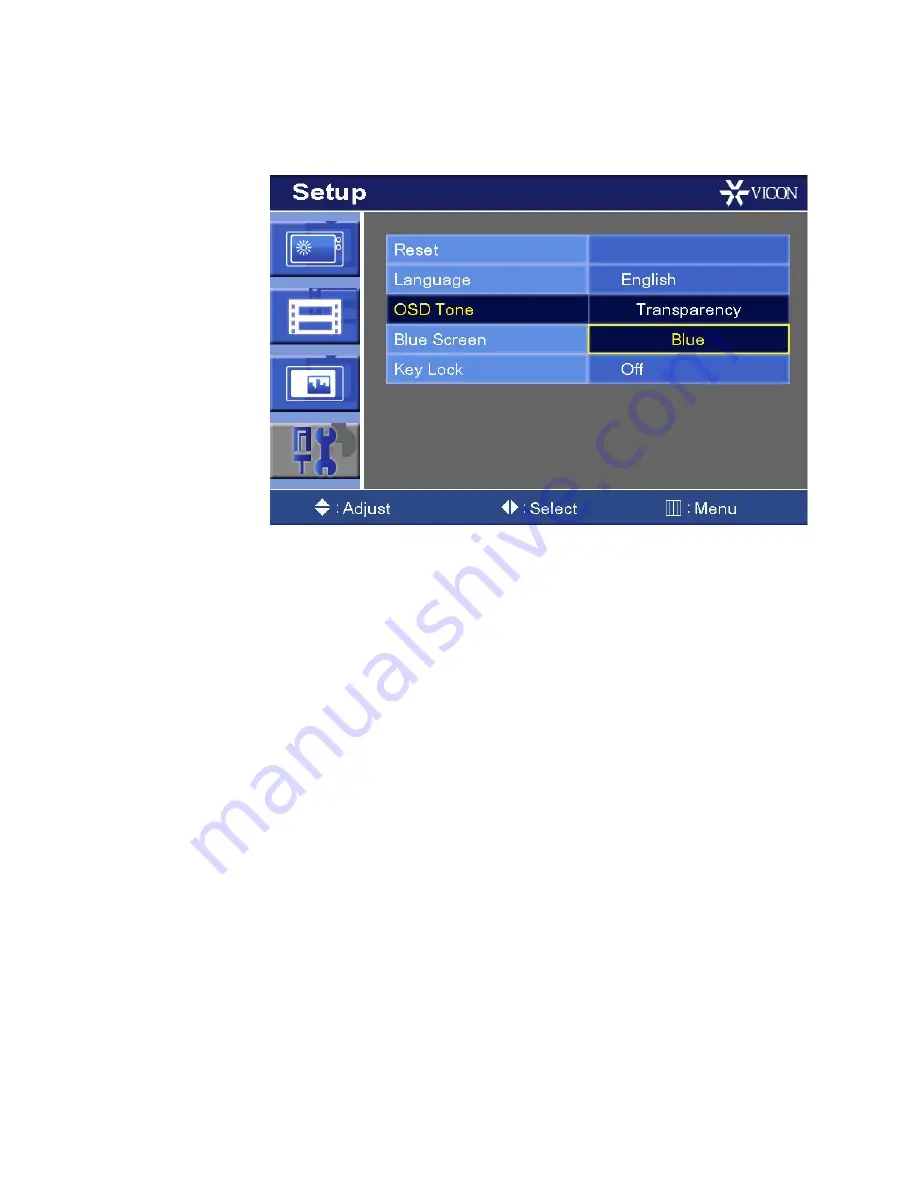
OSD Tone
Select Blue or transparent background for OSD and press Enter.
Page 1: ...cisely as described in the documentation This system has not been designed to be used in life critical situations and must not be used for this purpose Copyright 2008 Vicon Industries Inc All rights r...
Page 2: ......
Page 3: ...n tight spaces where they will be pinched or used to bear weight Allow some slack in the cord where it enters the unit 12 Lightning Disconnect the product from its power source and cable system when p...
Page 4: ...ipment off and on the user is encouraged to try and correct the interference by one or more of the following measures Reorient the receiving antenna Relocate the equipment with respect to the receiver...
Page 5: ...his manual describes the installation and operation of the Vicon VM 717LCD and VM 719LCD monitors The chapter consists of the following topics Topic Page Introduction 2 Connectors 3 Mounting 4 Control...
Page 6: ...r SOURCE video input selection AUTO geometry adjustment cursor and adjustment up and down Volume controls infrared sensor for the remote control and a MENU button for the on screen display Connectors...
Page 7: ...Description 1 12 VDC power input 2 D Sub connector VGA input 3 Video 1 Input composite video input 4 Video 1 Output looping output for Video 1 5 Video 2 Input composite video input 6 Video 2 Output lo...
Page 8: ...Monitors Mounting The monitors are provided with an easel stand for table mounting and may be wall or rack mounted using optional accessory kits Wall Mounting You can wall mount the monitor using the...
Page 9: ...Mounting 5 VM 717 719LCD Monitors XX 198 00 Rack Mounting The Rack mounting kit is provided with an installation guide Refer to the guide for mounting instructions...
Page 10: ...vates or exits the Onscreen Display OSD Also used to move to a previous menu or status 3 AUTO Automatically adjusts geometry of PC source In menu mode moves cursor down 4 Up cursor control Moves curso...
Page 11: ...Control Description POWER Turns power on or off to monitor SOURCE Selects PC Composite AV1 or AV2 or S Video inputs APC Auto Picture Control selects picture mode ACC Auto Color Control selects color m...
Page 12: ...utomatically adjusts geometry of PC source MUTE Mutes volume MENU Activates the Onscreen Display EXIT Exits the Onscreen display VOL Lowers or raises volume In menu mode moves cursor left or right UP...
Page 13: ...s you to set Brightness and Contrast for the PC VGA input and Brightness Contrast Color Tint and Sharpness for the composite and composite and S Video inputs Composite and S Video Input Mode Use the c...
Page 14: ...10 Installation and Operation XX 198 00 VM 717 719LCD Monitors Press MENU to save your selection PC VGA Input Mode The PC VGA provides Brightness and Contrast selection...
Page 15: ...Menu The Picture Sound menu allows you to set Picture Mode Color Tone Mute and Volume Additional settings are available for the PC VGA input Use the cursor buttons to select the item that you would l...
Page 16: ...Picture mode using the options shown in the right menu pane Dynamic will provide enhanced contrast and sharpness Standard provides standard contrast and sharpness Movie is recommended for viewing fil...
Page 17: ...00 Color Tone Select the desired Color Tone using the options shown in the right menu pane Cool gives the white colors a bluish tint Normal gives the white colors a neutral tint Warm gives the white c...
Page 18: ...and press MENU to save your selection Volume Use the right and left cursor buttons to set desired volume Press MENU to save your selection PC Menu The PC menu option is only visible when the PC VGA i...
Page 19: ...ptions menu provides Auto Adjust Phase H Position V Position and Frequency adjustment Auto Adjust provides automatic adjustment of PC source Phase adjusts the number of horizontal picture elements H P...
Page 20: ...he image vertically upward or downward on the screen Frequency adjusts the vertical noise of the screen image Setup Menu The Setup menu enables you to rest all settings to factory default set the menu...
Page 21: ...Onscreen Display Operation 17 VM 717 719LCD Monitors XX 198 00 Reset To reset the monitor to factory defaults select Reset and press Enter Language Select the language and press Enter...
Page 22: ...18 Installation and Operation XX 198 00 VM 717 719LCD Monitors OSD Tone Select Blue or transparent background for OSD and press Enter...
Page 23: ...Onscreen Display Operation 19 VM 717 719LCD Monitors XX 198 00 Blue Screen Setting the Blue Screen to On will display a blue background Select Blue Screen On or Off and press Enter...
Page 24: ...8 00 VM 717 719LCD Monitors Key Lock Key Lock prevents the OSD from displaying and allowing users to change settings Select Key Lock On and press Enter To unlock the monitor press SOURCE MENU simultan...
Page 25: ...D SUB Pin Assignments Pin Description Pin Description 1 Red Video 9 Not used 2 Green Video 10 Signal Cable Detect 3 Blue Video 11 Ground 4 Ground 12 SDA for DDC 5 Ground 13 H SYNC or H V SYNC 6 Red G...
Page 26: ...rast levels have not been turned down to minimum levels 4 Check that the correct input is selected Going to Sleep message on screen 1 Ensure the signal cable is securely connected to the video card co...
Page 27: ...ible harm to the environment or human health from uncontrolled waste disposal please separate this from other types of wastes and recycle it responsibly to promote the sustainable reuse of material re...
Page 28: ...hese signals and enters sleep mode Power Consumption Mode Power Consumption On Less than 50 W Standby Less than 11 W Suspend Less than 11 W Active Off Less than 8 5 W LED Indicator The LED will indica...
Page 29: ...M TFT Active Matrix Resolution 1280 H X 1024 V 60 Hz Pixel Pitch VM 717LCD 0 264 H X 0 264 V mm VM 719LCD 0 294 H X 0 294 V mm Brightness 300 cd m2 Typical Response Time 5 msec Typical Contrast Ratio...
Page 30: ...M 719LCD 17 W X 3 D X 14 3 H inches 432 W X 76 D X 363 mm Note Stand adds 2 inches 51 mm to height Shipping Dimensions VM 717LCD 17 2 W X 18 7 D X 8 9 H inches 436 W X 476 D X 225 mm VM 719LCD 19 3 W...
Page 31: ...the Company are not defective or any equipment which may have been tampered with altered misused or been subject to unauthorized repair Software supplied either separately or in hardware is furnished...
Page 32: ...s Brunel Way Fareham PO15 5TX United Kingdom 44 0 1489 566300 Fax 44 0 1489 566322 Germany vin videotronic infosystems gmbh Lahnstrasse 1 D 24539 Neumuenster Phone 49 0 4321 8790 Fax 49 0 4321 879 97...