


7
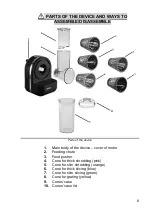
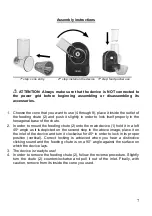
Assembly instructions
1
st
step: cone entry 2
nd
step: install on the device 3
rd
step: food pusher use
ATTENTION: Always make sure that the device is NOT connected to
the power grid before beginning assembling or disassembling its
accessories.
1. Choose the cone that you want to use (4 through 8), place it inside the outlet of
the feeding chute (2) and push it slightly in order to lock itself properly in the
hexagonal base of the chute.
2. In order to mount the feeding chute (2) onto the main device (1) hold it in a left
45
o
angle as it is depicted on the second step in the above image, place it on
the inlet of the device and turn it clockwise for 45
o
in order to lock in its proper
position (vertical). Correct locking is achieved when you hear a distinctive
clicking sound and the feeding chute is on a
90° angle against the surface on
which the device lays.
3. The device is ready to use!
4. In order to remove the feeding chute (2), follow the reverse procedure. Slightly
turn the chute (2) counterclockwise and pull it out of the inlet. Finally, with
caution, remove from its inside the cone you used.