7 — VIAVI Rail Kit
VIAVI Rail Kit
This rail kit is for the 60G appliances and JBODs.
Decide on a suitable location for the rack unit that will hold your chassis. It
should be a clean, dust-free area that is well ventilated. Avoid areas where
heat, electrical noise and electromagnetic fields are generated. A nearby
grounded power outlet is required.
How to attach the rails
Rail assemblies must be attached to the chassis and rack before inserting the
system into your rack.
Prerequisite(s):
The box your chassis was shipped in should include:
♦
two sets of rail assemblies
♦
two rail mounting brackets
♦
mounting screws and washers to mount the system into the rack
This rail will fit a rack between 26.5" and 36.4" deep.
Caution:
Do not use a two post "telco" type rack.
1.
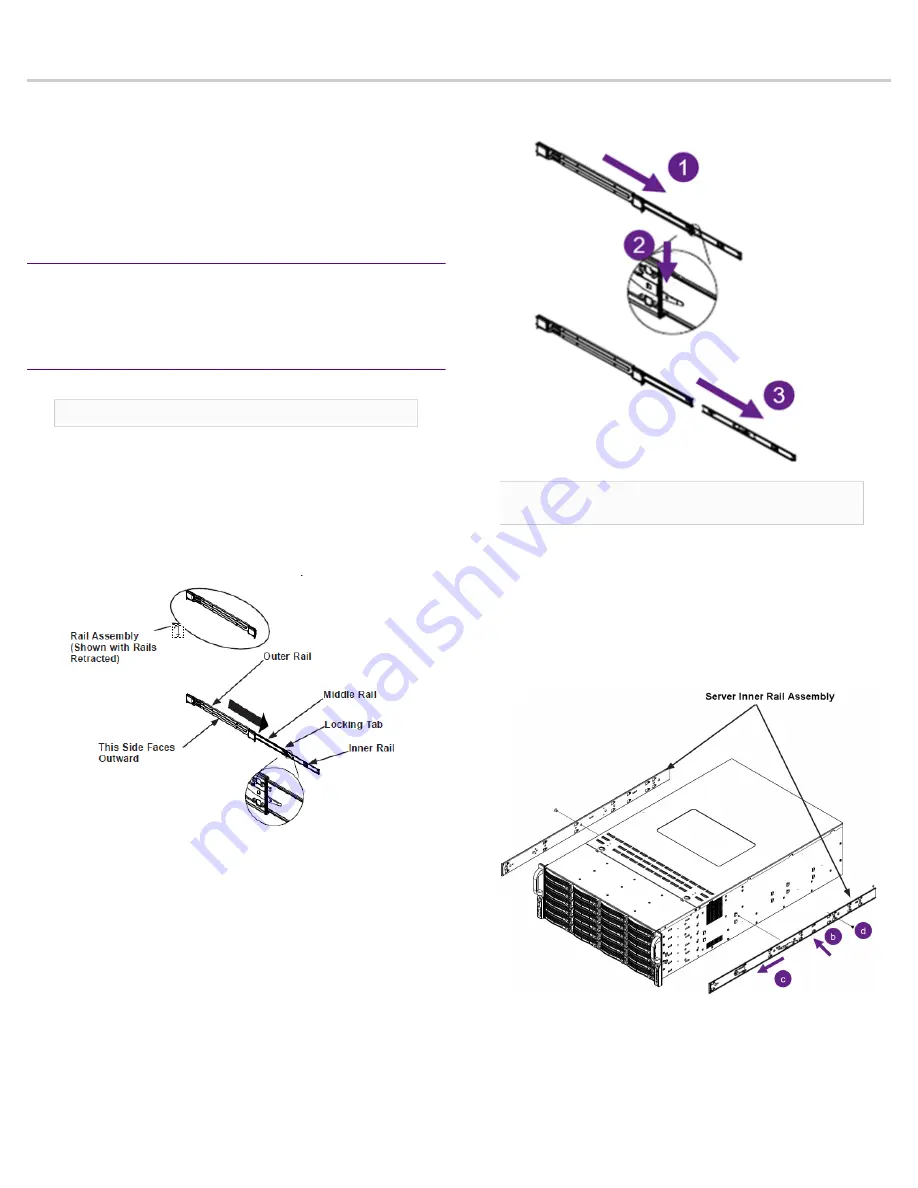
Identify the inner rack rails.
The chassis package includes one pair of rack rail assemblies in the rack
mounting kit. Each assembly consists of three sections: an inner rail that
secures directly to the chassis, an outer rail that secures to the rack, and
a middle rail which extends from the outer rail. These assemblies are
specifically designed for the left and right side of the chassis and are
labeled.
Both the front chassis rails and the rack rails have a locking tab, which
serves two functions. First, it locks the sever into place when installed
and pushed fully into the rack (its normal operating position). In
addition, these tabs lock the server in place when fully extended from
the rack. This prevents the server from coming completely out of the
rack when pulled out for servicing.
2.
Release the inner rails.
Each inner rail has a locking hatch. This latch prevents the server frm
coming completely out of the rack when the chassis is pulled out for
servicing.
a.
Pull the inner rail out of the outer rail until it is fully extended as
illustrated below.
b.
Press the locking tab down to release the inner rail.
c.
Pull the inner rail all the way out.
Caution:
Do not pick up the server with the front handles. They
are designed to pull the system from a rack only.
3.
Install the inner rails on the chassis.
a.
Identify the left and right inner rails (labeled)
b.
Place the inner rail firmly against the side of the chassis, aligning
the hooks on the side of the chassis with holes in the inner rail.
c.
Slide the rail toward the front of the chassis to hook the inner rail
onto the side of the chassis.
d.
If desired, secure the rail to the chassis with a screw.
e.
Repeat for the other inner rail


