VIAVI Solutions
Contact Us +1 844 GO VIAVI
(+1 844 468 4284)
To reach the VIAVI office nearest you,
visit viavisolutions.com/contacts.
© 2019 VIAVI Solutions Inc.
Product specifications and descriptions in this
document are subject to change without notice.
Launch and Configure Test:
1.
Press the
ON/OFF
button to turn on the
test set.
2.
If files are to be saved, tap the
FILE
Button
and tap the
Project
folder to view the
File
Explorer
. Otherwise, proceed to step 5.
3.
Tap the
Create Directory
soft key, enter a
name for your new folder, and tap the
Enter
key. All trace files will be saved to
this directory.
4.
Press the
HOME
button to display the
Home Screen.
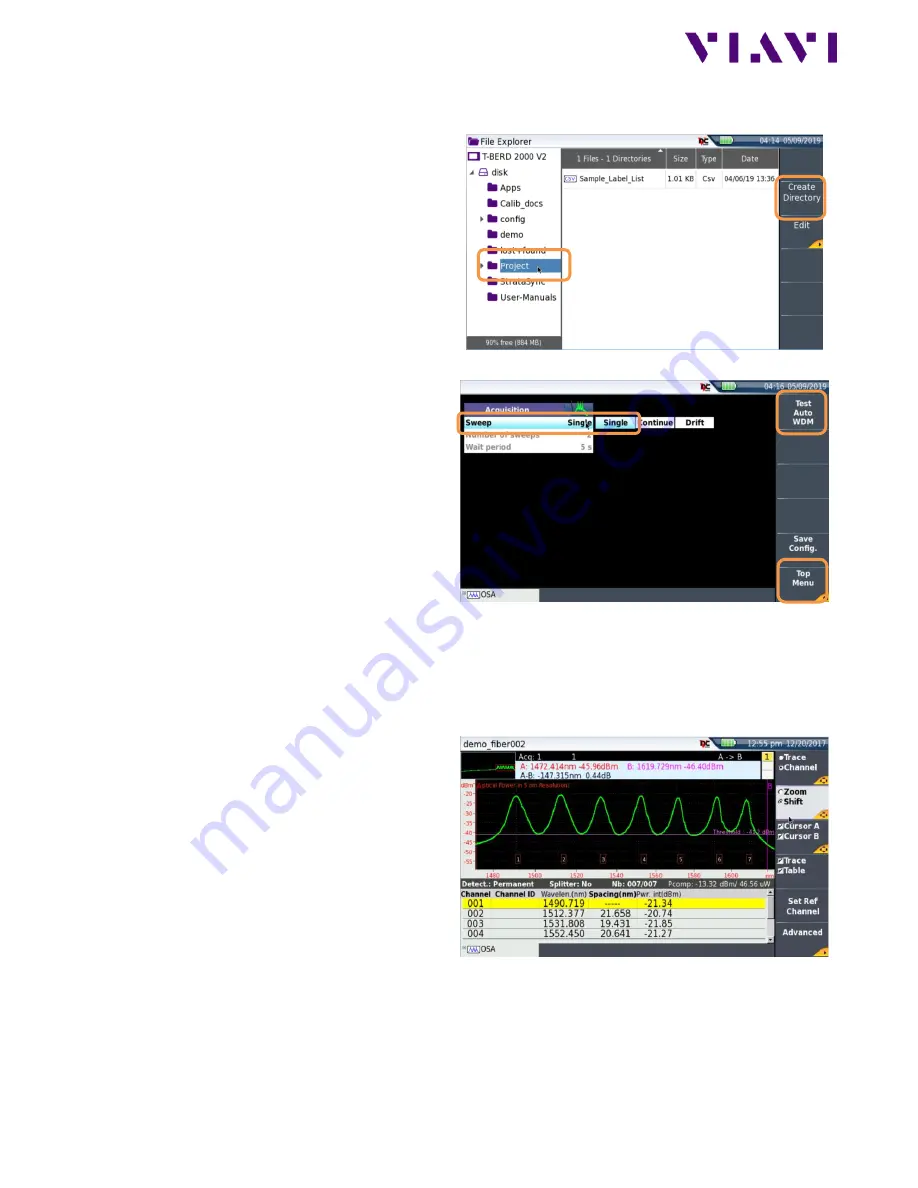
Figure 6: File Explorer
5.
Tap the
COSA-4055
icon until it is selected
and highlighted in yellow.
6.
Tap the
SETUP
button.
7.
Tap the
Acquisition
soft key.
8.
Set
Sweep
to
Single
and tap the
TEST AUTO
WDM
soft key
.
9.
Tap the
Top Menu
soft key.
10.
Tap the
Analysis
soft key. Set
Signal
Threshold
to
Auto
and
Mode
to
Permanent
. If a splitter/tap is used to
access the signal, set Splitter Compensation
Value
to the splitter loss (in dB or %).
Figure 7: Setup
Run Test:
1.
Tap the
START/STOP
button to start the
test. The
COSA-4055
will sweep the entire
CWDM wavelength range. Results will be
shown in graphical and tabular formats as
shown in
Figure 8
.
2.
Verify that traffic is on all expected
channels, at the anticipated wavelengths
and power levels, and that there are no
unexpected wavelengths present.
Things to look for:
a.
Every expected channel is present.
b.
Channels are about 20 nm apart.
c.
Power levels of each channel are
within roughly 3 dB of each other, or
within the relative amplitude
specification of the Network
Equipment Manufacturer.
Figure 8: Results


