INSTALLATION
This air compressor is ideal for mounting under the hood or even inside
your vehicle. The compact size of this compressor requires minimal
space, and oil-less design permits mounting in many different areas of
your vehicle. Please read and follow these Installation Instructions
carefully to avoid injury or damage to the compressor or your vehicle.
Each of our air compressors and parts have been
carefully produced and packaged. Before you begin
installation, please familiarize yourself with Installation
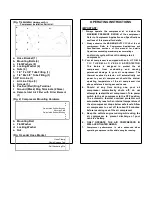
Parts List (Fig. 1) of this manual.
Guidelines for Selecting Mounting Location:
The selection of proper mounting location for your air
compressor will help ensure a long and trouble free
compressor service life. Please pay close attention to
the following guidelines:
1.
Select a FLAT AND SECURE location where the
compressor can be mounted by using the
mounting brackets provided.
2.
Choose a location where the 10 ft. positive wire
provided is long enough to reach the battery and
where there is an appropriate chassis grounding
point to be reached by the 2ft. ground wire.
3.
To maximize air compressor performance and
minimize amp draw, locate compressor as CLOSE
TO THE BATTERY as possible so that the length of
positive lead wire required is at a minimum.
4.
Choose a mounting location that is AS COOL AS
POSSIBLE AND AWAY FROM HEAT SOURCES.
The cooler the ambient temperature (air
temperature surrounding the air compressor), the
less chance the compressor will overheat.
5.
This compressor is moisture & splash resistant,
but NOT WATERPROOF. DO NOT MOUNT
COMPRESSOR IN LOCATIONS WHERE THE UNIT
IS LIKELY TO COME IN CONTACT WITH WATER.
6.
Select a compressor mounting location where air line
can be routed from compressor air inlet to remote
inlet air filter. Make sure Remote Inlet Air Filter is
located in a dry location, away from water splashes.
7.
You will also want to select a compressor
mounting location where the leader hose bracket
can be mounted to secure the 1.5 ft. leader hose.
8.
If it is necessary to mount the air compressor further
away from the battery, such as inside your vehicle or
in the bed of your pickup, the 10ft. positive wire may
not be long enough. Use a longer minimum 8 AWG
positive lead wire for remote installation.
9.
Do not mount compressor near areas where
flammable liquids are stored.
MOUNTING AND WIRING
1.
Disconnect ground cable from vehicle’s battery.
2.
Temporarily position the air compressor in the location where
it will be mounted. Route the positive wire to the positive post
of the battery. Measure and cut positive wire to the
appropriate length and use appropriate inline fuse.
3.
Route ground wire to the negative post of the battery
or to an appropriate chassis grounding point and cut
ground wire to length as needed.
4.
Mount the air compressor by using the pair of anti-
vibration mounting brackets and four sets of
13/64” (5mm) bolts, nuts, washers, and locking
washers provided. Use 13/64” drill bit to drill holes for
the first set of brackets. Mount this first bracket with
screws, flat washers, locking washers and nuts
provided. (Refer to Fig. 2 for placement of washers.)
5.
Place compressor into mounted bracket. Place second set of
bracket under the air compressor, make sure that the
compressor sits snuggly in between the two brackets. Mark
off holes to be drilled using the second set of brackets as
guides. Drill holes, and place compressor snugly between
brackets and mount the second bracket.
6.
Refer to Remote Air Filter Installation Instructions
included in the Remote Inlet Air Filter Pack for
installation of Remote Inlet Air Filter.
7.
This air compressor comes equipped with a 1.5 ft. heavy duty
heat resistant leader hose with _-inch fittings. This leader
hose is designed to provide easy access for air hose
attachment and to prolong the life of your extension hose as
well as minimizing wear to the compressor air outlet. Do not
remove this leader hose from the air compressor.
8.
Please note, the leader hose that comes with your
compressor may have a built-in inline check valve installed.
Do not remove inline check valve from leader hose.
9.
Select a proper location to mount leader hose with hose
bracket provided. Avoid locations where leader hose
may become tangled with wires and other hoses.
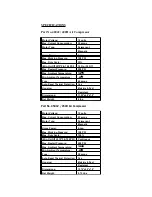
10. To mount hose bracket, drill hole with 3/16” drill bit
and push self–anchoring hose bracket pin into hole.
Route leader hose through hose bracket and secure
hose by pressing bracket clamp into locked position.
11. To remove hose from the hose bracket, simply press
down on the hose clamp release tab to release
bracket clamp. (Fig. 3)
12. Attach ground wire to the negative post of the battery or
chassis grounding point. Check to make sure that the air
compressor’s ON/OFF switch is in the OFF position.
Attach positive wire to positive terminal of the battery.
13. Re-check to make sure that all connections are made
securely.


