background image

11

N

P

O

G8,5

9.

IT

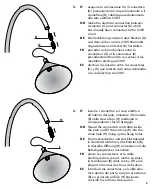
per  l’installazione dei kit 

F9.211.81/83

seguire le indicazioni dal riportare dal 
punto 1 al punto 7. 
per l’inserimento della lampadina, svitare 
senza rimuovere la viti (N).

GB

when installing kits 

F9.211.81/83

, follow 

the instructions from point 1 to point 7. 
To fit the lamp, loosen without removing 
the screws (N).

DE

Zur Installation der Kit 

F9.211.81/83


die Hinweise von Punkt 1 bis Punkt 7 
beachten. 
Zum Einsetzen der Lampe abschrauben, 
ohne die Schrauben (N) zu entfernen.

FR

pour l’installation des kits 

F9.211.81/83

suivre les indications du point 1 au 
point 7. 
pour la mise en place de l’ampoule, 
dévisser les vis (N) sans les retirer.

ES

para la instalación de los kit 

F9.211.81/83

, seguir las indicaciones 

que se dan en los puntos del 1 al 7. 
para poner la bombilla, desenroscar los 
tornillos (N) sin quitarlos.

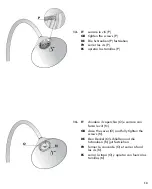
10. IT

sollevare il coperchio esterno (O) e svita-
re senza rimuovere le viti (P)

GB

lift the outer cover (O) and loosen without 
removing the screws (P)

DE

Den äußeren Deckel (O) abheben und 
abschrauben, ohne die Schrauben (P) zu 
entfernen.

FR

soulever le couvercle externe (O) et 
dévisser les vis (P) sans les retirer.

ES

levantar la tapa externa (O) y desenro-
scar los tornillos (P) sin quitarlos

Summary of Contents for F9.211.75

Page 1: ...istruzioni di montaggio installing instructions Gebrauchsanweisung instructions de montage instrucciones de montaje Viabizzuno A l v a l i n e For m progettiamo la luce lilia kit alogenuri...

Page 2: ...et de branchement au r seau lectrique doivent tre effectu es par un personnel qualifi ES ADVERTENCIA Durante la instalaci n y cada ve que se interviene sobre la l mpara asegurarse que la alimentaci n...

Page 3: ...Monate nur wenn sie von dem zugelassenen Verk ufer Viabizzuno gestempelt wird Die Garantie gilt 2 Jahr seit dem Stempeldatum und verf llt bei unberechtigten Gebrauch Manipulation des Datums Verlust od...

Page 4: ...jederzeit und ohne Ank ndigung die technischen Daten der im Katalog abgebildetem Produkte zu ndern unsere Ideen und unsere Beleuchtungsk rper sind eingetragt und international patentiert wer gewarnt...

Page 5: ...30L 35 70W verwenden mit Leuchmittel Philips E27 PAR30L 35 70W utiliser avec lampe Philips E27 PAR30L 35 70W utilizar con lamparas Philips E27 PAR30L 35 70W F9 211 81 alogenuri G8 5 35 70W 8 F9 211 83...

Page 6: ...ature D GB by means of a flat head screwdriver remove the terminal board C of the con nector K not provided with any cable ATTENTION lever on both grooves D DE Mit einem normalen Schraubendreher das K...

Page 7: ...l zuerst in die Kabelklemme E dann in den Korpus F des Verbinders stecken und zum Schluss den Anschluss an das Klemmenbrett C vornehmen dabei die Markierungen beachten Das gelb gr ne Erdungskabel an d...

Page 8: ...ed DE Das Klemmenbrett C wieder in den Korpus F des Verbinders klemmen und die Kabelklemme E fest anziehen ACHTUNG Wird die Kabelklemme E nicht richtig angezogen ist der elektri sche Schutzgrad nicht...

Page 9: ...do antes cableados a la red el ctrica de 230V L H 6 IT inserire i connettori e il cavo elettrico all interno del palo innestare il terminale B nello stesso foro H mettendo in corrispondenza i fori di...

Page 10: ...con lampadina Philips E27 PAR30L 35 70W GB Fit a lamp L of suitable specification see the labelling on the fitting to the lampholder M to be used with bulbs Philips E27 PAR30L 35 70W DE Eine passende...

Page 11: ...nstallation des kits F9 211 81 83 suivre les indications du point 1 au point 7 pour la mise en place de l ampoule d visser les vis N sans les retirer ES para la instalaci n de los kit F9 211 81 83 seg...

Page 12: ...pada rimontare l anello antiabbagliamento GB Fit a lamp of suitable specification see the labelling on the fitting to the lampholder refit the anti glare ring DE Eine passende Gl hbirne siehe Angaben...

Page 13: ...ES apretar los tornillos P 14 IT chiudere il coperchio O e serrare con forza le viti N GB close the cover O and fully tighten the screws N DE Den Deckel O schlie en und die Schrauben N gut festziehen...

Page 14: ...14...

Page 15: ...hwendung recycelbarer Materialien zu vermeiden Das ausgediente Ger t kann beim Kauf eines neuen Ger tes beim H ndler abgegeben oder zu einer ffentlichen Sammelstelle gebracht bzw in den daf r vorgeseh...

Page 16: ...sibili sono collegate ad un conduttore di terra Messa a terra tassativa GB class1 only basic insulation accessi ble conductors are earthed Earthing compulsory DE Klass 1 Grundisolation leitenden ber h...

Page 17: ...ures m talliques avec r flecteur ES L mpara de halogenuros met licos con reflector MR IT Lampade con vetro UV STOP GB Lamp with UV STOP glass DE Lampe mit UV STOP Filter FR Lampes avec verre anti UV E...

Page 18: ...na progettazione complessa che richiede tempo e impegno mn progettiamo la luce a 360 Viabizzuno is the name of the main road in the small village of Bizzuno in the province of Ravenna where I was born...

Page 19: ...energia pulita clean energy...

Page 20: ...alla luce il grigio dei materiali come cemento alluminio acciaio il colore della collezione For m For m divides space vertically it is balanced rational and rigorous the light fitting is evolving in...

Page 21: ...r m book For m cartella colori e finiture folder sample finishes and colours manuale For m 2007 manual For m 2007 autore mario nanni progetto editoriale e grafico Viabizzuno edito da Viabizzunoeditore...

Page 22: ...s colore e forma che vivono per se stesse e per l emozione che li circonda il blu della notte il suo colore Alvaline cuts through space diagonally it is dynamic irreverent witty and playful it makes t...

Page 23: ...o cod 15215 vol 11 fileau cod 14564 vol 10 tulp cod 00290 vol 9 clv2 cod 00284 vol 8 emma cod 00287 vol 19 la DOd cod 17779 vol 20 plag in cod 17778 cartella colori e finiture folder sample finishes a...

Page 24: ...Viabizzuno srl 10 via romagnoli 40010 bentivoglio bologna italia t 39 0518908011 f 390518908089 www viabizzuno com viabizzuno viabizzuno com...

Reviews: