background image


16


VIA Mobile360 M810 EVK Quick Start Guide

7.  Start the vehicle to power on the VIA Mobile360 M810 system. After the system finishes booting there will be a short beep followed by the notification “Scan 

registration QR code.” After the audio notification, there is a 60 second window to scan the QR code from the app.

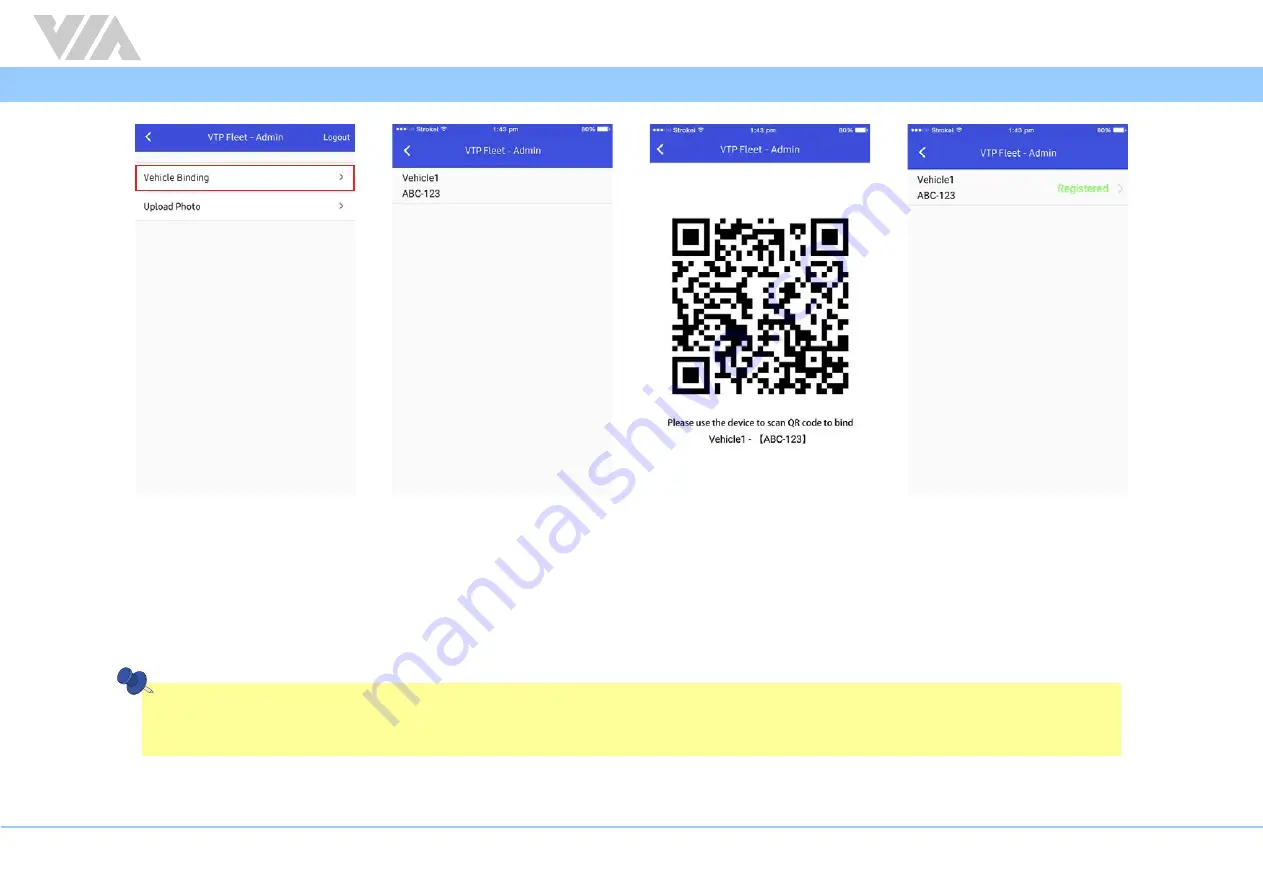
8.  In the app, tap on the vehicle in the list to generate a QR code that is used to bind the system.
9.  Place the QR code in front of the driver camera lens of the VIA Mobile360 M810 system.
10.  Once the system has scanned the QR code the system will play the audio confirmation, “Registration successful”. 
11.  Tap on “OK” on the pop-up notification to return to the vehicle list where it will show “Registered” beside the vehicle name.

Note: 

The VIA Mobile360 ADAS Display is the recommended accessory to see and hear system alerts. Please refer to Appendix B of the VIA Mobile360 M810 User Manual for detailed information and 

instructions.
If the QR code is not successfully scanned within the 60 seconds time frame, the device will play the audio notification “Registration Failed”. If this occurs, reboot the device and start over.

12.  Log back into the VIA Fleet Cloud Management Portal and go to “Management -> Vehicles”. Click on the Fleet in the list and select the vehicle which was registered. 

There will be three new sections added to the vehicle information page.

Summary of Contents for Mobile360 M810

Page 1: ...QUICK START GUIDE VIA Mobile360 M810 EVK 1 01 11082022 ...

Page 2: ...se in regard to this document and to the products described in this document The information provided in this document is believed to be accurate and reliable as of the publication date of this document However VIA Technologies assumes no responsibility for the use or misuse of the information including use or connection of extra device equipment add on card in this document and for any patent inf...

Page 3: ...Updated Add Vehicle instructions in VIA Fleet Vehicle Registration section 2 Updated descriptions in VIA Mobile360 M810 System Registration and Device Settings sections 3 Updated screenshot in VIA Fleet Cloud Management Portal s Device Settings section to show updated UI 1 00 03 06 2021 Initial release ...

Page 4: ... 1 2 Firmware Folder 2 1 1 3 Tool Folder 2 2 Installing Firmware Using a MicroSD Card 3 3 Network Configuration 6 3 1 Ethernet Settings 7 3 2 Wi Fi Settings 8 3 2 1 Wi Fi Hotspot Mode 8 3 2 2 Wi Fi Station Mode 9 4 VIA Fleet Cloud Management Portal 10 4 1 VIA Fleet Vehicle Registration 10 4 2 VIA Mobile360 M810 System Registration 14 4 3 Device Settings 19 ...

Page 5: ...ol Folder Description VIA_Mobile360_Fleet_Calibration_Tool zip VIA Mobile360 M810 Series Calibration tool for Windows OS 1 1 1 Document Folder Content VIA_Mobile360_M810_EVK_Quick_Start_Guide pdf This document provides instructions on how to setup and register a vehicle with a VIA Mobile360 M810 system installed for the VIA Fleet Cloud Management Portal VIA_Fleet_Cloud_Management_Portal_Quick_Star...

Page 6: ...talled on the VIA Mobile360 M810 to evaluate the cloud and AI functions Users can use this package to restore the system if users mess up the system and want to go back to pre installed environment 1 1 3 Tool Folder VIA_Mobile360_Fleet_Calibration_Tool zip This zip folder includes the VIA Mobile360 Fleet Calibration Tool for Windows 10 compatible computers The tool is required for camera calibrati...

Page 7: ...croSD card into a PC and format the MicroSD card to FAT32 format Extract and copy the bspinst folder from the VIA Mobile360 M810 Yocto 2 3 EVK firmware zip file to the root folder of the MicroSD card An example of the folder structure is shown below 2 Eject the MicroSD card from the PC and plug the MicroSD card into the MicroSD card slot at the front of the VIA Mobile360 M810 system as shown in th...

Page 8: ...system as shown in the following image and power up the system VIA Mobile360 M810 Rear I O Note To power up the VIA Mobile360 M810 system refer to Section Connecting the VIA Mobile360 M810 to the Vehicle s Ignition IGN and Section Installing the Phoenix Plug to DC Jack in the VIA Mobile360 M810 User Manual ...

Page 9: ...tallation process will automatically start if the bootable MicroSD card is detected You will see the installation process on the HDMI monitor as shown below 5 Eject the bootable MicroSD card once the process has completed and the system will automatically reboot ...

Page 10: ...e VIA Mobile360 M810 system follow the steps below 1 Connect the VIA Mobile360 M810 system to an x86 PC with a networking cable plug the networking cable into the Ethernet port on each device 2 Open a browser on the x86 PC and input the URL http 192 168 1 200 dist in the browser s address bar to connect to the web utility running on the VIA Mobile360 M810 system Note The host PC and VIA Mobile360 ...

Page 11: ... on the left side of the screen 4 The current static IP address of the VIA Mobile360 M810 system will be displayed in the Current Static IP field To change the static IP address type the desired static IP into the New Static IP field then click Save 5 Note The default static IP address is 192 168 1 200 6 After changing the static IP use the new IP assigned to the VIA Mobile360 M810 system to conne...

Page 12: ...mode Once connected to the web utility select the Wi Fi icon on the left side of the screen The Wi Fi module can be toggled on or off by the switch on the top right side of the screen 3 2 1 Wi Fi Hotspot Mode Follow the steps below to configure the Wi Fi hotspot settings 1 After enabling Wi Fi select Hotspot to configure the Wi Fi hotspot settings ...

Page 13: ...steps below to configure the Wi Fi station mode settings 2 After enabling Wi Fi select Station mode to configure the Wi Fi station mode settings 3 A list of available Wi Fi hotspots will be displayed Select the desired hotspot to connect to from the list 4 Input the password if required and click Connect 5 The VIA Mobile360 M810 system will establish a connection 6 Note The VIA Mobile360 M810 does...

Page 14: ...rt Guide for complete instructions on how to login in and setup the free trial period for a VIA Mobile360 M810 system The sections below will explain the specific steps related to binding a VIA Mobile360 M810 system as well as how to calibrate and enable the available AI functions Note The DSS Camera is mandatory for the a Mobile360 M810 system to be connected to the VIA Fleet Cloud Management Por...

Page 15: ...he VIA Mobile360 M810 system is installed in Fleet Select the Fleet created in step 3 of section 1 3 1 in the VIA Fleet Cloud Management Portal Quick Start Guide Vehicle Model Select the vehicle model mandatory created in step 7 of section 1 3 1 in the VIA Fleet Cloud Management Portal Quick Start Guide If the required vehicle model is not yet added add it as per instructions in steps 5 8 of secti...

Page 16: ...registration document not mandatory Permitted Drivers Drivers must be created before adding permitted drivers for the vehicle AI Features Alert Language Select the language the audio alerts should be played in English Japanese Traditional Chinese and Simplified Chinese are supported ...

Page 17: ...EVK Quick Start Guide 5 Click Save to register the vehicle 6 After clicking Save the program will return to the Management Vehicles page Click the Fleet name and it will expand to show the vehicle has been added to the fleet ...

Page 18: ...e cameras AI features available Please refer to the VIA Mobile360 Fleet Calibration Tool guide for complete instructions After installation is complete follow the steps below to register the VIA Mobile360 M810 to the VIA Fleet Cloud Management Portal 1 Scan the appropriate QR code below to download the VIA Mobile360 app from either the Google Play Store for Android devices or the App Store for iOS...

Page 19: ...row of icons in the app 4 Select VIA Fleet Login 5 Input the same Username and Password provided for the VIA Fleet Cloud Management Portal to login and tap on OK 6 Select Vehicle Binding to display the list of all vehicles created in your VIA Fleet Cloud Management account ...

Page 20: ...irmation Registration successful 11 Tap on OK on the pop up notification to return to the vehicle list where it will show Registered beside the vehicle name Note The VIA Mobile360 ADAS Display is the recommended accessory to see and hear system alerts Please refer to Appendix B of the VIA Mobile360 M810 User Manual for detailed information and instructions If the QR code is not successfully scanne...

Page 21: ...ation on the vehicle ADAS Calibration Shows whether the available ADAS calibration process has been completed for all available ADAS features DSS Calibration Shows whether the DSS calibration process has been completed SVS Calibration Shows whether the SVS calibration process has been completed Pedestrian Detection Shows whether the Pedestrian detection feature is enabled or not Parking Assist Sho...

Page 22: ...18 VIA Mobile360 M810 EVK Quick Start Guide Note To register more devices repeat the steps above ...

Page 23: ... M810 EVK Quick Start Guide 4 3 Device Settings The System Settings page allows universal settings to be configured for all VIA Mobile360 Series devices registered to an account in the VIA Fleet Cloud Management Portal ...

Page 24: ... Alerts Enable or disable the audio alerts for Distracted Driving Driver Fatigue Phone Usage and Smoking Audio Settings 2 Way Call Volume Adjust the volume for 2 way calls Alert Volume Adjust the volume for alerts from the device Firmware Upgrade Displays the current firmware version deployed to all VIA Mobile360 M810 systems When finished making changes click Save Note When the VIA Mobile360 M810...

Page 25: ...dded viatech com Email embedded via tech eu Taiwan Headquarters Taiwan Headquarters USA USA Europe Europe Tsinghua Science Park Bldg 7 No 1 Zongguancun East Road Haidian Dist Beijing 100084 China Tel 86 10 59852288 Fax 86 10 59852299 Email embedded viatech com cn 3 15 7 Ebisu MT Bldg 6F Higashi Shibuya ku Tokyo 150 0011 Japan Tel 81 3 5466 1637 Fax 81 3 5466 1638 Email embedded viatech co jp China...

Reviews: