background image


ARTiGO A600 User Manual

ARTiGO A600 User Manual

ARTiGO A600 User Manual

ARTiGO A600 User Manual    


28


4.7.


Installing the VESA mounting kit (optional) 

An optional VESA mounting kit is available for mounting the ARTiGO A600 
behind the monitor or wall. 
 

Step 1

Step 1

Step 1

Step 1    

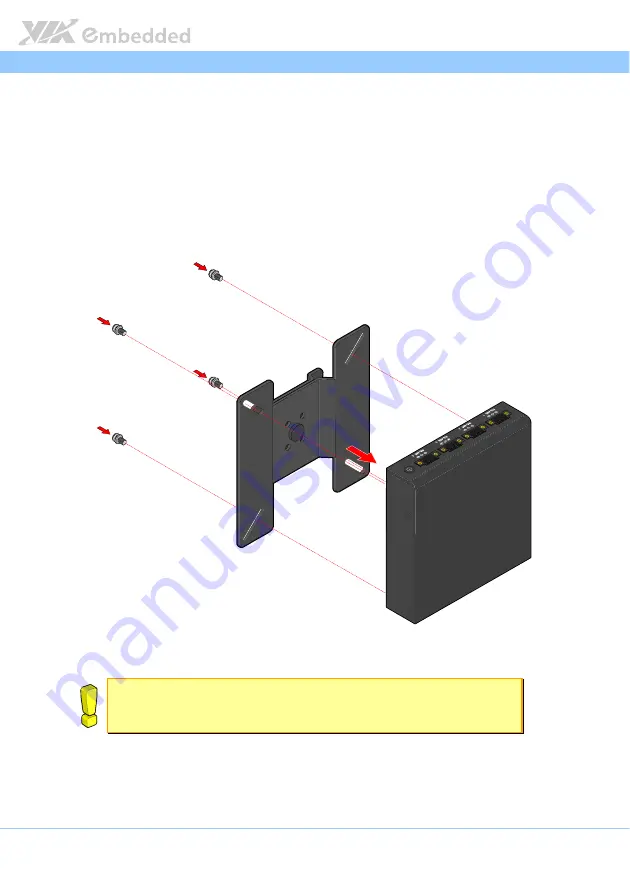
Attach the VESA bracket on the back of the ARTiGO A600 using four M4 x 
6mm screws. 


Figure 

Figure 

Figure 

Figure 35

35

35

35: Installing the VESA bracket

: Installing the VESA bracket

: Installing the VESA bracket

: Installing the VESA bracket    


Cautions:

Cautions:

Cautions:

Cautions:    

1.  Remove first the rubber feet before installing the VESA bracket.  
2.  Do not use other types of screws for VESA bracket; these might damage the internal board. 


Summary of Contents for ARTiGO A600

Page 1: ...0 10 09242015 175600 USER MANUAL ARTiGO A600 Fanless Ultra compact System...

Page 2: ...cts described in this manual at any time without prior notice Regulatory Compliance FCC FCC FCC FCC A Radio A Radio A Radio A Radio Frequency Interference Statement Frequency Interference Statement Fr...

Page 3: ...ce the power cord in such a way that people cannot step on it Always unplug the power cord before inserting any add on card or module If any of the following situations arises get the equipment checke...

Page 4: ...ATG A600 A600 A600 A600 3 3 3 3D10A1 D10A1 D10A1 D10A1 ARTiGO A600 system with Freescale i MX6 Dual Lite ARM Cortex A9 Core 1 0GHz 4GB eMMC Flash 1GB DDR3 SDRAM 3 x USB 2 0 1 x COM 1 x DIO 2 x LAN 1 x...

Page 5: ...nal I O Pin Descriptions and Functionality External I O Pin Descriptions and Functionality 7 7 7 7 2 1 Power Button 7 2 2 COM Connector RS 485 7 2 3 Digital I O Connector 8 2 4 COM Connector 8 2 5 DC...

Page 6: ...al ARTiGO A600 User Manual vi 5 5 5 5 Software and Technical Supports Software and Technical Supports Software and Technical Supports Software and Technical Supports 31 31 31 31 5 1 Linux Support 31 5...

Page 7: ...14 Figure 17 WLAN connector diagram 15 Figure 18 SPI connector diagram 16 Figure 19 Unscrewing the top cover 17 Figure 20 Removing top cover 18 Figure 21 Inserting 3G MiniPCIe module 19 Figure 22 Secu...

Page 8: ...tal I O connector pinout 8 Table 3 COM connector pinout 8 Table 4 DC In jack pinout 9 Table 5 Micro SD Card slot pinout 9 Table 6 Mini USB 2 0 port pinouts 10 Table 7 HDMI port pinout 11 Table 8 LAN p...

Page 9: ...ersified embedded applications In addition the ARTiGO A600 offers four COM connectors for RS 485 mode interface in the front panel and onboard connectors such as SPI connector SIM card socket miniPCIe...

Page 10: ...t optional 1 1 6 Wide Range of Operating Temperatures The ARTiGO A600 carries a qualified thermal performance design which allows a wide range of operating temperatures from 0 C 60 C suitable for crit...

Page 11: ...1and H 264 video decoding up to 1080p LAN LAN LAN LAN VIA VT6113 10 100 base TX PHY chip Audio Audio Audio Audio VIA VT1603A I2S Audio Codec HDMI HDMI HDMI HDMI Integrated HDMI 1 4 transmitter Front...

Page 12: ...al Construction Mechanical Construction Aluminum top cover Metal chassis housing Compliance Compliance Compliance Compliance Ce FCC Note Note Note Notes s s s 1 As the operating temperature provided i...

Page 13: ...l ARTiGO A600 User Manual 5 1 3 Panel Layout Figure Figure Figure Figure 1 1 1 1 Front Front Front Front p p p panel layout anel layout anel layout anel layout Figure Figure Figure Figure 2 2 2 2 Rear...

Page 14: ...t side side side side view d view d view d view dimension imension imension imension Figure Figure Figure Figure 4 4 4 4 Right Right Right Right s s s side view dimension ide view dimension ide view d...

Page 15: ...ntrol menu Popup power control menu Popup power control menu Popup power control menu press the button for 4 seconds and System Off System Off System Off System Off press the button for 8 seconds Figu...

Page 16: ...l Signal 1 GPIO5 2 GPIO7 3 GPIO6 4 GPIO8 5 GND 6 DIO_PW 12V 5V 7 RI_PW 12V 12V 8 Table Table Table Table 2 2 2 2 Digital I O connector pinout Digital I O connector pinout Digital I O connector pinout...

Page 17: ...4 4 4 4 DC DC DC DC In jack pinout In jack pinout In jack pinout In jack pinout 2 6 Micro SD Card Slot The ARTiGO A600 comes with a Micro SD card slot located on the rear I O panel The Micro SD card s...

Page 18: ...SB port is shown below Figure Figure Figure Figure 12 12 12 12 Mini USB 2 0 port diagram Mini USB 2 0 port diagram Mini USB 2 0 port diagram Mini USB 2 0 port diagram Mini USB 2 0 Port 1 Mini USB 2 0...

Page 19: ...ition video signal The pinout of the HDMI port is shown below Figure Figure Figure Figure 13 13 13 13 HDMI HDMI HDMI HDMI port diagram port diagram port diagram port diagram Pin Pin Pin Pin Signal Sig...

Page 20: ...pinout LAN port pinout LAN port pinout LAN port pinout The LAN port has two individual LED indicators located on the front side to show its Active Link status and Speed status Link LED Link LED Link...

Page 21: ...he miniPCIe slot is compatible with mini PCIe 2 0 module that has full length in size The pinout of miniPCIe slot is shown below Figure Figure Figure Figure 15 15 15 15 Mini Mini Mini MiniPCIe slot di...

Page 22: ...card socket is disabled The SIM card socket is designed only for 3G module without built in SIM card socket on it The SIM card socket is labeled as SIM1 The pinout of the slot is shown below Figure F...

Page 23: ...USB module The pinout of WLAN connector is as shown below Figure Figure Figure Figure 17 17 17 17 WLAN connector diagram WLAN connector diagram WLAN connector diagram WLAN connector diagram Pin Pin Pi...

Page 24: ...xture for updating the SPI flash ROM The connector is labeled as SPI The pinout of the connector is shown below Figure Figure Figure Figure 18 18 18 18 SPI connector SPI connector SPI connector SPI co...

Page 25: ...lation procedures It is recommended to use a grounded wrist strap before handling computer components Electrostatic discharge ESD can damage some components 4 1 Removing Chassis Top Cover Step 1 Step...

Page 26: ...RTiGO A600 User Manual 18 Step 2 Step 2 Step 2 Step 2 Slide the top cover horizontally to disengage it from the chassis then pull up to remove the top cover Figure Figure Figure Figure 20 20 20 20 Rem...

Page 27: ...Figure Figure Figure Figure 21 21 21 21 Inserting Inserting Inserting Inserting 3G M 3G M 3G M 3G MiniPCIe iniPCIe iniPCIe iniPCIe module module module module Step Step Step Step 2 2 2 2 Once the mod...

Page 28: ...a cover Removing 3G antenna cover Removing 3G antenna cover Step Step Step Step 4 4 4 4 Insert the 3G antenna connector into the antenna hole from the inside of the chassis Insert the washer fasten it...

Page 29: ...socket and place the SIM card inside the socket Ensure the angled corner of the SIM card is placed in the correct way before closing the socket Step 3 Step 3 Step 3 Step 3 Gently close the socket by...

Page 30: ...module Step 1 Step 1 Step 1 Step 1 Locate the bottom access cover of the chassis Remove the screws then gently lift up and remove the bottom access cover Figure Figure Figure Figure 26 26 26 26 Remov...

Page 31: ...the WLAN USB module Mounting the WLAN USB module Mounting the WLAN USB module Step Step Step Step 3 3 3 3 Attach the WLAN USB board to board cable to the WLAN USB module VNT9271 connector and attach t...

Page 32: ...r Removing WLAN antenna hole cover Step Step Step Step 5 5 5 5 Insert the WLAN port connector into the antenna hole from the inside of the chassis Insert the washer fasten it with the nut and install...

Page 33: ...mini coaxial cable of the WLAN port connector to the mini RF connector on the WLAN USB module VNT9271 Figure Figure Figure Figure 31 31 31 31 Connecting WLAN mini coaxial cable Connecting WLAN mini c...

Page 34: ...til it completely covers the top side of the chassis Figure Figure Figure Figure 32 32 32 32 Installing Installing Installing Installing the the the the top cover top cover top cover top cover Step 2...

Page 35: ...1 Step 1 Locate the designated areas for rubber feet on the bottom side of the chassis Step 2 Step 2 Step 2 Step 2 Attach each rubber foot and firmly press it down to ensure the rubber foot is properl...

Page 36: ...1 Step 1 Step 1 Step 1 Attach the VESA bracket on the back of the ARTiGO A600 using four M4 x 6mm screws Figure Figure Figure Figure 35 35 35 35 Installing the VESA bracket Installing the VESA bracket...

Page 37: ...Step 2 Align the VESA mounting hole of the VESA plate to the VESA hole on the back of the monitor Figure Figure Figure Figure 36 36 36 36 Installing the VESA plate Installing the VESA plate Installin...

Page 38: ...the ARTiGO A600 system by sliding into the VESA plate Then connect all the necessary cables on the rear panel of the system Figure Figure Figure Figure 37 37 37 37 Installing ARTiGO Installing ARTiGO...

Page 39: ...w viatech com for the latest updated drivers Installing a third party driver such as the ALSA driver from the Advanced Linux Sound Architecture project for integrated audio 5 2 Technical Supports and...

Page 40: ......

Reviews: