background image

1

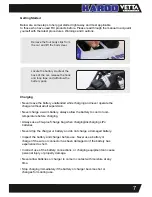
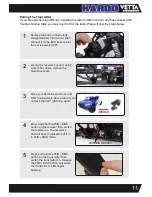
Remove the body, install a fully 
charged battery into the car, then 
connect it to the ESC. Ensure that 
the car is powered OFF.

2

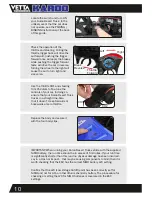
Locate the receiver box and, using 
a 2mm hex driver, remove the 
protective cover.

3

5

4

Place your Karoo Desert Truck and  
T3W transmitter in close proximity but 
not less than 12” (300mm) apart.

Press and hold the PAIR / BIND 
button on the transmitter then 
switch the transmitter on. Release 
the PAIR / BIND button only when 
the transmitter’s LED begins 
flashing.

Press and hold the PAIR / BIND 
button on the receiver then switch 
the receiver on. The receiver’s 
LED will flash to indicate that it is 
in PAIR / BIND mode.

300mm

PAIR/BIND Button

Pairing The Transmitter

If you are experiencing difficulty in getting the radio to talk to the car and have checked the 
trouble shooting table you may need to Pair the radio. Please follow the steps below.

11

Summary of Contents for Karoo

Page 1: ... is not a toy 14 Recommended for ages 14 and up Adult supervision required for ages under 18 years old Contains small parts keep out of reach of children 3 years of age and younger Distributed in the UK by MADE IN CHINA J Perkins Distribution Northdown Business Park Ashford Road Maidstone Kent ME17 2DL England service jperkins com To download the full Owner s Manual Technical Information Guide ple...

Page 2: ...productive harm This product is not a toy 14 Recommended for ages 14 and up Adult supervision required for ages under 18 years old Contains small parts keep out of reach of children 3 years of age and younger Important Information Important Information Throughout this manual you will see different notes cautions and warnings to help alert you to important information about the section you are read...

Page 3: ...oduction 6 Features 6 Getting Started 7 Charging 7 Planet T3W Radio System 9 Wiring Schematic 12 ESC Programming and Calibration 12 General Care 14 Maintenance 14 Storage and Disposal 18 Troubleshooting Guide 18 Troubleshooting Tables 19 Exploded Views 21 Spare Parts List 26 3 ...

Page 4: ...y Always use caution and common sense as failure to operate your product in a safe and responsible manner can result in damage to the product or other properties Therefore this product is not intended for use or maintenance by children without direct adult supervision Vetta Racing and your hobby dealer shall not be liable for any loss or damages whether direct indirect special incidental or conseq...

Page 5: ...ssly Always allow the motor in your vehicle to cool completely before using it again R C models are an extremely fun hobby but safety should never be ignored or taken lightly Always take caution when operating your model as damage to property and injury can result from careless operation Please consult your local hobby dealer with any questions or troubleshooting issues And of course don t forget ...

Page 6: ... efforts put into the details of making this as scale as possible from the open windows and the internal roll cage to the 6 point rear axle and LED bumper light rail At the heart of this desert racer is a high capacity rechargeable 1800 mah 8 4 volt NiMH battery pack coupled to a 40A ESC this drives the premium heavy duty 21T 550 brushed motor giving you a well controlled positive power transfer t...

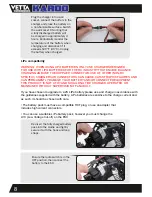
Page 7: ...ging LiPo batteries Never drop the charger or battery and do not charge a damaged battery Inspect the battery and charger before use Never use a battery or charger if the wire or connector has been damaged or if the battery has experienced a short Incorrect use of the battery connections or charging equipment can cause personal injury or property damage Never allow batteries or charger to come in ...

Page 8: ...rge current and as such it should be chosen with care The battery pack must have a compatible HCT plug or use an adapter that includes high current connectors You can use a suitable LiPo battery pack however you must change the LVC Low Voltage Cut off on the ESC Re insert the fully charged battery pack into the cradle and tightly secure it with the hook and loop straps Ensure the radio switch is i...

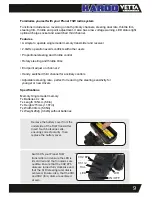
Page 9: ...l for ancillary controls Adjustable steering rate perfect for reducing the steering sensitivity for younger or new drivers Specifications Memory Single model memory Tx Batteries 4 x AA Tx Length 165mm 5 8in Tx Height 215mm 11 07in Tx Width 90mm 5 05in Tx Weight 282g 0 62lb without batteries Remove the battery cover from the underside of the T3W transmitter Insert four AA alkaline cells ensuring cor...

Page 10: ...When running your Karoo Desert Truck vehicle with the supplied NiMH battery the run time should be in excess of 5 minutes If your run time is significantly shorter than this and no physical damage has been incurred say in a crash or impact that may be causing components to bind then it is worth checking that the ESC has the correct NiMH battery LVC setting Confirm that the LVC Low Voltage Cutoff poi...

Page 11: ...ld the PAIR BIND button on the transmitter then switch the transmitter on Release the PAIR BIND button only when the transmitter s LED begins flashing Press and hold the PAIR BIND button on the receiver then switch the receiver on The receiver s LED will flash to indicate that it is in PAIR BIND mode 300mm PAIR BIND Button Pairing The Transmitter If you are experiencing difficulty in getting the radi...

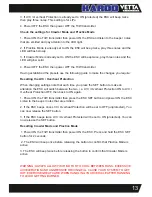
Page 12: ...otection 2 Overheat protection 3 Crawler Mode 4 Beginner Mode Wiring Schematic Before configuring programming your ESC use the following guide to check the LVC Overheat Protection settings and the Crawler Practice Mode settings Check the settings for LVC Overheat Protection 1 Power ON the T3W transmitter then power ON the ESC and listen to the beeps notes that are emitted 2 If LVC Overheat Protecti...

Page 13: ...n to make an alteration the ESC will switch between the two i e LVC Overheat Protection ON to LVC Overheat Protection OFF then back to ON again 1 Power ON the T3W transmitter then press the ESC SET button and power ON the ESC Listen to the beeps notes that are emitted 2 If the ESC beeps once LVC Overheat Protection will be set to OFF unprotected You can now release the SET button 3 If the ESC beep...

Page 14: ...vehicle after running to help prevent corrosion Using an air compressor is effective but please use eye protection Transmitter Although the receiver included with your radio system is rated for all weather use the transmitter is not The transmitter should not be used in the rain or other wet environment to avoid damage to the sensitive electronics Clean dirt and debris off of your transmitter regu...

Page 15: ...load on the electrical components and may cause premature failure Having gear mesh set too loose will cause excess wear and possible skipping of teeth during operation thus causing excess wear and premature failure Checking The Gear Mesh 1 Remove the gear cover 2 The gear mesh is not adjustable on the Karoo as it has a fixed motor mount However the motor sometimes can be installed un centred We rec...

Page 16: ... which will need replacing See your local hobby dealer for replacement parts Refilling your shocks 1 Remove shock from vehicle remove spring and top cap Remove the bleed screw from the cap 2 With shock shaft extended add oil to top of body use only 100 silicone oil and reinstall the shock cap Be sure the o ring stays seated and does not squeeze out 3 Slowly compress the shock shaft 100 of travel us...

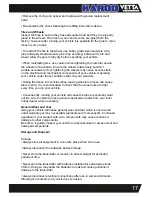
Page 17: ...g wheels too loose can cause them to strip It is recommended to check that the wheel nuts are tight every time you run your vehicle Consequently running your vehicle will cause the tires to eventually wear out Be sure to obtain and use genuine replacement parts from your local hobby dealer when necessary General Wear and Tear Using your vehicle will cause general wear and tear which is not covered...

Page 18: ...ires causing connections to come loose It is a good idea to unplug and reconnect motor and battery connections when beginning power related troubleshooting Also inspect for any damage caused to the antenna Drivetrain issues can mask themselves as power related Fully inspect the wheels driveshafts and motor for foreign objects that may have become tangled or wrapped around the spinning parts of the...

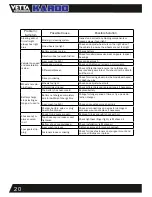
Page 19: ...y voltage too low Replace or recharge batteries in transmitter and vehicle Steering not responding as expected Trim not set properly Adjust steering trim Screws too tight on steering parts Adjust screws to allow for free motion Fasteners have become loose Check and tighten all fasteners to as new condition be careful to not over tighten Vehicle not respond ing as expected to transmitter Trims not ...

Page 20: ...one pins Wheels not spin ning freely Wheels too tight Check and adjust wheel nuts Differentials stripped Check differentials and replace repair if necessary Battery charge stops lasting as long as it used to The battery has become old Replace battery Battery not charged completely due to insufficient charge time Charge for longer period of time or try a peak de tection charger Gear mesh too tight C...

Page 21: ...TAS01024 VTAS01046 VTAS01056 2x10 VTAS01020 VTAS01055 VTAS01023 VTAS01001 VTAS01149 VTAS01019 VTAS01016 VTAS01051 VTAS01051 VTAS01015 VTAS01025 VTAS01147 M4 x 4 VTAS01015 VTAS01129 M3 x 18 VTAS01022 VTAS01021 VTAS01017 VTAS01046 VTAS01050 15x10x4 VTAS01024 VTAS01047 VTAS01009 VTAS01055 E2 5 VTAS01045 VTAS01008 VTAS01009 VTAS01039 VTAS01039 VTAS01042 VTAS01144 M3 VTAS01046 VTAS01023 VTAS01050 15x10...

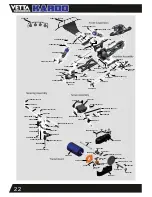
Page 22: ...031 VTAS01042 VTAS01037 VTAS01035 VTAS01029 VTAS01035 VTAS01058 M3 x 8 VTAS01028 VTAS01028 VTAS01054 E8 VTAS01066 M3 x 12 VTAS01032 VTAS01117 VTAS01106 VTAS01091 VTAS01105 VTAS01025 VTAS01103 VTAS01059 3 x 10 VTAS01038 17T VTAS01104 VTAS01107 VTAS01022 VTAS01119 8 x 5 x 0 2 VTAS01119 8 x 5 x 0 2 VTAS01051 VTAS01147 VTAS01146 VTAS01142 VTAS01051 VTAS01042 VTAS01040 VTAS01066 M3 x 12 VTAS01059 3 x 1...

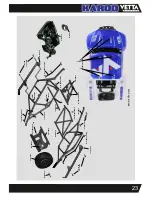
Page 23: ...057 M3x6 VTAS01066 M3x12 VTAS01079 HLNA0906 HLNA0905 HLNA0792 VTAS01076 VTAS01077 Roll Cage Body VTAS01110 VTAS01111 M3x12 VTAS01135 VTAS01135 M3x12 VTAS01135 M3x12 VTAS01135 M3x12 VTAS01135 M3x12 VTAS01135 VTAS01078 VTAS01124 VTAS01123 VTAS01123 VTAS01057 M3x6 VTAS01061 VTAS01135 M3x12 23 ...

Page 24: ...S01113 11x5x4 VTAS01102 VTAS01101 VTAS01096 VTAS01146 M3x3 VTAS01087 VTAS01094 VTAS01099 VTAS01063 VTAS01087 VTAS01135 M3x12 VTAS01097 VTAS01121 M3x10 Rear Suspension Assembly VTAS01042 VTAS01042 VTAS01042 VTAS01042 VTAS01042 VTAS01063 VTAS01099 VTAS01089 VTAS01063 VTAS01098 VTAS01097 VTAS01135 M3x12 VTAS01098 VTAS01136 M3x25 VTAS01002 VTAS01128 M3x10 VTAS01042 VTAS01063 VTAS01043 VTAS01146 M3x3 V...

Page 25: ...VTAS01059 VTAS01058 M3x8 VTAS01092 VTAS01128 3x10 VTAS01065 M3x8 VTAS01065 3x10 VTAS01090 M3x10 Chassis Assembly VTAS01058 M3x8 VTAS01058 M3x8 VTAS01025 VTAS01100 VTAS01058 M3x8 VTAS01065 M3x8 25 ...

Page 26: ...r with pin 2 sets Karoo VTAS01017 Differen al Case 2pcs Karoo VTAS01018 Differen al Drive Spur Gear 2pcs Karoo VTAS01019 Differen al Drive Gear 2pcs Karoo VTAS01020 Differen al Bevel Gear S 4pcs Karoo VTAS01021 Differen al Bevel Gear B 4pcs Karoo VTAS01022 Differen al Pin 2pcs Karoo VTAS01023 Washer 6pcs Karoo VTAS01024 Differen al Drive Cup 4pcs Karoo VTAS01025 Center Coupler 3pcs Karoo VTAS01026 Body P...

Page 27: ...pcs Karoo VTAS01059 Bu on Head Hex Screw M3x10 6pcs Karoo VTAS01060 Bu on Head Hex Screw M3x14 6pcs Karoo VTAS01061 Cap Head Hex Screw M3x10 6pcs Karoo VTAS01062 Cap Head Hex Screw M3x14 6pcs Karoo VTAS01063 Cap Head Hex Screw M3x18 6pcs Karoo VTAS01064 Cap Head Hex Screw M3x28 6pcs Karoo VTAS01065 Flat Head Hex M3x8 6pcs Karoo VTAS01066 Flat Head Hex M3x12 6pcs Karoo VTAS01067 Flat Head Hex M3x14...

Page 28: ...S01105 Motor Mount for 17T Karoo VTAS01106 Central Transmission Cover Upper Karoo VTAS01107 Central Transmission Cover Lower Karoo VTAS01108 Motor Mount For 23T Karoo VTAS01109 Rear Central CVD front half Karoo VTAS01110 Driver Helmet 2pcs Karoo VTAS01111 Driver Blister set with decal Karoo VTAS01112 Rear Differen al sha Karoo VTAS01113 Ball Bearing 11x5x4 6pcs Karoo VTAS01114 Rear Shock Sha and Pi...

Page 29: ...ms 2pcs Karoo VTAS01139 Tyre Set 2pcs Karoo VTAS01124 Wheel Set 2pcs Karoo VTAS01151 Body Shell Blue Karoo VTAS01152 Body Shell Grey Karoo VTAS01181 Clear Body Shell op onal Clear Karoo VTAS01123 Side Impact Bars Karoo VTAS01142 Brushed 550 23T Motor Karoo VTAS01143 Brushed ESC 40A Karoo VTAS01141 Standard 3kg Servo Karoo VTAS01182 PLAT1000 PLAR1000 NiMH Ba ery 1800mAh 8 4V HCT Hump 6 1 Karoo Plan...

Page 30: ...nal Parts Continued Declaration of Conformity CE Conformity Declaration This device has been tested in accordance with the relevant harmonised European directives This product s design fulfils the protective aims of the European Community relating to the safe operation of this equipment For a copy of the Declaration of Conformity please visit www vettaracing com Disposal Electrical equipment marked...

Page 31: ...design material selection and assembly to make our products as durable as possible Vetta products are covered under warranty only against manufacturer s defect in materials workmanship or assembly when it is new before being used If you believe a defect in materials workmanship or assembly was not apparent when the product was new and only became evident after the product was used then please cont...

Page 32: ...www vettaracing com ...
Reviews: