background image


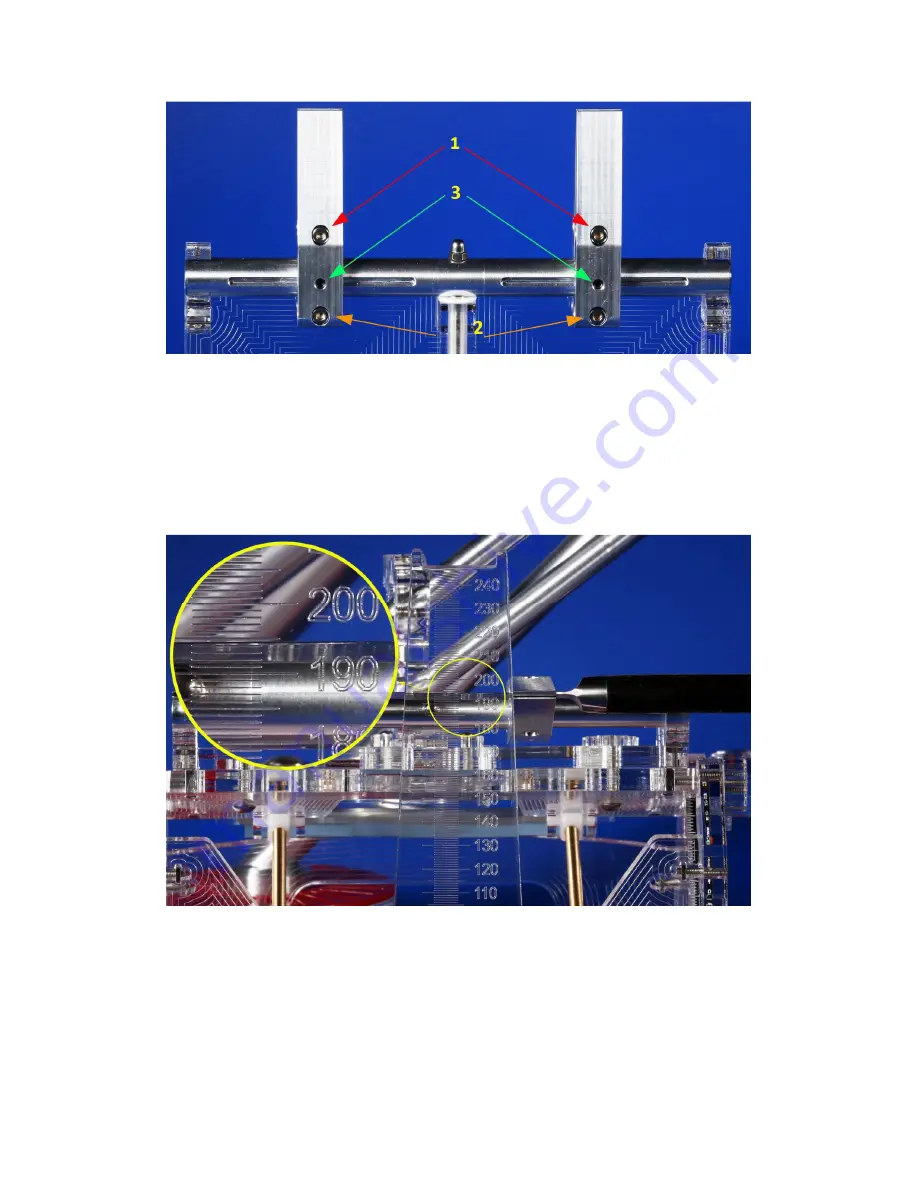
1

. Bolts for clamping the blade. They are designed for clamping the blade and preliminary 

fixing of the clamps' position. 


2

. Bolts for fixing the clamps' position. 


3

. The adjusting bolts (do not tighten) prevent the clamps from rotating and also limit their 

horizontal movement using symmetrical grooves on the guide plate. After having loosened the 
adjustment bolts, the clamps can be moved to one side.  


To clamp and place the blade, follow these instructions: 


 Set the required distance between the clamps and then place the blade inside them. 


 Fix the blade in place using the bolts no.1 to prevent it from slipping out. 


 Place the clamp-blade triangle onto the revolving tilting table platform. 


Summary of Contents for Ermak-10

Page 1: ...icate the sharpener lubricant is in fact not advised as it can retain abrasive particles 6 Beware of the magnets they are very strong Slide the knife gradually starting with the tip of the blade and working towards the heel When taking the knife off work backwards by first sliding in the heel of the blade moving towards the tip If you try to attach or take off the entire blade at one time sudden s...

Page 2: ...ble tower joined with a platform handle and a stone arm To be able to assemble the sharpener you must carry out two operations in the following order 1 Use the DIN912 M6x20 screw which is screwed to the top of the tower during transport to fix the handle to the tower There is no need for azimuth alignment just screw it tightly in the opening in the tower using a HEX key 2 Insert the vertical rod d...

Page 3: ... on the platform It must be stable on the table without rocking Levelling is not required To determine the angle of sharpening do not forget that the sharpening angle on the table is set at half just turn the cogwheel adjuster until the mark on the side of the platform meets the mark on the side scale The precision of the scale allows you to determine the sharpening angle to an accuracy of 0 25 de...

Page 4: ...ays visible and the stops themselves have a more complex shape with a little step which also serves as a scale pointer There is now only one transparent slider under the stop with its step being in the right cut out of the dorsal stop The biggest change can be seen on the table with clamps which is now much more interesting There are no flat springs on the clamps they are now more compact and ergo...

Page 5: ...mit their horizontal movement using symmetrical grooves on the guide plate After having loosened the adjustment bolts the clamps can be moved to one side To clamp and place the blade follow these instructions Set the required distance between the clamps and then place the blade inside them Fix the blade in place using the bolts no 1 to prevent it from slipping out Place the clamp blade triangle on...

Page 6: ... the rotating clamps By the way the options for adjusting the rotation symmetry can be used in the case of adjusting the width of the taper towards the cutting edge to compensate the asymmetry of the sharpening Otherwise the use of the sharpener is no different to the E8 or E9 models The motion kinematics are the same but the weight of the entire motion system has dropped significantly due to the ...

Reviews: