Vestil LSC-2448-4SD Assembly Instructions Manual Download Page 9

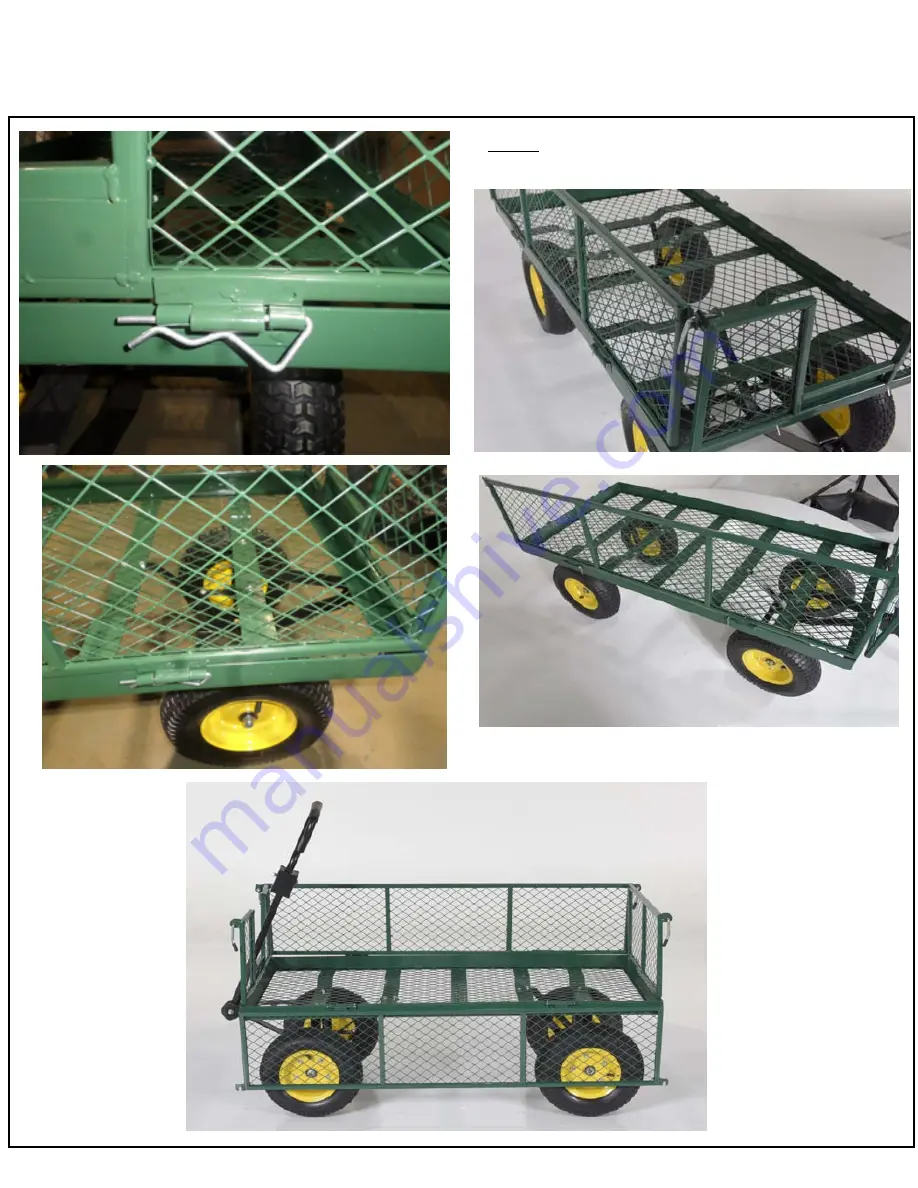
7. Assembling front , rear & side panels (Fig. 6)

a) Align tabs on the panels  with tabs on the base panel

b) Attach front panel (T), back panel (S) and side panels (R) to the trolley base (J) using R pins.

FIG.6

Page 

9

 of 

10


  Copyright 201

7

 Vestil Manufacturing Corp

.

   LSC-2448-

4SD

, manual.doc 

Summary of Contents for LSC-2448-4SD

Page 1: ...forced in the location where the product is used is exclusively the responsibility of the owner end user 2 Vestil is not liable for any injury or property damage that occurs as a consequence of failin...

Page 2: ...4kg LSC 2448 PT Platform cart 24in x 48in 61cm x 122cm in 1 3cm 12 in 32 4cm 500 pounds 227 3cm 10in 3 in 25cm x 9cm 55 lb 25kg LSC 2448 SC Double decker cart 24in x 48in 61cm x 122cm 1 in 4 4cm 33in...

Page 3: ...r 4 H M12 Lock Nut 4 I Hex Head Bolt M8x20 washer lock nut 13 J Deck 1 K Steering Assembly Stabilizer Link 1 L Wheel Linkage 1 M Steering Assembly 1 N Rear Axle Weldment 1 O Left Link 1 P Right Link 1...

Page 4: ...A B E F H G I J Base K O L L M N Q R S P Q T P R Copyright 2017 Vestil Manufacturing Corp Page 4 of 7 U LSC 2448 4SD manual doc C D...

Page 5: ...K to the yoke Q and the steering assembly M with a bolt The location of the bolt is marked d 2 Slide the axle receivers of two wheels see FIG 2B onto the wheel posts of the steering assembly M then se...

Page 6: ...holes in the formed strap labeled b Fasten the link arms to strap b with 4 bolts flat washers and hex nuts c Next align the bolt holes in the steering assembly M with the bolt holes in strap c indicat...

Page 7: ...on each axle valve stem facing out b Use M12 washer and M12 lock nut to secure the wheels on the axle Valve stem facing out M12 washer M12 lock nut Wheel axle FIG 4A Page 7 of 10 Copyright 2017 Vestil...

Page 8: ...o identified in FIG 3 on p 6 through the coupler and handle and through the other side of the bracket d Secure the handle bolt with a flat washer and hex nut b Slide the coupler A and align the bolt h...

Page 9: ...Fig 6 a Align tabs on the panels with tabs on the base panel b Attach front panel T back panel S and side panels R to the trolley base J using R pins FIG 6 Page 9 of 10 Copyright 2017 Vestil Manufact...

Page 10: ...ity in Angola IN The warranty covers defects in the following original dynamic components motors hydraulic pumps electronic controllers switches and cylinders It also covers defects in original parts...

Reviews: