background image

EN - 29

EN

6.  TROUBLESHOOTING&TRANSPORT

6.1 

troubleShootinG

If you still have a problem with your appliance after checking these basic 

troubleshooting steps, please contact an authorised service person or qualified 

technician.

Problem

Possible Cause

Solution 

Hob burners do not 

work.

The burners may be in the ´

off

position.

Supply gas pressure may not be 

correct.

Power (if the appliance has an electric 

connection) is switched off.

Check the position of the control knob.

Check the gas supply and gas pressure.

Check whether there is power supplied. Also 

check that other kitchen appliances are working.

Hob burners do not 

light.

Burner cap and crown are not 

assembled correctly.

Supply gas pressure may not be 

correct.

LPG cylinder (if applicable) may be 

depleted.

Power (if the appliance has an electric 

connection) is switched off. 

Ensure the burner parts have been placed 

correctly.

Check the gas supply and gas pressure.

LPG cylinder may need replacing.

Check whether there is power supplied. Also 

check that other kitchen appliances are working.

Flame colour is 

orange/yellow.

Burner cap and crown are not 

assembled correctly.

Different gas compositions.

Ensure the burner parts have been placed 

correctly.

Due to the design of the burner, the flame can 

appear to be orange/yellow in certain areas of the 

burner.

If you operate the appliance with natural gas, city 

natural gas may have different compositions. Do 

not operate the appliance for a couple of hours.

Burner is not 

igniting or only 

partially lighting.

Burner parts may not be clean or dry.

Ensure that parts of the appliance are dry and 

clean.

Burner sounds 

noisy.

-

This is normal. The noise may reduce as they 

heat up.

Noise

-

It is normal for some metal parts on the cooker to 

produce noise when in use.

The hob or cooking 

zones cannot be 

switched on.

There is no power supply.

Check the household fuse for the appliance.

Check whether there is a power cut by trying other 

electronic appliances.

The hob produces 

an odour during 

the first cooking 

sessions.

New appliance.

Heat a saucepan full of water on each cooking 

zone for 30 minutes.

Oven does not 

turn on.

Power is turned off.

Check whether there is power supplied. Also 

check that other kitchen appliances are working.

No heat or oven 

does not warm up.

Oven temperature control is incorrectly 

set.

Oven door has been left open.

Check the oven temperature control knob is set 

correctly.

Summary of Contents for VC-993wnPBG

Page 1: ...Free Standing Cooker Operation manual Kuchnia wolnostoj ca Instrukcja obs ugi Samostoje i tedilnik Uporabni ki priro nik VC 993wnPBG VC 993wnPBR...

Page 2: ...stfrost product Our retro product line has been created out of the need to let the classic design and bold colors meet modern solutions We have created a range of easy to use products which nicely fit...

Page 3: ...Cooker 12 2 3 Gas Connection 12 2 4 Gas Conversion if available 13 2 5 Electrical Connection and Safety if available 14 2 6 Adjusting the feet 15 3 PRODUCT FEATURES 17 4 USE OF PRODUCT 19 4 1 Use of g...

Page 4: ...if they have been given supervision or instruction concerning use of the appliance in a safe way and understand the hazards involved Children should not play with the appliance Cleaning and user maint...

Page 5: ...talled For detailed information refer to the anti tilting kit set guide During use the appliance will get hot Care should be taken to avoid touching heating elements inside the oven Handles may become...

Page 6: ...s of the appliance are compatible The specifications for this appliance are stated on the label CAUTION This appliance is designed only for cooking food and is intended for indoor domestic household u...

Page 7: ...ly cord is damaged it must be replaced by the manufacturer its service agent or similarly qualified persons in order to prevent a hazard Do not let children climb on the oven door or sit on it while i...

Page 8: ...e cabinets must be able to withstand a minimum temperature of 100 C The appliance must not be installed behind a decorative door in order to avoid overheating 1 3 During Use When you first use your ov...

Page 9: ...rol knobs are always in the 0 stop position when the appliance is not in use The trays incline when pulled out Take care not to spill or drop hot food when removing it from the oven CAUTION The use of...

Page 10: ...ON The inside surface of the storage compartment may get hot when the appliance is in use Avoid touching the inside surface Do not hang towels dishcloths or clothes from the appliance or its handles 1...

Page 11: ...roduct should not be treated as household waste Instead it should be handed over to the applicable collection point for the recycling of electrical and electronic equipment By ensuring this product is...

Page 12: ...the room has a door which opens directly to outside air in which case no permanent ventilation is required For rooms with a volume greater than 10 m3 no permanent ventilation is required Important Re...

Page 13: ...Cupboard 420 B mm Cooker Hood 650 700 C mm 20 D mm Product Width E mm 100 A B C C D E 2 3 Gas Connection Assembly of gas supply and leakage check Connect the appliance in accordance with applicable l...

Page 14: ...required can be supplied as spare parts During connection always keep the nut on the gas manifold fixed while rotating the counter part Use appropriately sized spanners for a safe connection For surf...

Page 15: ...rew inside the hole Valve with flame failure device Valve with flame failure device Determining the minimum flame position To determine the minimum position ignite the burners and leave them on in the...

Page 16: ...ed switch must be easily accessible once the appliance has been installed Ensure all connections are adequately tightened Fix the supply cable in the cable clamp and then close the cover The terminal...

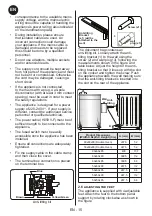
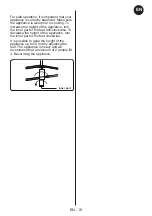
Page 17: ...height of the appliance turn the inner part of the feet anti clockwise To decrease the height of the appliance turn the inner part of the feet clockwise It is possible to raise the height of the appl...

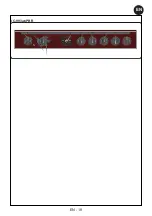
Page 18: ...e of your appliance may differ from that shown in the figures below List of Components 1 2 3 4 5 1 Cooktop 2 Control Panel 3 Oven Door Handle 4 Oven Door 5 Adjustable Feet Control Panel 6 Oven Functio...

Page 19: ...EN 18 EN VC 993wnPBR Mode Professional...

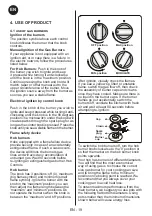
Page 20: ...econds before re igniting an extinguished gas burner Hob Controls Hob burner The knob has 3 positions off 0 maximum big flame symbol and minimum small flame symbol Ignite the burner with the knob in t...

Page 21: ...on For the details of different functions see Oven Functions Oven thermostat knob After selecting a cooking function turn this knob to set the desired temperature The oven thermostat light will illumi...

Page 22: ...ended that you preheat the oven for about 10 minutes Warning When grilling the oven door must be closed and the oven temperature should be adjusted to 190 C Faster Grilling Function The oven s thermos...

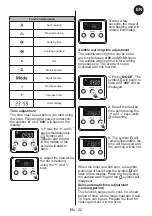
Page 23: ...stment The audible warning time can be set to any time between 0 00 and 23 59 hours The audible warning time is for warning purposes only The oven will not be activated with this function 1 Press MODE...

Page 24: ...1 Select the desired cooking function and the temperature using the control knobs 2 Press MODE until you see end and symbol on the display screen A and the current time of day will flash 3 Use the an...

Page 25: ...er will switch back to manual function Sound Adjustment To adjust the volume of the audible warning sound while the current time of day is displayed press and hold the button for 1 2 seconds until an...

Page 26: ...ball bearings to allow for easy access to your food The Wire Grid The wire grid is best used for grilling or for processing food in oven friendly containers WARNING Place the grid to any correspondin...

Page 27: ...inished panel at the rear of the oven They work by collecting any grease and oil residue during cooking Catalytic liners are designed to have a working life of about 300 hours The liner self cleans by...

Page 28: ...ipe them over again with a wet cloth and dry them Do not clean the enamelled parts while they are still hot from cooking Do not leave vinegar coffee milk salt water lemon or tomato juice on the enamel...

Page 29: ...pliance and allow it to cool before cleaning your appliance Remove the glass lens then remove the bulb Insert the new bulb resistant to 300 C to replace the bulb that you removed 230 V 15 25 Watt Type...

Page 30: ...are not assembled correctly Different gas compositions Ensure the burner parts have been placed correctly Due to the design of the burner the flame can appear to be orange yellow in certain areas of t...

Page 31: ...caught between the timer buttons Touch model there is moisture on the control panel The key lock function is set Remove the foreign matter and try again Remove the moisture and try again Check whether...

Page 32: ...ION 276 2 l h 218 1 MEDIUM BURNER DIA of INJECTOR 1 100mm 97 62 NOMINAL RATING kW 1 75 1 75 CONSUMPTION 166 7 l h 127 2 MEDIUM BURNER DIA of INJECTOR 1 100mm 97 62 NOMINAL RATING kW 1 75 1 75 CONSUMPT...

Page 33: ...EN 32 EN...

Page 34: ...bdarzyli cie nas kupuj c produkt marki Vestfrost Linia retro naszych produkt w powsta a z potrzeby po czenia klasycznego projektu i odwa nych kolor w z nowoczesnymi rozwi zaniami W ten spos b stworzyl...

Page 35: ...u gazu je li jest dost pne 15 2 5 Przy cze elektryczne i bezpiecze stwo je eli jest 15 2 6 Zestaw zabezpieczaj cy przed przechyleniem 16 2 7 Regulacja n ek 17 3 CECHY PRODUKTU 18 4 U YTKOWANIE PRODUKT...

Page 36: ...o wiadczenia i wiedzy ale tylko pod nadzorem lub zgodnie z udzielonymi instrukcjami dotycz cymi jej u ytkowania w spos b bezpieczny i przy zrozumieniu zwi zanych z tym zagro e Dzieci nie mog bawi si k...

Page 37: ...ych p yn w a przed jej zamkni ciem poczeka a kuchenka ostygnie Nie w cza urz dzenia za pomoc zewn trznego czasomierza lub odr bnego systemu zdalnego sterowania OSTRZE ENIE Aby zapobiec przewr ceniu si...

Page 38: ...echnik w serwisowych Instalacja i naprawy przeprowadzane przez nieautoryzowanych technik w mog by niebezpieczne Zabrania si dokonywania wszelkich zmian i modyfikacji specyfikacji kuchenki Stosowanie n...

Page 39: ...nie umieszczono takiego symbolu nale y si zapozna z instrukcj techniczn w kt rej zawarto niezb dne wytyczne dotycz ce przystosowania kuchenki do warunk w u ytkowania w danym kraju Podj to wszystkie mo...

Page 40: ...da za adne szkody kt re mog o spowodowa umieszczenie kuchenki w nieodpowiednim miejscu i jej instalacja przez nieuprawnione osoby Rozpakowuj c kuchenk nale y si upewni e nie zosta a ona uszkodzona pod...

Page 41: ...r ca para z piekarnika mo e spowodowa oparzenia Nie umieszcza materia w palnych ani atwopalnych w kuchence ani w jej pobli u gdy kuchenka pracuje Do wstawiania i wyjmowania potraw z piekarnika zawsze...

Page 42: ...mechanicznym wyci giem Przy d ugotrwa ym i intensywnym u ytkowaniu kuchenki potrzebna mo e by dodatkowa wentylacja na przyk ad otwarcie okna lub bardziej wydajna wentylacja na przyk ad zwi kszenie po...

Page 43: ...henki zalecamy bezwzgl dne u ytkowanie oryginalnych cz ci zamiennych i w razie potrzeby kontakt z naszymi autoryzowanymi agentami serwisowymi Deklaracja zgodno ci CE O wiadczamy e nasze produkty spe n...

Page 44: ...iaj c prawid owe z omowanie tego wyrobu przyczynisz si do zapobiegania potencjalnym negatywnym konsekwencjom jego niew a ciwej utylizacji dla rodowiska naturalnego i zdrowia ludzi Aby uzyska wi cej sz...

Page 45: ...cm2 chyba e pomieszczenie ma drzwi kt re otwieraj si bezpo rednio na zewn trz W wczas wentylacja sta a nie jest wymagana Dla pomieszcze o kubaturze wi kszej ni 10 m3 nie jest wymagana sta a wentylacja...

Page 46: ...g powietrza wok kuchenki Je li nad urz dzeniem b dzie instalowany okap kuchenny lub dowolna szafka odleg o mi dzy p yt grzejn a szafk okapem kuchennym powinna by taka jak pokazano poni ej A mm Szafka...

Page 47: ...element w wykorzystywanych do przy czania Punkty do sprawdzenia przy przy czaniu gazu przewodem sta ym Aby zamontowa sta e przy cze gazowe przy u yciu po cze gwintowych np nakr tek w r nych krajach st...

Page 48: ...ycz c dysz gazowych Korona Klucz Podstawa palnika Nak adka palnika Pokrywa palnika Regulacja minimalnej pozycji p omienia Najpierw nale y si upewni e kuchenka jest od czona od zasilania elektrycznego...

Page 49: ...ia oznaczone na tabliczce znamionowej urz dzenia w celu potwierdzenia zgodno ci z dost pnym napi ciem sieciowym a przewody elektryczne powinny by w stanie obs ugiwa moc znamionow urz dzenia r wnie wsk...

Page 50: ...rzed przechyleniem ciana Wymiary produktu szeroko g boko wysoko cm A mm B mm 60 60 90 piekarnik podw jny 297 5 52 50 60 90 piekarnik podw jny 247 5 52 90 60 85 430 107 60 60 90 309 5 112 60 60 85 309...

Page 51: ...h rysunkach Wykaz element w 1 2 3 4 5 1 P yta kuchenki 2 Panel sterowania 3 Uchwyt drzwiczek piekarnika 4 Drzwiczki piekarnika 5 Regulowane n ki Panel sterowania VC 993wnPBG 6 Pokr t o wyboru funkcji...

Page 52: ...PL 19 PL VC 993wnPBR Mode Professional...

Page 53: ...przed jego przypadkowym zga ni ciem W takim przypadku zabezpieczenie odcina dop yw gazu do palnika co zapobiega gromadzeniu si niespalonego gazu Odczekaj 90 sekund przed ponownym zapaleniem zgas ego p...

Page 54: ...mo e by wysoka Konieczne jest aby w trakcie i po zako czeniu gotowania nie dopuszcza dzieci ani zwierz t do palnik w Po u yciu p yta przez d u szy czas pozostaje bardzo gor ca Nie stawia na urz dzeniu...

Page 55: ...o daje lekki efekt grillowania potraw Zaleca si wst pne podgrzanie piekarnika przez mniej wi cej 10 minut Funkcja pizzy W cza si termostat i zapalaj si lampki ostrzegawcze piekarnika zaczyna dzia a pi...

Page 56: ...u grilla Nale y zawsze ustawia tack pod spodem aby zbiera krople kapi cego oleju lub t uszczu Zaleca si wst pne podgrzanie piekarnika przez mniej wi cej 10 minut Ostrze enie Przy grillowaniu drzwiczki...

Page 57: ...nie przez okre lony czas Mo na ustawi czas trwania w zakresie od 0 do 10 godzin Przygotowa potraw do gotowania i w o y do piekarnika 1 Wybra dan funkcj pieczenia i temperatur za pomoc pokr te panelu s...

Page 58: ...do piekarnika 1 Wybra dan funkcj pieczenia i temperatur za pomoc pokr te panelu sterowania 2 Nacisn MODE TRYB a na ekranie pojawi si dur i symbol Symbol A b dzie miga 3 Wybra dany czas gotowania za po...

Page 59: ...pobiec przewr ceniu si naczynia w razie u ywania ma ego palnika Tacka g boka Tacka g boka najlepiej sprawdza si do gotowania gulaszu Po o y tack na dowolnym stela u wcisn do ko ca i upewni si e jest p...

Page 60: ...ia anie palnika Na podstawce do wok w nie nale y stawia garnk w o p askim dnie Nie nale y u ywa garnk w o dnie wypuk ym bez podstawki do wok w POPRAWNIE NIEPOPRAWNIE 5 CZYSZCZENIE I KONSERWACJA 5 1 Cz...

Page 61: ...ale y ustawi maksymaln temperatur piekarnika na 20 30 minut Po ostygni ciu piekarnika nale y wytrze jego dno Nie zaleca si r cznego czyszczenia wk adek katalitycznych Stosowanie we ny stalowej impregn...

Page 62: ...cz ci ze stali nierdzewnej je li dotyczy Nale y regularnie czy ci cz ci urz dzenia wykonane ze stali nierdzewnej Wytrze cz ci ze stali nierdzewnej mi kk ciereczk nas czon sam wod Nast pnie osuszy je...

Page 63: ...a tylko przez autoryzowanego serwisanta lub wykwalifikowanego technika Zmiana lampki piekarnika OSTRZE ENIE Przed czyszczeniem urz dzenia nale y je wy czy i pozostawi do ostygni cia Zdemontowa szklan...

Page 64: ...ne kontrole Nale y systematycznie sprawdza przew d zasilania gazem Je li zostanie wyczuta nawet najdrobniejsza nieprawid owo nale y skontaktowa si z autoryzowanym serwisem aby wymieni przew d Zalecamy...

Page 65: ...palnika nie s poprawnie zamontowane R ny sk ad gazu Upewni si e cz ci palnika zosta y prawid owo zmontowane Konstrukcja palnika powoduje e p omie mo e wygl da na pomara czowy ty w niekt rych obszarach...

Page 66: ...panel sterowania jest wilgotny Ustawiona jest funkcja blokady Usun cia a obce i spr bowa ponownie Usun wilgo i spr bowa ponownie Sprawdzi czy ustawiona jest funkcja blokady Wentylator piekarnika je l...

Page 67: ...276 2 l h 210 9 g h REDNI PALNIK REDNICA DYSZY 1 100mm 97 65 OCENA NOMINALNA kW 1 75 1 65 KONSUMPCJA 166 7 l h 120 g h REDNI PALNIK REDNICA DYSZY 1 100mm 97 65 OCENA NOMINALNA kW 1 75 1 65 KONSUMPCJA...

Page 68: ...i elektrycznej w trybie konwencjonalnym kWgodz cykl 1 03 Zu ycie energii elektrycznej z wymuszonym obiegiem powietrza kWgodz cykl 0 94 Liczba wn k 1 r d o ciep a ELEKTRYCZNY Pojemno l 105 Piekarnik te...

Page 69: ...ywno energetyczna 3 59 0 Technologia grzewcza 4 Gazowa Rozmiar 4 Szybka Efektywno energetyczna 4 57 0 Technologia grzewcza 5 Gazowa Rozmiar 5 Wok Efektywno energetyczna 5 56 0 Efektywno energetyczna p...

Page 70: ...in nakup izdelka Vestfrost Na a linija izdelkov retro je bila ustvarjena z eljo po tem da klasi na zasnova in drzne barve ustvarijo sodobne re itve Ustvarili smo vrsto izdelkov ki so preprosti za upor...

Page 71: ...e je na voljo 13 2 5 Elektri na povezava in varnost e je na voljo 14 2 6 Komplet proti nagibanju 15 2 7 Nastavljanje nogic 15 3 LASTNOSTI IZDELKA 17 4 UPORABA IZDELKA 19 4 1 Uporaba plinskih gorilnik...

Page 72: ...zorom ali so prejele navodila za varno uporabo naprave in razumejo vpletena tveganja Otroci se z napravo ne smejo igrati Otroci ne smejo opravljati i enja ali vzdr evanja naprave brez nadzora OPOZORIL...

Page 73: ...informacije preberite navodila za komplet proti prevra anju Med uporabo se bo naprava segrela Pazite da se ne dotaknete grelnih elementov znotraj pe ice Po zelo kratkem asu uporabe ro aji postanejo v...

Page 74: ...ana samo za peko hrane in je namenjena le za notranjo uporabo v gospodinjstvu Ne sme se uporabljati za druge namene kot je npr negospodinjska uporaba v poslovnem okolju ali za ogrevanje prostorov Napr...

Page 75: ...prava kuhalno plo o iz stekla ali steklene keramike POZOR V primeru po enega stekla kuhalne plo e nemudoma izklopite vse gorilnike in vse elektri ne grelne elemente ter napravo izolirajte iz napajanja...

Page 76: ...sledica izolacijskih materialov na grelnih elementih Predlagamo da pred prvo uporabo pe ico pustite prazno in jo za 45 minut nastavite na najvi jo temperaturo Poskrbite da bo okolje v katerem je name...

Page 77: ...prostoru v katerem je naprava name ena Prepri ajte se da je kuhinja dobro prezra evana e posebej med delovanjem naprave naj bodo naravne odprite za zra enje odprte ali pa namestite prezra evalno napr...

Page 78: ...zdr evanjem Pred izvajanjem kakr nega koli i enja ali vzdr evanja poskrbite da bo naprava izklopljena iz omre ja Ne odstranite krmilnih gumbov da bi o istili nadzorno plo o Da bi ohranili u inkovitost...

Page 79: ...o zbiralni mesto za recikliranje elektri ne in elektronske opreme S pravilnim odlaganjem tega izdelka boste pomagali prepre iti morebitne negativne posledice na okolje in zdravje ljudi do esar lahko p...

Page 80: ...so ve ji od 10 m3 trajno prezra evanje ni potrebno Pomembno Ne glede na velikost prostora morajo imeti vsi prostori v katerih je name ena naprava neposredni dostop do zunanjega zraka preko okna na odp...

Page 81: ...imi lokalnimi in mednarodnimi standardi in predpisi Najprej preverite katere vrste plin je name en na tedilniku Ta podatek je naveden na nalepki na hrbtni strani tedilnika Informacije povezane z ustre...

Page 82: ...ne med razli nimi komponentami vedno uporabite tesnila prilo ena v kompletu za zamenjavo plina Tesnila ki se uporabljajo med povezavo morajo biti odobrena za uporabo v plinski povezavi Za plinske pove...

Page 83: ...nj ega plamena Za dolo itev najni jega polo aja pri gite gorilnike in jih pustite v najni jem polo aju Odstranite gumbe saj so vijaki dostopni le ko so gumbi odstranjeni S pomo jo majhnega izvija a pr...

Page 84: ...lj pritrjeni Napajalni kabel pritrdite v kabelsko sponko in zaprite pokrov Priklju ek priklju ne omarice se nahaja na priklju ni omarici Rjava Rumena zelena Modra 2 6 Komplet proti nagibanju Okvir pro...

Page 85: ...i ajte da je naprava uravnote ena e elite pove ati vi ino naprave notranji del nogic obrnite v nasprotni smeri urnega kazalca e elite zmanj ati vi ino naprave notranji del nogic obrnite v smeri urnega...

Page 86: ...naprave prikazane na slikah v nadaljevanju Seznam delov 1 2 3 4 5 1 Kuhalna povr ina 2 Nadzorna plo a 3 Ro aj na vratih pe ice 4 Vrata pe ice 5 Prilagodljive nogice Nadzorna plo a VC 993wnPBG 6 Kontr...

Page 87: ...SI 18 SI VC 993wnPBR Mode Professional...

Page 88: ...re i kakr no koli nabiranje nezgorelih plinov Po akajte 90 sekund preden ponovno pri gete gorilnik z izgorelim plinom 4 2 Krmilniki kuhalne plo e Gorilnik kuhalne plo e Gumb ima tri polo aje izkloplje...

Page 89: ...za funkcijo pe ice Gumb obrnite v polo aj ustreznega simbola elene funkcije pe enja Za podrobnosti razli nih funkcij glejte Funkcije pe ice Termostatski gumb pe ice Ko izberete funkcijo pe enja z obr...

Page 90: ...Priporo eno je da pe ico predhodno segrevate 10 minut Opozorilo Ko pe ete na aru morajo biti vrata pe ice zaprta temperatura pe ice pa mora biti nastavljena na 190 C Funkcija hitrej ega ara Termostat...

Page 91: ...vna nastavitev zvo nega opozorila as zvo nega opozorila lahko nastavite na as med 0 00 in 23 59 Zvo no opozorilo je le za opozorilne namene Pe ica se s to funkcijo ne bo aktivirala 1 Pritisnite tipko...

Page 92: ...enutnega asa v dnevu Hrano pripravite za pe enje in jo polo ite v pe ico 1 S pomo jo kontrolnih gumbov izberite eleno funkcijo pe enja in temperaturo 2 Pritisnite tipko MODE dokler na zaslonu ne vidit...

Page 93: ...in Oba kontrolna gumba obrnite v polo aj 0 in pritisnite katero koli tipko da ustavite zvok Simbol bo izginil in asovnik bo preklopil nazaj v ro no funkcijo Nastavitev zvoka e elite nastaviti glasnos...

Page 94: ...konca Za ita Za ita je na kuhalno povr ino pritrjena z dvema vijakoma Re etka s polovi nim teleskopskim vodilom Ena izmed re etk je teleskopska Brez te av se na krogli nih le ajih raztegne do polovic...

Page 95: ...te pe ico lahko popolnoma o istili boste ob asno morali uporabiti teko istilni material Kataliti no i enje Kataliti ne podloge so name ene v notranjosti pe ice Podloge so matirane plo e svetle barve n...

Page 96: ...anjosti in zunanjosti steklenih delov uporabite istilno sredstvo za steklo Nato jih sperite in temeljito osu ite s suho krpo i enje emajliranih delov Emajlirane dele naprave redno istite Emajlirane de...

Page 97: ...obljen tehnik Menjava lu i pe ice OPOZORILO Napravo izklopite in po akajte da se ohladi ele nato jo o istite Odstranite stekleno le o nato odstranite arnico Na mesto stare arnice 230 V 15 25 W tipa E1...

Page 98: ...rona gorilnika nista pravilno sestavljeni Razli ne sestave plina Prepri ajte se da so deli gorilnikov pravilno name eni Zaradi zasnove gorilnika je lahko plamen v dolo enih delih gorilnika oran ne rum...

Page 99: ...so ujeti tujki Model na dotik kontrolna plo a je vla na Nastavljena je funkcija zaklepanja tipk Odstranite tujke in poskusite znova Odstranite vlago in poskusite znova Preverite ali je nastavljena fu...

Page 100: ...BA 276 2 l h 210 9 g h MEDIUM BURNER DIA of INJECTOR 1 100mm 97 65 NOMINALNA RATING kW 1 75 1 65 PORABA 166 7 l h 120 g h MEDIUM BURNER DIA of INJECTOR 1 100mm 97 65 NOMINALNA RATING kW 1 75 1 65 PORA...

Page 101: ...SI 32 SI...

Page 102: ......

Page 103: ......

Page 104: ......

Reviews: