6
If a moulded plug is present, the fuse cover must
be refitted when changing the fuse using a 13
amp ASTA approved fuse to BS 1362. In the event
of losing the fuse cover, the plug must NOT be
used until a replacement fuse cover has been
obtained and fitted. A new fuse cover can be
obtained from your nearest electrical dealer. The
colour of the correct replacement fuse cover is
that of the coloured marks on the base of the plug.
ENSURE THAT YOUR MACHINE IS
CONNECTED CORRECTLY.
Socket outlets are not permitted in bathrooms,
neither should any provision be made for
connecting moveable electrical appliances. No
stationary appliance is to be installed within reach
of a person using the bath or shower.
IMPORTANT!
In case of damage to the power cord it must be
replaced by a power cord of corresponding type,
available from the manufacturer or his service
representative
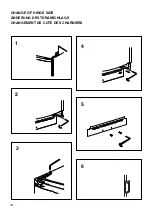
9. CHANGE OF HINGE SIDE
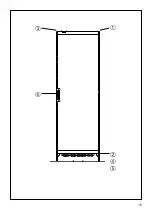
See drawings page 18.
The doors can be changed from right-hinged to
left-hinged or vice versa in the following way:
1. Remove the upper hinge. This will later be used
as the upper hinge on the opposite side. Lift off
the upper door.
2. On appliances with a door closer on the upper
door, this door closer is removed and re-
mounted on the opposite side.
3. Remove the middle hinge. Lift off the bottom
door. Replace the hinge screws.
4. Remove the kick panel. The bottom hinge is dis-
mounted at the 3 screws. The hinge is turned
180° and mounted on the opposite side.
5. Remove the screws in the middle of the new
hinge side. Mount the bottom door and screw
on the middle hinge. Mount the upper door and
screw on the upper hinge.
6. Adjusting the bottom door: Loosen the 3 screws
in the bottom hinge and push the bottom hinge
to the required side. Tighten the screws and
mount the kick panel.
7. The kick panel is mounted and the hole plug is
mounted on the opposite side.
8. Adjusting the upper door: Loosen the screws in
the hinge above the door and turn the hinge to
the required side. Tighten the screws.
9. Move the handle. The covering plugs for the
handle holes are mounted.
10. CHANGING THE LIGHT BULB
Remove the mains plug from the socket. The bulb
is changed like a normal light bulb.
Bulb designation: 12W E14.
Please note:
The bulb must not be larger than
12W, max.
Summary of Contents for CFS 344
Page 1: ...FREEZERS MANUAL OF INSTRUCTIONS FOR USE AND INSTALLATION...
Page 3: ...3 GB 4 D 7 F 10...
Page 12: ...12 Fig 3 Fig 1 Fig 2 2 3 1 min 1700 1550 150 min 25 min 1040 600 min 15 25...
Page 13: ...13 Fig 4...
Page 14: ...14 1 2 3 6 4 5 CHANGE OF HINGE SIDE NDERUNG DES T RANSCHLAGS CHANGEMENT DE COTE DES CHARNIERS...
Page 15: ...15...
Page 16: ...95 56 188 01...


