background image

Vertiv | Liebert 

CRV

+ | User Manual       

  34 

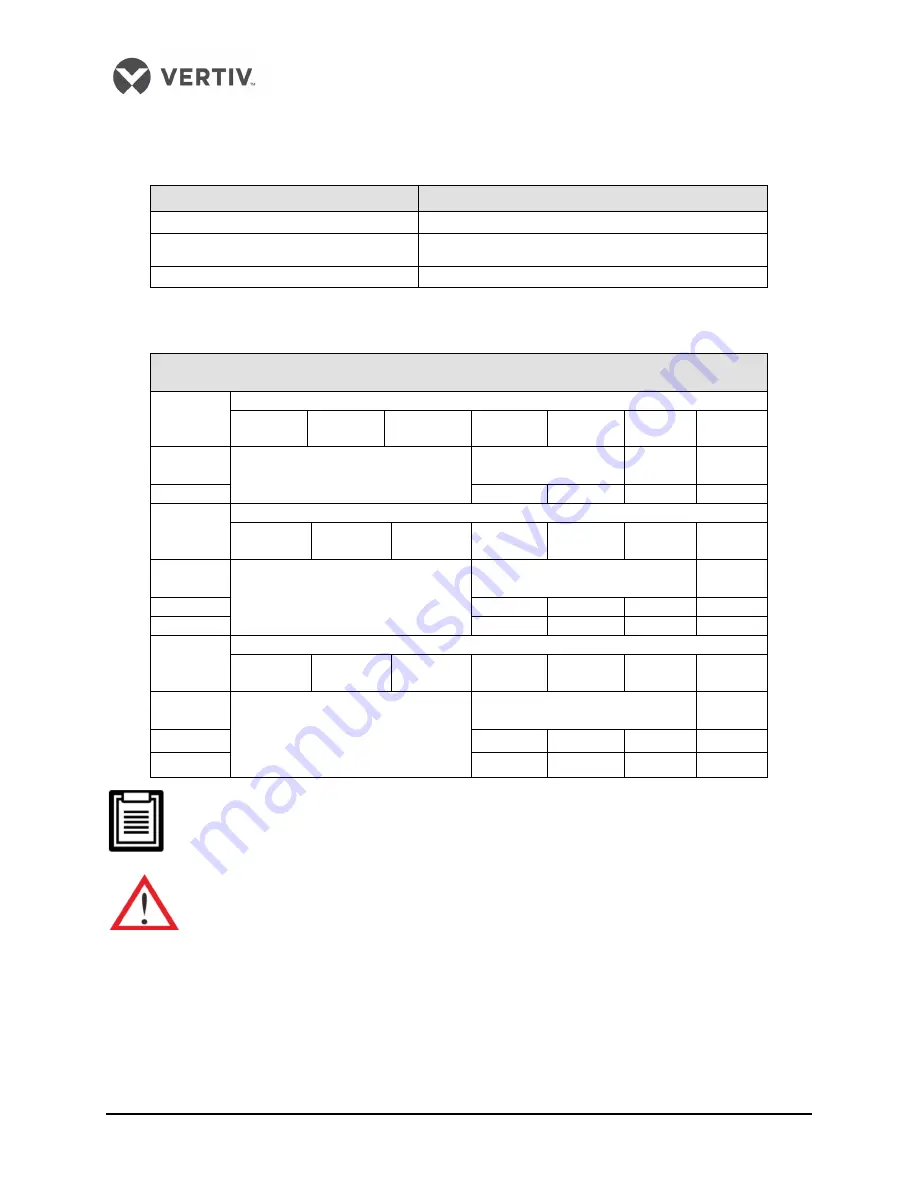
The refrigeration oil used in the Liebert CRV+ air conditioner is depicted in the table in Listing 2.9: 

Listing 2.9 

Unit model 

Types of refrigeration oil 

CR 012 

PVE (FV505) 

CR025 

POE (RL32H) 

CR035 

PVE (FVC68D) 

Table depicting the amount of refrigeration oil to be added 

Refrigeration oil adding amount with different pipe length 

(length unit: mm, refrigeration oil unit: ml)


Liquid 

pipe OD 

(mm) 

CR012 

10 

20 

30 

35 

40 

45 

50 

12.7 

Refrigeration oil charging is not 

needed 

Refrigeration oil 

charging is not needed 

15 

30 

16 

15 

30 

45 

60 

Liquid 

pipe OD 

(mm) 

CR025 

10 

20 

30 

35 

40 

45 

50 

12.7 

Refrigeration oil charging is not 

needed 

Refrigeration oil charging is not 

needed 

32 

16 

11 

19 

28 

37 

19 

35 

48 

60 

72 

Liquid 

pipe OD 

(mm) 

CR035 

10 

20 

30 

35 

40 

45 

50 

16 

Refrigeration oil charging is not 

needed 

Refrigeration oil charging is not 

needed 

13 

19 

12 

24 

37 

49 

22 

39 

55 

71 

87 

Consult Vertiv Co. for adding the refrigeration oil 

Do not use poor quality refrigeration oil as it can damage the system 

Select the right make and type of refrigeration oil depending on the model.

If any error or damage occurs due to adding the incorrect make and type of oil, the warranty
will be void.

2.3.6  


Removing Transportation Fastener and Vibration Absorber 

Certain fasteners and vibration absorbers are mounted on the equipment to protect partial components 
from getting damaged and distorted due to bumping, impact, and resonance. 

Summary of Contents for Liebert CRV Plus

Page 1: ...Liebert CRV Precision Air Conditioner User Manual ...

Page 2: ......

Page 3: ...described in this document may not be within the purchasing scope or the usage scope Unless otherwise specified in the contract all statements information and recommendations in this document are provided AS IS without warranties guarantees or representations of any kind either express or implied The information in this document is subject to change without notice Every effort has been made in the...

Page 4: ...Caution note indicates a hazardous or potentially harmful situation that can result in death or injury It also indicates instructions that need to be adhered to failing which may result in danger and safety issues thereby having an adverse effect on the reliability of the device and security Even for practices not related to physical injury the content under the Warning heading is used for precaut...

Page 5: ... The main switch is positioned on the electrical panel cover Open the right door to access it Before any maintenance operation switch off the machine with this electronic insulation device in order to eliminate risks such as electrical shocks burns automatic restarting moving parts and remote control The panel key supplied along with the unit must be kept by the personnel responsible for the maint...

Page 6: ...tective gloves safety shoes and arm protection while working with the hot compressors discharge lines and reheats There is a risk of leaking water that can cause damage to the equipment as well as the building There should be an effective water drain connection and facilities Installation should be precise Implementation of the application and service practices should be suitable and fault free No...

Page 7: ... 2 Storage Environment 9 1 5 3 Refrigerant Charging Requirement 10 Chapter 2 Installation 12 2 1 Pre installation 12 2 1 1 Transportation Movement 12 2 1 2 Unpacking 13 2 1 3 Inspection 14 2 2 Installation Preparation Site Preparation 14 2 2 1 Equipment Room Requirement 14 2 2 2 Installation Space requirements 15 2 2 3 Installation Tools 16 2 3 Mechanical Installation 17 2 3 1 System arrangement d...

Page 8: ...ral Maintenance 69 3 2 1 Routine Maintenance Inspection Monthly 69 3 2 2 Routine Maintenance and Inspection Half Yearly 70 3 2 3 Self Diagnosing Functions 71 3 2 4 Maintenance of Electrical Control utilities 71 3 2 5 Air Filter Maintenance 73 3 2 6 Fan Kit Maintenance 74 3 2 7 Electrical Heater Maintenance 74 3 2 8 Refrigerating System Maintenance 74 3 2 9 Drainage system maintenance 74 3 2 10 Tro...

Page 9: ...PART I GENERAL INFORMATION ...

Page 10: ......

Page 11: ...imal performance Therefore care should be taken while testing these sensitive products or maintaining a favorable environment for mission critical equipment as even a slight deviation may lead to inaccurate results Precision Air Conditioning must not only keep room conditions within a specific range but also must have the precision to react quickly to a drastic change in heat load and prevent wide...

Page 12: ... 0 None Bit 9 Power Supply Bit 18 Low Voltage Locking Option 3 380 415V 3 ph 50Hz N 0 None T 380 3 ph 60Hz N Bit 19 Monitor Bit 10 System Configuration 0 None S SIC Card Bit 20 Detector 8 R 410A brushless scroll compressor 0 None Bit 11 Humidifier Bit 21 Package 0 None P Domestic S Electrode humidifier C Overseas sea worthy Bit 12 Display Bit 22 Special Function L Large Display A None S Standard d...

Page 13: ...umidification re heating air filtration condensation management temperature and humidity control alarm functions and compatibility with data communications Liebert CRV is designed to comply with mission critical requirements and ensure that servers are maintained at the correct temperature and humidity levels Figure 1 3 shows the various components and their respective locations Figure 1 3 Compone...

Page 14: ...ing sections take a look at the list of components used in the Liebert CRV Precision Air conditioning series 1 3 1 DC Brushless Compressor The Liebert CRV series models comprise of a DC Brushless compressor which has a host of promising features as mentioned in the following list Low operational noise Rapid Cooling Less Vibration Moreover there are no brushes compared to typical DC motors Its comp...

Page 15: ... high performance with a great variety of possible air flow rates Figure 1 5 shows the EC Fans used in the models belonging to the CRV series Figure 1 5 EC Fans 1 3 3 Evaporator The sophisticated design of the distributor ensures that the refrigerant is distributed evenly in each loop thereby improving the effectiveness of the heat exchanger Streamlined Heat exchanger design and air distribution f...

Page 16: ...ficant energy savings Designed for modulating control of the refrigerant mass flow with precision Ensures effective control on super heating at the end of the evaporator Better low load capacity Designed for easy Installation and Service Figure 1 7 depicts the image for the EEV used in the CRV Series Figure 1 7 EEV 1 3 5 Electrode Humidifier The Electrode humidifier helps to maintain constant humi...

Page 17: ...ularity in the moisture content 1 3 8 Filter Drier Moisture can adversely affect the operations and service life of a system in the refrigeration lifecycle In order to rectify that condition filter driers are used to filter out particles remove and hold moisture to prevent it from circulating through the system 1 3 9 Micro Controller The Micro Controller used in CRV provides a simple operational u...

Page 18: ...f the condenser used in the CRV series Figure 1 11 Condenser For more information on the condenser refer to the separate condenser manual which explains the entire condenser ecosystem in detail 1 4 Optional Equipment The Liebert CRV series is compatible with multiple temperature humidity sensors based on the requirement An interesting development is the compatibility with the Liebert CRV series mo...

Page 19: ...ature is 34 C CR025 and CR035 20 C 45 C if a low temperature kit is configured the lowest outdoor operation temperature is 34 C Protection level indoor unit IP20 Altitude 1000m Above that please contact Vertiv Co Operation voltage range 380 415 V 10 3N 50Hz 60Hz 1 5 2 Storage Environment The following table in Listing 1 4 defines the Storage Environment parameters including the ambient humidity am...

Page 20: ...ue due to the wrong refrigerant oil will result in voiding of the warranty Low quality or counterfeit refrigerant will damage the system drastically Use the refrigerant approved by Vertiv Co Ltd to avoid the system abnormality or damage caused by using other brands of refrigerant Listing 1 5 depicts the refrigerant brands which are approved by Vertiv Co Ltd Listing 1 5 Brand Logo Note DU PONT The ...

Page 21: ...Vertiv Liebert CRV User Manual 11 Part II INSTALLATION ...

Page 22: ...t do not have too many bumps and if any avoid it as much as possible Liebert CRV systems are on the heavier side and therefore it is recommended that equipment like an electric forklift is utilized for these heavy duty systems Move the equipment to a location which is in the vicinity of the installation site If an electric forklift is used insert the tines of the forklift below the pallet as displ...

Page 23: ...iquity that is suitable to move the air conditioning package to the vicinity of the desired location Figure 2 2 Obliquity of the system 2 1 2 Unpacking The cabinet uses a honeycomb cardboard and winding stretch film for packaging purposes Shift the product to a location closer to the final installation site prior to unpacking the unit Initially remove the top cover and winding stretch film Next re...

Page 24: ... similar ecosystems Strict adherence to the installation procedures is mandatory in order to ascertain proper installation of the air conditioner 2 2 1 Equipment Room Requirement The equipment room must be prepared to ensure a smooth operation flow and obtain accurate results The equipment room must meet the standards for appropriate ventilation and heating The design specifications for the air co...

Page 25: ...nits and therefore these air conditioners must be installed preferably in a row of cabinets with high heat density and in a hot aisle and cold aisle arrangement Allocate space so that it is accessible for the qualified service personnel for repairs servicing and maintenance For the CRV range maintenance space must be allocated at the front and rear of the equipment At the least a space of 600 mm m...

Page 26: ...n knife Cable ties Insulating tape Insulating gloves Crimping pliers Heat shrinkable tube Insulated torque wrench Torque screwdriver Multimeter Clip on ammeter The tools mentioned in Listing 2 1 are generic and commonplace however depending on various factors such as site environment cables installation equipment and on site electrical connections these tools may vary in a real time scenario Ensur...

Page 27: ...ion preparations are taken into consideration move on to the next step in the installation process and eventually set up the system The CRV cooling units are designed for split floor installation The indoor unit must be installed on the floor of the equipment room or computer room The outdoor unit must be installed outdoors or on the floor of the other rooms as per the building architecture Indust...

Page 28: ...points should be considered before checking out the overall layout diagram The single system is used as an example to describe the entire system Vertiv staff and qualified professionals lay out the piping in the laboratory Piping is done by technicians Components marked with are not supplied by Vertiv Co but are recommended for proper circuit operation and maintenance Additional components marked ...

Page 29: ...ation is essential as it helps prevent the liquid refrigerant from flowing back once the condenser stops The top end of the inverted backbend must be installed higher than the ultimate level of the copper pipe of the condenser However if the condenser is installed lower than the compressor then there is no modification required as it fits the bill perfectly Back bend must be higher than the highes...

Page 30: ... Condenser is lower than the Compressor during installation 2 3 3 Product Dimensions The dimensions and weight of the indoor unit are displayed in Figure 2 9 and in the table within Listing 2 2 Figure 2 9 Dimensions of an indoor unit Heat insulation floor Floor Sealed Raised floor Humidifier water in Condensed water out Indoor unit Slope liquid Min 8m Slope discharge Outdoor unit ...

Page 31: ... 600 1100 2000 315 CR035RA138SS12E10000PV000 335 Base Plate pipe outlet Location Dimensions The locations of the pipe inlets and outlets on the unit base plate are shown in Figure 2 10 Figure 2 10 Base Plate Location for pipe outlets The following table in Listing 2 3 depicts the dimensions of the base plate pipe outlet Listing 2 3 Model a b c d e f g h I CR012 43 44 130 44 130 205 CR025 72 88 64 ...

Page 32: ...ts the dimensions of the top plate pipe outlet Listing 2 4 Model a b c d e f g h CR012 80 39 125 100 40 106 110 CR025 55 80 39 125 100 40 106 110 CR035 47 38 71 233 137 50 155 118 Front air outlet Locations and Dimensions The location and dimensions of the air outlet at the front are shown in Figure 2 12 Figure 2 12 Front air outlet locations dimensions unit mm To prevent damage of the power cable...

Page 33: ...eferably an open ground Use a movable wrench to loosen the fixing nuts on the four foot bolts in a clockwise sequence Rotate the hexagon bolts on the bottom of the feet clockwise or counter clockwise till the feet rises or drops to an appropriate position Use a gradienter to ensure that the cabinet is in a uniform level state Refer to the Figure 2 13 to understand the process better Figure 2 13 Le...

Page 34: ...ur fleet bolts in a clockwise sequence Rotate the hexagon bolts on the bottom of the feet clockwise till the feet drops from the cabinet frames Fixing the cabinet The cabinet provides two holes diameter 13 5 mm respectively on its top bottom front and rear as depicted in Figure 2 14 Figure 2 14 Fixing holes of the cabinet Install bolts in the four holes at the bottom to fix the cabinet onto the fl...

Page 35: ... the cabinet Rotate the cabinet connector 90 to the horizontal position Use M5 countersunk head screws to fix it on the cabinet frame Side of the door lock as depicted in Figure 2 15 Figure 2 15 Rotating the Cabinet connector Use the M5 countersunk head screws to fix the cabinet connector L shaped in the installation holes of the cabinet frame side of the hinge and rack frame adjacent to the cabin...

Page 36: ...arging operations and procedures must conform to the industry standards Pressure drop compressor oil return noise return and vibration must be considered during the designing and installation process Removing Filters Before the connection of the pipes in the indoor unit the filters need to be removed Open the rear door of the cabinet to reveal the 2 filters namely the top and bottom filters Next p...

Page 37: ...t the soft drainage pipe through the drainage hole of the pump Fix the pipe to the copper pipe connector with the hose clamp Moving forward connect it to the outer drainage pipe The outer diameter of the copper pipe is 12 7 mm and internal diameter of the soft pipe is 9 mm However if the unit is not configured with a pump the drainage pipe of the water tray should go through the drainage hole of t...

Page 38: ...d to change the water inlet pipe in the unit In this case connect a water inlet pipe to the water inlet hole on the top of the cabinet However if the water has to be filled from the bottom unscrew the connector of the water inlet soft pipe of the humidifier The water inlet soft pipe needs to be routed through the rubber plug hole close to the humidifier and connected to the outer water inlet pipe ...

Page 39: ...pecifications mentioned in the table under Listing 2 5 Alternatively contact the Vertiv support office to seek the help of the technician for gauging the length and diameter Listing 2 5 Model CR012 CR025 CR035 Pipe length D L D L D L 10m 16 12 7 16 12 7 19 16 20m 16 12 7 19 16 22 19 30m 19 12 7 22 16 25 19 40m 19 16 22 16 25 19 50m 19 16 22 19 25 22 A pipe extension kit is required for Equivalent ...

Page 40: ... Pipe connectors For bottom piping before welding the compressor discharge pipe and liquid pipe follow the requirement labeled on the copper pipe Cut the copper pipe using a cutter a little bit of the compressor lubricating oil may leak however do not weld the copper cap on the seal directly as it may result in heating of the oil following which it may catch fire The exposure time of the system pi...

Page 41: ...Please consult Vertiv for such specific inquiry and installation There is no necessity of cutting the indoor unit pipes while installing the solenoid valve After the entire system is installed open the ball valve to keep the pressure and carry out the vacuum operation thereby avoiding the moisture absorption of the compressor refrigeration oil Thus it accounts for operational safety and also exten...

Page 42: ...es of the solenoid valve in a liquid pipe Figure 2 24 Connecting the cables of the Solenoid valve 3 Finally clip the coil of the valve body press the coil tightly to ensure complete contact between the coil and valve body as displayed in Figure 2 25 Figure 2 25 Fixing the coil Charging Refrigerant and Adding Refrigeration Oil The Liebert CRV air conditioners come pre charged in the factory with 2B...

Page 43: ...g amount 2 41 4 52 5 24 The refilling amount of the refrigerant is calculated using the following formula Refrigerant refilling amount kg Recommended refrigerant charging amount of outdoor unit recommended refrigerant charging amount of indoor unit refrigerant refilling amount of per meter liquid pipe kg m total length of liquid pipe m Refer to the table in Listing 2 8 for the refrigerant refillin...

Page 44: ...eration oil charging is not needed Refrigeration oil charging is not needed 32 16 11 19 28 37 19 35 48 60 72 Liquid pipe OD mm CR035 10 20 30 35 40 45 50 16 Refrigeration oil charging is not needed Refrigeration oil charging is not needed 13 19 12 24 37 49 22 39 55 71 87 Consult Vertiv Co for adding the refrigeration oil Do not use poor quality refrigeration oil as it can damage the system Select ...

Page 45: ...the wind leading grill Adjust the installation direction of the wind leading grill to lead wind to the left or right depending on the installation location of the Liebert CRV series air conditioners The wind leading grill is composed of several pieces Remove the screws on both sides of the single piece of the wind leading grill rotate it by 180 Install it back to change the wind direction Figure 2...

Page 46: ...d successfully Listing 2 10 Item Result Sufficient space is kept for maintenance according to the user manual The equipment is placed vertically and mounting fasteners are fastened The pipes between the indoor unit and outdoor unit are completed The ball valves of the indoor unit and outdoor unit are fully opened The wind direction of the wind leading grill has been adjusted if required Drainage p...

Page 47: ...l and Power cable Input and Output control the cable of the unit 2 4 2 Installation Notes The connections of all the power cables control cables and ground cables should be in compliance with the local and national electrical regulations Observe the unit nameplate for the full load current The cables sizes must meet the conditions as specified in the local wiring protocols and rules Mains supply r...

Page 48: ...r unit namely Electrical port location of the indoor unit Connecting the Power cables of the indoor unit Connecting the Control cables Connecting the Solenoid valve of the Pipe extension kit Optional Electrical Port location of the indoor unit For any model in the CRV series open the back door of the indoor unit following which the specific layout and locations of the low voltage components can be...

Page 49: ...le specifications refer to the full load current FLA described in the table within Listing 2 12 Figure 2 29 Top and bottom cable entry holes The cable sizes must strictly meet and adhere to the local wiring regulations and protocols as it supersedes every type of connection Listing 2 12 Full Load current unit A Model Standard model Standard model with electric heater Standard model with humidifier...

Page 50: ...measures before connecting the control cables Water under floor sensor If a water under floor sensor is equipped connect one end of the sensor to terminal 51 and the other end to common terminal 24 Each unit can be connected with multiple sensors in parallel but there would be only one water under floor alarm SIC card If a SIC card is equipped connect A B GND and 12 on the SIC card to the respecti...

Page 51: ...t sensors for Liebert CRV models Insert the connector of the rack temperature sensor in the TB3 point On connecting the cable route the cable through the top or bottom of the unit following which it should be connected to the first sensor Connect the first sensor to the second sensor Thus the sensors are connected in a chain Fix the temperature in front of the hottest source inside the rack Do not...

Page 52: ...ol board of the outdoor unit However connecting them is an option depending on the requirement External Common Alarm Terminals 75 and 76 can be connected to the external common alarms They generate signals to external alarm devices such as an alarm indicator When the critical alarm occurs the contact will be closed to trigger remote alarms send signals to the building management system or dial the...

Page 53: ...the wiring and connector connections including the fixing blocks are fixed firmly and appropriately Do not power on or operate the installed unit as Vertiv s authorized professional technicians have to perform a check and confirm whether it is good to go Starting up and Operating the unit should only commence if the commissioning process is successful following which Vertiv s engineers give the go...

Page 54: ...ables are reliably connected Power supply Check whether the voltage phase rotation and frequencies of the front end power supplies for the indoor and outdoor units are normal and whether the power supply cables are well connected and whether each functional circuit breaker and contactor are reliably connected SPD if installed The SPD module should not be loosened and the alarm terminals should be ...

Page 55: ...tween the condenser and the outdoor unit If the condenser is higher than the outdoor unit the liquid pipe should be at a greater height than the U bend of the condenser coil 3 Vacuuming Open all the ball valves and solenoid valves in the refrigerant pipes of the air cooled unit Enable the vacuuming mode and open the solenoid valve in liquid pipes Vacuum from both the high and low pressure location...

Page 56: ...e charge the suitable amount of liquid refrigerants according to the indications on the label After charging the refrigerants do not turn on the compressor and charge the refrigerant dynamically until the crank case heating device has been pre heated for longer than 12h For dynamic filling of the refrigerants the charging speed should not be high in order to avoid the compressor damage There is a ...

Page 57: ...el Enter level 2 password Set the system Manual Mode Manual Mode Enabled Set to Y 2 Start vacuum mode Enable Manual Mode Vacuum mode Set to Y 1 Close the transformer circuit breaker 2 Ignore the Fan Power Failure alarm after startup 3 If the vacuuming starts before the vacuuming mode is started low pressure sensor fault alarm will occur after startup and then ignore this alarm 3 Manually start sto...

Page 58: ...he same using the checklist in Listing 2 16 Listing 2 16 Check item Result Check and confirm that all the output functions are automatic Check that the Temperature Humidity settings as well as the control precisions are configured correctly Make sure all the other functions are configured and set correctly ...

Page 59: ...Vertiv Liebert CRV User Manual 49 PART III SYSTEM OPERATION GENERAL MAINTENANCE ...

Page 60: ...s packed with potential features that help monitor and manage the AC unit Figure 3 1 depicts the appearance of the micro processing controller Figure 3 1 Appearance of the micro controller 3 1 2 Control buttons The micro controller provides 5 control buttons as depicted in Figure 3 2 Figure 3 2 Control Buttons The table in Listing 3 1 includes the detailed functions of the control buttons Listing ...

Page 61: ... the Enter button again to highlight the input data field in the Password screen Press the Up and Down button to change the current password number Press the Enter button to confirm the password following which the Main Menu screen is populated on the controller screen Example 2 This section depicts the process of changing parameters The procedure is the same for almost all parameters In this exam...

Page 62: ... fan mode is set to Remote the queue displays the remote temperature In the lower part of the screen it displays the unit output status fan cooling heating dehumidifying and humidifying and unit operation status off running standby and locked The icons on the main screen indicate the unit output status unit property and unit operating status The icons and their definitions are displayed in the tab...

Page 63: ...not change any values and settings Level 2 Maintenance personnel Browse all menu information Set all parameters Level 3 Factory technician On entering an incorrect password the users cannot change the settings however they can view the menu To go back to the Normal screen press the Esc button and then click on the Enter button to get access to the Password interface again If the users do not enter...

Page 64: ...g the alarm parameters to mention a few Temp Hum Set The users can perform tasks such as setting the Compressor or Fan mode defining the temperature and humidity Setpoints and other relevant parameters among other tasks System State The users can perform various tasks ranging from viewing the system operating state ambient temperature and humidity system input and output system operating time and ...

Page 65: ...e UP or Down button to scroll through the Alarm status records if more than one alarm is activated The Alarm status records will be automatically cleared when the system is powered off Alarm History The Alarm History menu is used to view the historical alarm records of the AC unit It also displays the Alarm type Alarm Start time and Alarm End time Figure 3 8 depicts the Alarm History screen Figure...

Page 66: ...nd YY is the total number of the high pressure abnormal records It also includes the start time and end time of the abnormal record Figure 3 9 shows the HP Abnormal screen Figure 3 9 HP Abnormal menu At times there is more than 1 abnormal record In such scenarios press the Up and Down button to scroll through the several abnormal records There is a provision of storing up to 50 records which will ...

Page 67: ...m Stpt Select the Alarm Setpoint displayed as Alarm Stpt to view the Alarm Setpoint menu Press the Up and Down buttons to scroll through the menu Figure 3 11 depicts the Alarm Setpoint menu Figure 3 11 Alarm Setpoint menu System Alarm Select the System Alarm item on the Alarm Set screen to enter the screen as depicted in Figure 3 12 Press the Up or Down button to scroll through the menus Figure 3 ...

Page 68: ...t to OFF However they can be set to ENA and DISA Air Lost Hi Exh Temp Hi Exh Lock Lo Exh SH Lo Exh Lock HP Abnor HP Alm HP Lock LP Alm LP Lock LP Sen Lock Water Alm Water UF Fan Alm Heat Alarm Remote Alm Sensor Alarm Select the Sensor Alarm item on the Alarm Set screen to access the menu Press the Up and Down button to scroll through the menu items in the Sensor Alarm menu Figure 3 13 depicts the ...

Page 69: ...ough the menus Figure 3 14 depicts the CP Driver Alarm menu Figure 3 14 CP Driver alarm menu The CP Driver Alarms are crucial fault alarms which cannot be set to OFF however they can be set to ENA and DISA EEV Alarm Select the EEV Alarm on the Alarm Set screen to access its menu Press the Up or Down button to scroll through the menus Figure 3 15 depicts the EEV Alarm menu Figure 3 15 EEV Alarm The...

Page 70: ...that can be cleared is the Alarm History Temperature and Humidity Settings On selecting the Temp Hum Set menu item in the Main Menu the users will gain access to the following screen Refer Figure 3 17 Figure 3 17 Temperature Humidity screen The Temperature and Humidity settings will not be cleared despite system power off The temperature setting is the target temperature of compressor operation wh...

Page 71: ...ect the cursor to System State on the Main Menu screen to enter the system state screen On choosing System State the users will be directed to the following figure Refer 3 18 Figure 3 18 System State screen Run State The Run State item on being selected in the System State menu displays the important operating parameters of devices including ambient temperature humidity and the prevalent states of...

Page 72: ...requency relevant to the compressor in addition to adjustments of these analog signals as depicted in Figure 3 20 Figure 3 20 Analog Signals Switch Signals After going through the menu the current input and output states of the devices can be viewed using the Switch Signals utility Figure 3 21 shows the screen for the Switch Signals function Figure 3 21 Switch Signals ...

Page 73: ... screen following to access its menu Users can view the start and stop records of important components using this facility The data will not be lost during the power off state or power failure Figure 3 23 depicts the On Off Record screen Figure 3 23 On Off Record menu For example select the Fan item on the On Off Record screen It will display the data in XX YY format where XX is the serial number ...

Page 74: ...displays the basic System settings of various attributes Figure 3 26 depicts the Common Settings menu Figure 3 26 Common Settings In the Common Set menu there is a Restore Factory RstFacty function Move the cursor using the Up or Down button to scroll to this function Press Enter followed by selecting Yes or No using the Up and Down button Press Enter to confirm On selecting Yes all the system set...

Page 75: ...reen is depicted in Figure 3 27 Figure 3 27 Fan Settings Fan 1 State Fan 4 State are read only values On selecting 35 kW only the Fan 1 State and Fan 2 State will be displayed Comp Set The Comp Set screen is depicted in Figure 3 28 Figure 3 28 Comp Set items ...

Page 76: ...elected for Manual Ena then the Fan Speed can be set at 75 and the Output can be changed to the ON state Some components have dependencies and that should be taken into consideration prior to configuring the settings for those utilities For example the fan has to be started prior to setting the Comp Output Heat Output and Humd Output values Some parameters such as Soft Off and Lquid Valve cannot b...

Page 77: ...re adjustment will not be cleared on powering off the system or in case of a power failure Figure 3 31 depicts the Selected Option screen Figure 3 31 Sel Option menu items Help Menu Figure 3 32 depicts the Help Menu screen Figure 3 32 Help Menu In Figure 3 32 all the options are functional except for the Enab 1st Run which cannot be even viewed by the users ...

Page 78: ...econd format Figure 3 33 depicts the Date and Time screen Figure 3 33 Date Time screen Password The Password settings will not be lost in case of a power failure Figure 3 34 depicts the Password menu Figure 3 34 Password Menu screen Version Info This facility is used to view the software version as depicted in Figure 3 35 Figure 3 35 Version Info ...

Page 79: ...ed on the equipment as well as the ones mentioned in the manual must be considered otherwise it may lead to injury and fatality Disconnect local and remote power supplies before operating or working with the equipment Qualified and Professional Maintenance personnel are the ones supposed to operate and handle the equipment Careful and cautionary measures are conveyed to the professional personnel ...

Page 80: ... pressure Check the discharge pressure Check the refrigerant pipes for signs of leaks Check the moisture condition in the system through the sight glass Check the electronic expansion valve Heating system Check the re heater operation Check the erosion situation of the components 3 2 2 Routine Maintenance and Inspection Half Yearly Following is a checklist Refer Listing 3 7 of the items and functi...

Page 81: ...ce of Electrical Control utilities In this section the following processes will be discussed in brief namely Maintenance of Electric parts Maintenance of Control System Water Leak detector Maintenance of Electric Parts Visual checks and handling needs to be carried out to check the correctness of electrical connections for the following items Conduct the electrical insulation test on the system to...

Page 82: ...en the control interface board and various components including contactors and solenoid valves for liquid pipes Inspect the input connection between the control interface board and various components including high pressure switches heating over temperature protection switches discharging temperature and high pressure sensors Specifically check the inserting terminals such as high pressure switche...

Page 83: ...ilter Maintenance The efficiency of the configured filter is 30 in compliance with industry standards such as the America ASHRAE52 76 and Eurovent 4 5 standard the dust resistance value is 90 EU4 standard Set the filter maintenance and alarm logic to ensure efficient operation The fan operating time is 2160 hours by default though the time is set and customized based on the local operating environ...

Page 84: ...g caused by the fan operation 3 2 7 Electrical Heater Maintenance Following are the basic instructions relevant to the maintenance of the Electrical Heater from the user perspective If an optional electrical heater is used then it should be monitored periodically Ensure that there is no dust debris or foreign matter on the surface The heater elements will heat continuously in the normal state Insp...

Page 85: ...MCB is closed check if the power voltage of each phase is normal Control board faulty Check J15 on the micro processing control board to ascertain whether the control board is faulty or functions correctly Fan power module faulty Check the alarm lamp on the fan power module to ascertain whether it is faulty or functions correctly EC fan faulty Check L1 L2 and L3 of the fan against power failure ph...

Page 86: ...ng system Symptom Possible causes Items to be checked or handling method Compressor can t be started Does not power on Shutdown Check the main power against under voltage over voltage and phase loss MCB and contactor faulty Check the compressor MCB contactor and connecting cables Alarm lock View the unit alarm records replace the damaged component and power it on again Compressor coils shorted and...

Page 87: ...speed controller is found faulty then it has to be replaced The suction and exhaust pressures do not change after startup Either the Compressor is reversed or the internal air tightness of the compressor has failed If the compressor is reversed exchange any two L lines of the compressor If the internal air tightness of the compressor has failed and cannot be restored replace the compressor Low suc...

Page 88: ...od Compressor over temperature Too high compression ratio Check the settings of the HP switch and LP switch and inspect if the condenser is clogged Check that the fans of the evaporator and condenser are normal Too high suction overheat degree Regulate the EEV or add proper amount of refrigerant ...

Page 89: ... N 153161 162 154 B K B K B K BK BK B R GR BK BK BK BK BL BL BR BK 1 2 1GND 2GND 4FI1 1GND 4FI1 1 4FI1 2GND 4FI1 2 380V 415V 50Hz 60Hz 3N L2 B K BK 3 4 L1 1 2 B K N L3 6 5 Main switch QS N QS 5 QS 3 QS 1 PE B L Y G PE N A B C N A B C N EMI G G EMI A EMI B EMI C EMI N EMI G EMI G EMI N EMI C EMI B EMI A HP 5V HP VIN HP GND Exhaust air probe RT3 Delivery air probe1 RT1 Delivery air probe2 RT2 94 95 ...

Page 90: ...V GND RDU SIC1 J2 3 1 2 3 J23 1 R J23 2 BR J23 3 BK J 8 1 2 J8 1 J8 2 BK BK J2 5 1 2 J25 1 J25 2 BK BK 3 4 1 2 J14 1 2 J14 B BK BR 12 GND A B Delivery air probe2 RT2 J25 3 J25 4 BK BK 62 61 1 2 J2 0 1 2 J20 CANH J20 CANL BK BR BK J18 T03 YE WH BK BR J19 1 J19 2 TB3 TB2 63 24V TB1 24V TB2 63 Freon solenoid valve Y1 XPE XPE BK BK J28 5 J28 6 64 Y1 Optional 0V TB1 10V TB1 G10 TB2 61 TB2 62 J14 A TB2 ...

Page 91: ... KM2 A1 电加热接触器 Heat contactor KM2 N ST1 C ST1 NC 电加热故障告警 Heat alarm XPE EH1 L EH2 L EH1 N EH2 N N A1 B1 12V GND J1 1 J1 2 ST2 C ST2 NC 选配件 Optional 94 95 电子膨胀阀 EEV 153 KM1 153 KM1 154 KM1 161 KM1 162 10DI 高压告警 High pressure alarm 70 71 汇流排 Connection bars N A1 B1 12 00 Terminal block 端子排 GND GND 12V 12V B1 B1 24V 24V 0V A1 A1 00 12 N N N N A1 B1 G10 10V 51 24 37 38 70 71 75 76 A2 B2 12V GND 94 95 ...

Page 92: ...il Driv Fail Comm Fail Unsel Rfg Lack of Rfg Filt Maint Clr HP Abnor Clr Alm Hist Fan Alm Wat UF Alarm Stpt Hi Sup Temp Lo Sup Temp Hi Ret Temp Air Lost T Hi Ret Hum Lo Ret Hum Power OV Power LV Filt Maint Rem Sw Pol Hi Dsch Temp Hi Dsch Lock Lo Dsch SH Lo Dsch Lock HP Abnor HP Alm Power Lost Power LV Power PL Water OF Water UF Hum Alm LP Sen Lock Filt Clog Filt Maint Loss Master Addr Overlap Remo...

Page 93: ... Maint Clr HP Abnor Clr Alm Hist Fan Alm Wat UF Alarm Stpt Hi Sup Temp Lo Sup Temp Hi Ret Temp Air Lost T Hi Ret Hum Lo Ret Hum Power OV Power LV Filt Maint Rem Sw Pol Hi Dsch Temp Hi Dsch Lock Lo Dsch SH Lo Dsch Lock HP Abnor HP Alm Power Lost Power LV Power PL LP Sen Lock Water OF Heat Alm Freq Offset Filt Clog Filt Maint Loss Master Addr Overlap Remote Alm HP Lock LP Alm LP Lock Power OV Water ...

Page 94: ...ail Lo Exh SH Water Alm Com Fail of EEV Hi Ret Temp Filt Alm No Rfg Sel Lo Sup Temp Filt Maint Loss Rfg Hi Sup Temp Air Lost Suc Temp Sensor Alarm Hi Ret Hum Lp Sen Lock LP Pressure Sensor Fail Lo Ret Hum Remote Alm Com Fail of CP Driv HP Lock Ret Temp Sensor Alarm Driv Fail LP Lock Ret Hum Sensor Alarm Hi HS Temp Hi Exh Lock Air Temp Sensor Alarm Comp OC Lo Exh Lock Sup Temp Sensor Alarm Comp PL ...

Page 95: ...Vertiv Liebert CRV User Manual 85 APPENDIX 4 Hazardous Substances or Elements Declaration ...

Page 96: ...d 10DI with loads If yes disconnect all the cables of the control board and then apply load for test Power supply failure over voltage and under voltage Power supply board fault menu setting error and poor connection of cables Check the input voltage of J01 of power supply board and compare the voltage to the system status analog value ABC 3 phase voltage Adjust the alarm menu alarm setting alarm ...

Page 97: ...t closed Open the ball valve and close the circuit breaker High pressure alarm occurs when starting the compressor Failure of outdoor fan poor connection of control circuit input voltage fault failure of the pressure sensor Check the menu analog values Comparison between discharge pressure and gauge pressure check if the pressures are consistent Check if system menu output voltage of the outdoor u...

Page 98: ...VertivCo com VertivCo com Block B2 Nanshan I Park No 1001 Xueyuan Road Nanshan District Shenzhen 518057 PR China ...

Reviews: