background image

17

BASIC OPERATION 

Switch Power On/Off 

Turn the Power switch/Volume control 

clockwise to switch the transceiver ON. 

Turn the Power switch/Volume control 

counter clockwise to switch the 

transceiver OFF.


Adjusting the Volume 

R

otate the Volume control to adjust the 

volume. Clockwise increases the volume 

and counter clockwise decreases it. 

You may need to adjust the volume more 

precisely while communicating with other 

parties. 


Selecting a Channel 

Rotate the Tuning Control to choose your 

desired channel. Clockwise increases 

the number and counter clockwise 

decreases it. If none channel has been 

programmed, it cannot be used. When a 

non-programmed channel is selected, an 

alert tone sounds will be heart.


Summary of Contents for VZ-30-G6-4

Page 1: ... 燨燥 燫 燩 User Guide Frequency 400 470MHz FCC ID 2ADPVVZ 30 G6 4 Two Way Raido ...

Page 2: ...elieve this easy to use transceiver will provide dependable and reliable communication to personal operating at peak efficiency ŗŦųŵŦŹġ ŔŵŢůťŢųť transceivers incorporate the latest in advanced technology As a result we feel strongly that you will be pleased with the quality and features of this product ...

Page 3: ...nna 12 GETTING ACQUAINTED 13 Orientation 13 Programmable Auxiliary Functions 15 Status Indication 16 LED Indicator 16 BASIC OPERATION 17 Switch Power On Off 17 Adjusting the Volume 17 Selecting a Channel 17 Transmitting 18 Receiving 18 ADVANCED OPERATIONS 20 Channel Number Annunciation 20 Star Up Tone 20 Keypad Beeper 20 Battery Save 20 Low Battery Alert 21 SQL Change 22 ...

Page 4: ...nnel Lock Out BCLO 23 Time Out Timer TOT 23 Squelch Tail Elimination STE 23 Talk Around 24 Scramble 24 Calling Back 24 Only Receiving 25 VOX 25 Scan 25 Table 1 Standard CTCSS Tones Table 26 Table 2 Standard DCS Codes Table 26 TROUBLESHOOTING GUIDE 27 ...

Page 5: ...o way radio contains a transmitter and a receiver To control your exposure and ensures compliance with the occupational controlled environment exposure limits always adhere to the following procedure ƹTransmit no more than 50 of the time ƹTo transmit press the Push to Talk PTT button ƹTo receive calls release the PTT button Transmitting 50 of the time or less is important because the radio generat...

Page 6: ...Operation If you wear a radio on your body when transmitting always place the radio in a ŗŦųŵŦŹġ ŔŵŢůťŢųť supplied or approved clip holder holster case or body harness for this product If you do not use one of the ŗŦųŵŦŹġ ŔŵŢůťŢųť supplied or approved body worn accessories and are not using the radio held in the normal use position Ensure the radio and its antenna are at least 1 inch 2 5 cm from y...

Page 7: ...adio in any facility where posted notices instruct you to do so Hospitals or health care facilities may be using equipment that is sensitive to external RF energy Aircraft When instructed to do so turn off your radio when on board an aircraft Any use of a radio must be in accordance with applicable regulations per airline crew instructions Medical Devices Pacemakers The Advanced Medical Technology...

Page 8: ...ize the potential for interference ƹTurn the radio OFF immediately if you have any reason to suspect that interference is taking place Hearing Aids Some digital wireless radios may interfere with some hearing aids In the event of such interference you may want to consult your hearing aid manufacturer to discuss alternatives Other Medical Devices If you use any other personal medical device consult...

Page 9: ...e of radios in the area where you drive Always obey them When using your radio while driving please ƹGive full attention to driving and to the road ƹUse hands free operation if available ƹPull off the road and park before making or answering a call if driving conditions so require ...

Page 10: ...ge batteries in such areas Sparks in a potentially explosive atmosphere can cause an explosion or fire resulting in bodily injury or even death Note The areas with potentially explosive atmosphere referred above include fueling areas such as below decks on boats fuel or chemical transfer or storage facilities areas where the air contains chemicals or particles such as grain dust or metal powders a...

Page 11: ...atteries can cause property damage and or bodily injury such as burns if a conductive material such as jewelry keys or beaded chains touches exposed terminals The conductive material may complete an electrical circle short circuit and become quite hot Exercise care in handling any charge battery particularly when placing it inside a pocket purse or other container with meal objects ...

Page 12: ...lectric shock 4 To reduce the risk of damage to the cord or plug pull the plug rather than the cord when disconnecting the charger from the AC receptacle 5 To reduce the risk of electric shock unplug the charger from the outlet before attempting any maintenance or cleaning 6 Use of an attachment not recommended or sold by ŗŦųŵŦŹġ ŔŵŢůťŢųť may result in a risk of fire electric shock or personal inj...

Page 13: ... plug of the extension cord are the same number size and shape as those on the plug of the charger ƹThe extension cord is properly wired and in good electrical condition ƹThe cord size is 18AWG for lengths up to 100feet and 16AWG for lengths up to 150 feet 9 The supply cord of this charger can not be replaced ...

Page 14: ...isted in the following table before discarding the packing material If any items are missing or have been damaged during shipment file a claim with the carrier immediately Supplied Accessories ITEM QUANTITY Radio 1 Antenna 1 Li ion Battery 1 Power Adapter 1 Charger Base 1 Belt Clip 1 User Guide 1 Warranty Card 1 ...

Page 15: ...t s normal that the talk and standby times are noticeably shorter than normal times If leaving the battery in very hot place or conditions it will reduce the capacity and lifetime of the battery Overcharging may also shorten its lifetime 3 Charging the Battery Pack Please charge your battery only with approved ŗŦųŵŦŹġ ŔŵŢůťŢųť charger Initially charging the battery pack after purchase or extended ...

Page 16: ...d charging begins 4 After charging about 4 hours when the light turns to green it means the battery pack is fully charged 5 Then you can take off the battery pack or transceiver with the battery pack and use it Attaching Removing the Antenna 1 Screw the antenna into the connector on the top of the transceiver by holding the antenna at its base and turning it clockwise until secure 2 Turn the anten...

Page 17: ...13 GETTING ACQUAINTED Orientation ...

Page 18: ...t is facilitated to carrying the transceiver 5 TX RX Indicator Light green while receiving a signal or when the squelch is open Lights red while transmitting 6 Speaker Output the audio 7 Internal Microphone Input the audio signal while you talk 8 PTT Switch Push and hold to transmit Release to receive 9 Programming Key P1 The default setting of short key is TX Power Change Short press this key to ...

Page 19: ...software programming Programmable Auxiliary Functions Your dealer may program the P1 P2 long press or short press with one of the following auxiliary functions respectively No Function 1 Scan 2 Squelch Off 3 Squelch Off Momentary 4 SQL Change 5 TX Power Change 6 Talk Around 7 VOX Note You can set the time of pressing long key from 1 5 5 seconds default 2 0 seconds with programming software when ...

Page 20: ... Off Momentary feature only to be enabled for analog channels Status Indication LED Indicator LED Indicator Radio Status The LED glows red Transmitting The LED flashes red Low Battery The LED glows green Receiving The LED flashed green Scanning The LED glows orange After voice communication ends you can hold the PTT switch to talk while the LED glows orange ...

Page 21: ...to adjust the volume Clockwise increases the volume and counter clockwise decreases it You may need to adjust the volume more precisely while communicating with other parties Selecting a Channel Rotate the Tuning Control to choose your desired channel Clockwise increases the number and counter clockwise decreases it If none channel has been programmed it cannot be used When a non programmed channe...

Page 22: ...nnel hold the PTT key to transmit a call to the private call contact preset for the current channel ƹFor best sound quality at the receiving station hold the microphone approximately 1 5 inches 3 6 cm from your mouth 2 Release the PTT switch to receive Receiving On analog channels your dealer may have programmed CTCSS DCS Scrambler signaling in your transceiver If your selected channel is programm...

Page 23: ...not be heard If your selected channel is not set up with a signaling type you will hear calls made by any party not just those in your system On digital channels only the same tone or directly call the radio ID to be received ...

Page 24: ...ng Control the transceiver sounds the current corresponding channel number Star Up Tone When you switch the transceiver ON There will be a start up tone The default setting is ON Keypad Beeper The transceiver beeps each time if you press a key on the keypad The default setting is ON Battery Save The battery save function decreases the amount of power used when signal is not being received and no o...

Page 25: ...tion activates When a signal is received or an operation is performed battery save is disabled The default setting is ON Low Battery Alert For extra convenience if the battery level run low when press PTT to transmit the transceiver will sounds Please charge the battery at setting time every 1 255 seconds default OFF to alert the user to recharge the battery ...

Page 26: ...el correctly set you will hear sound only while actually receiving signals You can select from level 1 3 cycles The default setting is 2 Squelch Off Press the Squelch Off key to open noise squelch press it again to close Squelch Off Momentary Press the Squelch Off Momentary key to open noise squelch Release it to close ...

Page 27: ...er TOT The Time Out Timer is used to prevent any caller from using a channel for an extended period of time OFF 1 255 seconds If you continuously transmit for a period of time that exceeds the programmed time default OFF the transceiver will stop transmitting and an alert tone will sound To stop the tone release the PTT switch If programmed by your dealer a pre alert tone will sound before the tim...

Page 28: ...used in place of the TX frequency when transmitting The default setting is OFF Scramble When scramble feature is activated any other party listening on your channel is prevented from eavesdropping your conversation The default setting is OFF Calling Back This feature is only enabled for digital channels When communication ends but within the preset time period The LED glows orange Press and hold P...

Page 29: ...t hands free with the transceiver or thru a headset Re press the programmed key to exit this feature The default setting is OFF Scan Press the programmed Scan key to initiate transceiver scanning from the current channel and ascends through the channel numbers in scan list The green LED solidly glows when a signal is re received with signaling match on a channel Press the Scan key again to exit tr...

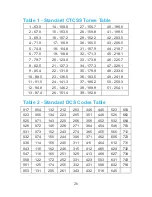
Page 30: ... 5 49 241 8 11 91 5 24 141 3 37 186 2 50 250 3 12 94 8 25 146 2 38 189 9 51 254 1 13 97 4 26 151 4 39 192 8 Table 2 Standard DCS Codes Table 017 054 132 212 263 346 445 523 654 023 065 134 223 265 351 446 526 662 025 071 143 225 266 356 452 532 664 026 072 145 226 271 364 454 546 703 031 073 152 243 274 365 455 565 712 032 074 155 244 306 371 462 606 723 036 114 156 245 311 411 464 612 731 043 115...

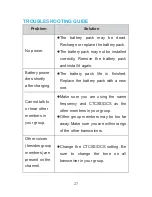
Page 31: ...attery pack life is finished Replace the battery pack with a new one Cannot talk to or hear other members in your group zMake sure you are using the same frequency and CTCSS DCS as the other members in your group zOther group members may be too far away Make sure you are within range of the other transceivers Other voices besides group members are present on the channel zChange the CTCSS DCS setti...

Page 32: ...listed above provides the user with the information needed to make him or her aware of RF exposure and what to do to as sure that this radio operates with the FCC RF exposure limits of this radio Electromagnetic Interference Compatibility During transmissions your radio generates RF energy that can possibly cause interference with other devices or systems To avoid such interference turn off the ra...

Reviews: