


5-2
VX-4000 VHF Low-band Service Manual
50-Ohm
Dummy Load
Inline Wattmeter
Deviation Meter
Frequency
Counter
RF Sampling
Coupler
RF Signal
Generator
Transceiver
Power Supply
13.8V DC
CT-71 connection
Cable
PC
COM port
Alignment
PLL & Transmitter
Set up the test equipment as shown for transmit-
ter alignment.
Maintain the supply voltage at 13.8 V DC for all
steps.
Before beginning, connect the transceiver and PC
using the CT-71 programming cable, and download
the EEPROM data from the transceiver to the com-
puter.
Store this data in a disk file so that it can be saved
and retrieved later. Using the table below, program
the channel, CTCSS, and DCS alignment settings for
your transceiver version. Upload this file to the
transceiver.
Note
:Signal levels in dB referred to in this proce-
dure are based on 0 dBµ = 0.5 µV (closed cir-
cuit).
Caution:
Do not connect the audio output line to
ground, and be certain that the speaker has
adequate capability to handle the audio
output from the radio.
Because of the bridge audio amplifier cir-
cuit used in the radio, it is necessary to con-
struct and use a simple audio load test
adapter as shown in the schematic diagram
below, when conducting receiver align-
ment steps.
PLL VCV
r
Connect the positive lead of the DC voltmeter to
test point
TP1007
(VCV) on the Main Unit, as in-
dicated in the figure, and connect the negative
lead to chassis ground.
r
Set the transceiver to the high band edge fre-
quency channel, then adjust
L1021
on the Main
Unit for 7.0 V on the voltmeter.
r
Key the transmitter, and adjust
L1022
on the
Main Unit for 7.0 V on the voltmeter.
r
Next select to the low edge frequency channel
and confirm the VCV is more than 1.8 V (for type
A) or 1.7 V (for type B) on the voltmeter.
r
Key the transmitter, and confirm the VCV is more
than 1.8 V (for type A) or 1.7 V (for type B) on the
voltmeter.
PLL Reference Frequency
With the wattmeter, dummy load and frequency
counter connected to the antenna jack, select the
band center frequency channel, and select the “low”
power output level.
Key the transmitter, and adjust
TC1001
on the
Main Unit, if necessary, so the counter frequency is
within 100 Hz of the channel center frequency for
the transceiver version.
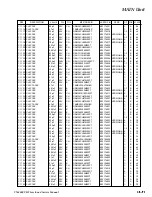
Alignment Channel Frequencies
VHF TYPE A
Channel
Frequency
CTCSS
DCS
(simplex)
Encode
Encode
CH1
29.71 MHz
None
None
CH2
33.35 MHz
None
None
CH3
36.99 MHz
None
None
CH4
33.35 MHz
151.4 Hz
None
CH5
33.35 MHz
None
023
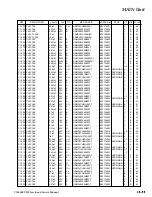
VHF TYPE B
Channel
Frequency
CTCSS
DCS
(simplex)
Encode
Encode
CH1
37.01 MHz
None
None
CH2
43.50 MHz
None
None
CH3
49.99 MHz
None
None
CH4
43.50 MHz
151.4 Hz
None
CH5
43.50 MHz
None
023
Summary of Contents for VX-4000L
Page 13: ...1 12 VX 4000 VHF Low band Service Manual Note ...
Page 17: ...VX 4000 VHF Low band Service Manual 3 2 Block Diagram ...
Page 18: ...VX 4000 VHF Low band Service Manual 3 3 Block Diagram ...
Page 19: ...VX 4000 VHF Low band Service Manual 3 4 Interconnection Diagram ...
Page 30: ...VX 4000 VHF Low band Service Manual 6A 5 MAIN Unit Lot 8 Circuit Diagram ...
Page 31: ...VX 4000 VHF Low band Service Manual 6A 6 MAIN Unit Lot 8 ...
Page 55: ...VX 4000 VHF Low band Service Manual MAIN Unit Note ...
Page 57: ...VX 4000 VHF Low band Service Manual 6B 2 DISPLAY Unit Note ...
Page 65: ...6B 10 VX 4000 VHF Low band Service Manual DISPLAY Unit Note ...
Page 67: ...VX 4000 VHF Low band Service Manual 6C 2 KEY Unit Note ...
Page 69: ...6C 4 VX 4000 VHF Low band Service Manual KEY Unit Note ...